I cut my photographic teeth using Ansel Adams zone system which emphasizes the understanding and working around the technical limitations of the photographic process to accomplish creative objective which are pre-visualized at the time of capture.
Digital cameras have a much shorter range than the B&W film I used with the zone system but the ability to manipulate the results in Photoshop after capture eclipse the simple burning and dodging possible in a darkroom. The use of adjustment layers and masking are a integral part of my digital workflow. An adjustment layer is created in Photoshop from the Layers menu or or the Layers window. For this editing function a Levels adjustment layer is used as a placeholder for changing the mode of the layer and masking.
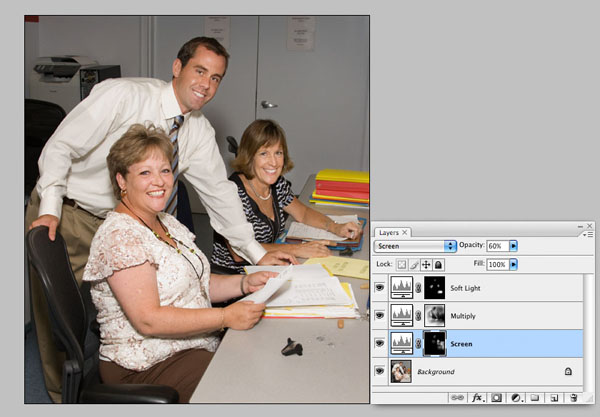
The photo below was taken with a single flash on a bracket using one of my DIY diffusers with the top flap open to bounce half the light off the ceiling. Anticipating fall-off I optimized exposure for the guy in the middle knowing I could darken the foreground and lighten the background figures in post-processing
I've created a Photoshop action (automated command script) which creates three Levels adjustment layers, inverts their masks from white to black, then changes the layer mode and renames the layer. To recreate the this action follow these steps:
- Create a Levels adjustment layer
- click on the white rectangle mask in the new layer that appear and use the cmd+I keystroke command to invert the mask to black
- Duplicate the adjustment layer two more time (creating three layers)
- Goto the top adjustment layer, Change mode to "soft light" and change name of the layer
- Goto the middle adjustment layer, Change mode to "multiply" and change name of the layer
- Goto the bottom adjustment layer, Change mode to "screen" and change name of the layer
About Masking and Tools:
The masking metaphor, like many functions in Photoshop, originated in offset printing where a clear window would be cut out of a sheet of red masking paper or plastic to create square or other shape borders on photos. Anything under the clear window would be exposed, anything hidden by the mask wouldn't. The masks on the adjustment layers work in the similar fashion but instead of the mask being solid with clear windows it is either black, white or some shade of gray in between. If the mask is black no change will occur. As the mask is changed to gray or white the effect of the layer, e.g. screen or multiply, will be applied to the background layer beneath it.
The mask can be changed from white to black either with the eraser tool or the paint brush tool. I prefer to set the foreground color to black, background color to white use the eraser tool with a flow rate of 10-20% to open the mask and apply the effect. The erased areas of the black mask change to white. If I open the mask too much and wish to scale back the change I switch to the paint brush and use it to fill the mask back in. Some people prefer to use the paint brush set to white or black to open and close mask. That works also and the net effect of applying the adjustment mode is the same. Try both and use the method you find most intuitive.
About the Modes:
Soft Light adds contrast, Screen lightens and decreases saturation, and Multiply darkens and increases saturation. To apply the effect to the image the mask on the respective adjustment layer is clicked, then the eraser tool (or white paintbrush) is used over the image in the editing window to apply the effect. The result of the selective adjustment is seen in real time in the image. The screenshot below shows the layers after editing the masks.
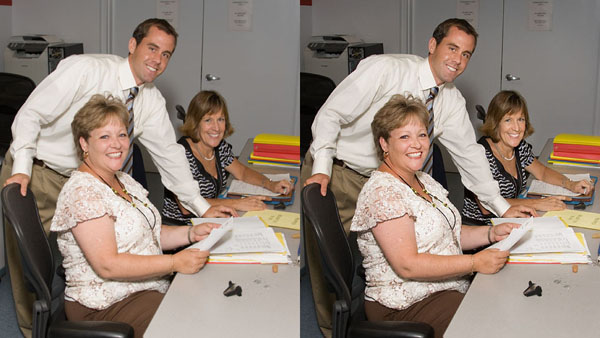
After opening the masks it is possible to adjust them by paint back over the mask with a black brush or by adjusting the opacity slider on the layer. Soft Light, which selectively adds contrast usually needs to be scaled back to about 20%. Just adjust the sliders from 0% (no correction) to 100% (full correction) and find the level which looks best. The shot below shows a before and after comparison.
Here is the adjusted version in a larger size. The effect is subtle, just enough to compensate for the unavoidable flash fall-off.
A few caveats if you try this: Be sure the mask not the image icon on the adjustment layer is selected or you will find you are erasing the duplicate image not opening the mask. When skin is darkened with multiply it can become too red. If that occurs, use the desaturation sponge tool after flattening the layers.
It is also worth noting the Adobe changed the operation of the dodge and burn tools in CS4 to act similar to screen and multiply. I still prefer to use the adjustment layer method because can be altered by opening the mask and adjusting layer opacity and does not permanently change the underlying background layer until the image is flattened.
|
Holistic Concepts for Lighting
and Digital Photography
This tutorial is copyrighted by © Charles E. Gardner.
It may be reproduced for personal use, and referenced by link, but please to not copy and post it to your site.
You can contact me at: Chuck Gardner
For other tutorials see the Tutorial Table of Contents
|