High Speed FP Flash Mode
The Physical Limits of a Focal Plane Shutter with Flash
Canon DSLR (Digital Single Lens Reflex) cameras use a type of shutter called "focal plane" which consists of two moveable curtains which travel vertically. The first curtain opens and takes about 1/300th second to travel across the sensor before it is fully exposed. A conventional flash cannot fire until the shutter is completely cleared by the first curtain with is why there is a limit to how short the exposure can be set. It varies depending on sensor size and is usually 1/250th sec. for 1.6 crop sensors and 1/200th sec. for full-frame sensors. For this tutorial 1/250th will be used as the "x-sync" speed.
TRIVIA: The limit is called "x-sync" to differentiate it from the setting needed for flash bulbs which took so long to fire they had to be triggered before the shutter was opened to allow them to come to peak intensity.
- shutter is pressed
- mirror flips up
- first curtain of shutter moves up across the sensor
- when the sensor is fully revealed the flash fires
- second curtain of shutter closes to end the exposure
X-Sync Limits Outdoor Flash Use
Conventional flash works fine indoors where ambient light levels are low, but outdoors in bright sunlight the x-sync limit forces a photographer to use very small apertures to correctly expose the background. For example an outdoor scene will always meter "Sunny 16" with is an rule-of-thumb which expresses the exposure at f/16 as always being a shutter speed of 1 / ISO speed. With an x-sync limit of 1/250th second that would require using one of following combinations at ISO 100 to balance a flash-lit foreground with a sun lit background: f/16 @ 1/125th or f/11 @ 1/250th. Both will produce wide depth of field and make the background distracting.
The camera makers created a clever workaround which allows shooting at wider apertures. Instead of firing a single burst the flash is instructed to pulse continuously at high frequency as the two shutter curtains chase each other across the sensor. Freed from the x-sync limit a photographer can use any of these f-stop / shutter combinations to balance the sunlight: f/8.0 @ 1/500thf/5.6 @ 1/1000th
f/4.0 @ 1/2000th
f/2.8 @ 1/4000th
f/2.0 @ 1/8000th
Wider apertures allow selective blurring of the background to provide subject / background contrast desirable in portraits. However the rapid pulsing of the flash reduces the range of the flash because the same amount of stored power is spread over more flashes. But as the aperture is increase the amount of flash power needed is also reduced so there is trade off.
High Speed FP mode is designed to allow shooting at wide apertures in bright outdoor lighting, not stop action.
Practical Use of High Speed FP Flash Fill
Flash is needed outdoors to reduce contrast when the ambient lighting exceeds the range of the camera sensor. The flash can only reduce contrast if the camera is shooting into the shadow side of the ambient light, with minimal overlapping of sunny highlights and flash. The photo below shows an effective outdoor sunlight and single flash configuration:

The photo above was taken with a single Canon 580ex flash with my DIY diffuser mounted on a Stroboframe camera-flip bracket. The ambient exposure in Av mode of 1/2000th @ f/5.6 was set using the over-exposure warning so the hair and white jacket where kept below clipping with minimal overlap of the the flash, which require a minus 2 EC adjustment. In a backlight scenario like that one the flash acts in the role of frontal key light, not fill, because it created the highlight pattern on the front of the face. The fill in areas not illuminated by the flash came from the sky she was facing. Used in this manner the downward angle of the flash and the highlight pattern it creates looks natural because it matches and complements the direction of the natural light which also comes from overhead. There is no "nuclear" halo around the hair because the ambient exposure was reduced to the point it was below clipping. The overall result is natural looking because the scene range was modified with the flash to match the range of the sensor; the pre-requisite for technically correct exposure.
A More Systematic Test of High Speed FP mode
I frequently see comments on Internet lighting fora that Canon High Speed flash is underpowered so I decided to do a systematic test using the same backlighting scenario used for the portrait above. For the test I placed targets 10 and 20 feet from camera with a single direct 580ex in High Speed FP mode on my flash bracket. I shot the test around 10AM in the morning with the sun in the southeastern sky.
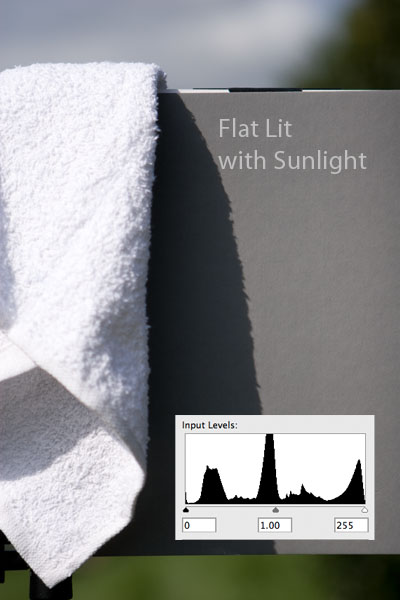
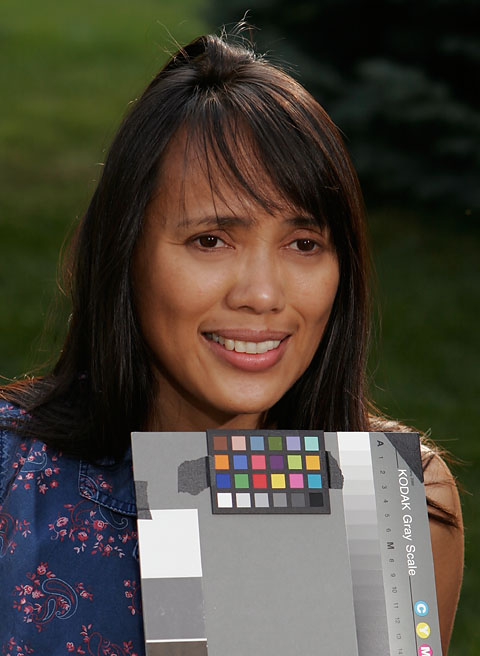
Testing is alway more useful when compared to a baseline. For my baseline I wanted the color to be balanced to the sunlight so I started the test by setting custom WB from a gray card flat lit by the sun. I started by making a reference shot of the card target facing into the sun:
How Evaluative Flash Metering Works
Canon introduced E-TTL II flash metering in 2004, and the 20D camera used for this test was the first prosumer body to use it. It utilizes 35 metering zones on the viewfinder and in some cases focal distance information from USM lenses to calculate the amount of flash needed. After the shutter is fully pressed it takes an ambient exposure reading, separate from the one used to control the shutter in Av mode. The ambient "map" of the brightness in the 35 zones becomes a baseline for comparison with the pre-flash reflections which immediately follow the ambient reading. For a backlit subject it works something like this:
The camera records the ambient map and can tell there is something in the middle which is less bright than the edges. The camera then fires and reads the pre-flash reflection. The really clever part of evaluative is how it subtracts the ambient light map from the pre-flash map to determine what the flash is reflecting off of:
By knowing the power of the pre-flash and the fact flash falls off predictably with distance the logic of the metering can make a virtual radar-like 3D map of the scene and determine there is something X feet away in the foreground. The focus distance from the lens helps also, but it is only used for direct flash, not when the flash head is tilted.
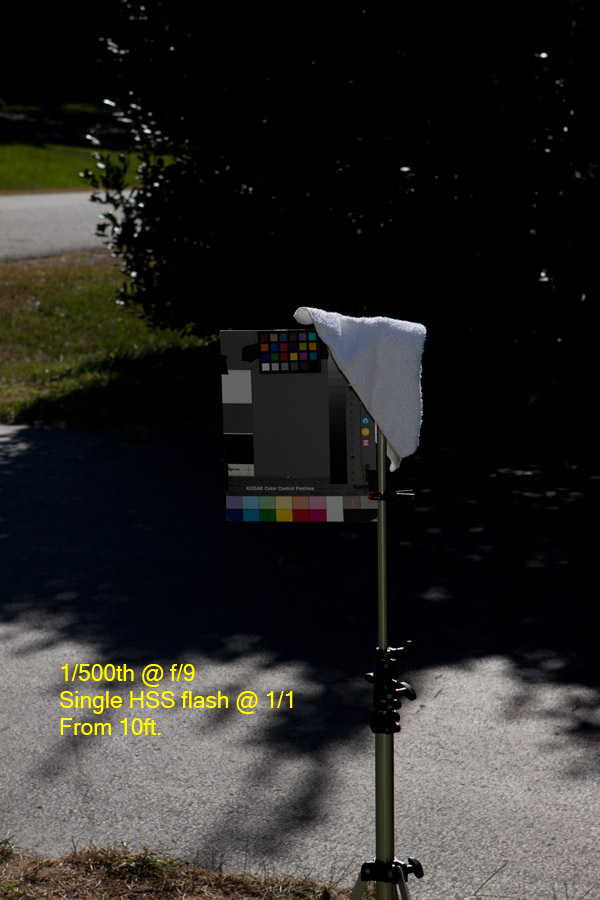
Effective Range in High Speed FP mode
The flash operates in High Speed FP Sync mode the effective range of the flash is reduced. To test the limits I conducted a test using one and then two direct 580ex flashes in M mode at the 1/1 (full power) setting.
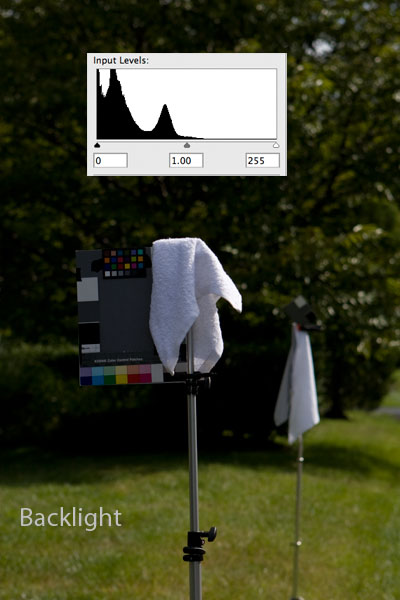
As a baseline for evaluation I started with a backlit, ambient only shot at 1/500th sec. adjusting exposure so the sunlit highlights on the white towel in my target were clipping in the camera warning:
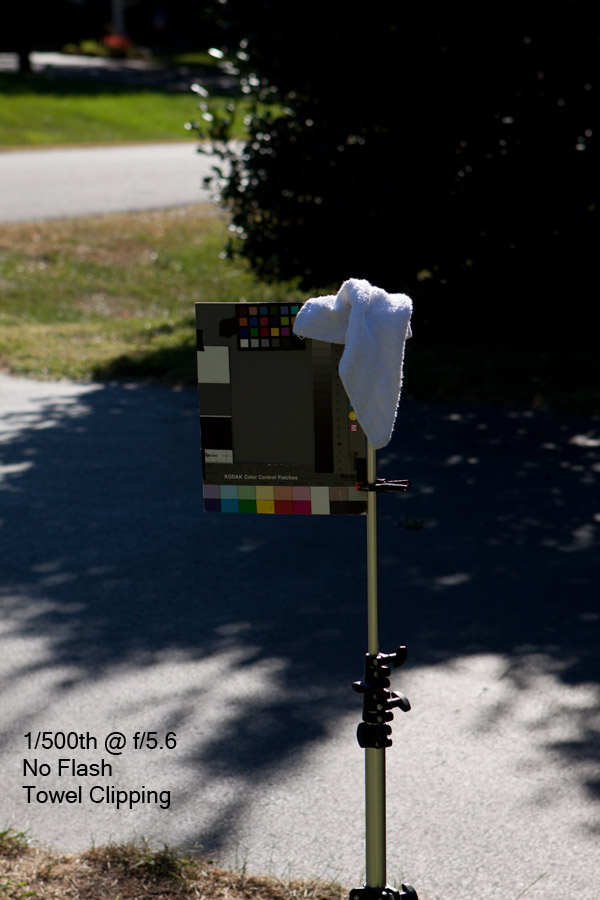

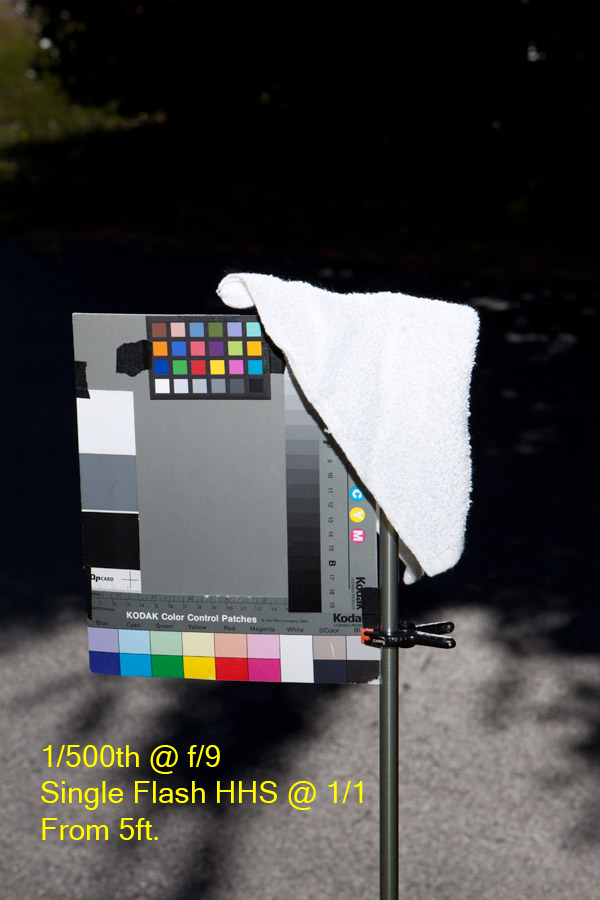
There are several things you should understand when using backlight like this, with any flash, conventional or HSS:
The ratio front-to-back between sun and skylight is about 3 f/stops: 8x more light on the back that the front side; an 8:1 ratio. So to exactly match flash lit front parts of the towel to the sunny rim lit parts the flash needs to contribute 3 stops more light. But perceptually we don't want an exact match. That would make lighting look flat because the shape defining contrast of the rim light would be lost. So the level of flash assist neeed is closer to 2 to 2.5 f/stops over the level of the skylight.
The light on the shaded front side is not "flat" as you might assume. Skylight always comes from overhead, just like the sunlight, and will have a dominant direction which will create subtle modeling on a 3D object like a face. So when putting a person in backlight you should find the domininant direction of the skylight, align the face to it as you would any "key" light, taking care to lift the face up into the light so the brow does not shade the eyes - before adding any flash. Then when the flash is added, place the "key" flash so it hits the face at the same angle, with a second fill flash, if used placed over the camera.
So the ratio before flash is added looks like this numerically:
H:S8:1 Back side sun vs. shade
---
2:1 Front side in directional skylight
Now we need to bring the front up to about 6 units of brighteness:
H:S8:1 Back side sun vs. shade
---
2:1 Front side in directional skylight
4:4 Flash added in front
So the combined ratio with flash added winds up being:
H:S8:1 Back side sun vs. shade
---
6:5 Front side in directional skylight + centered flash
The overall ratio in front 6:5 after flash is added is quite flat because the contrast the lighting ratio of the skylight modeling is quite subtle. In my examples above the flash is also coming off the bracket at a downward angle creating some directional modeling. Next I tested the range with dual flash similar to how I use them to light a face outdoors or indoors: fill over the camera on a bracket, with the slave key light 45° to the side (of the nose of a human subject.
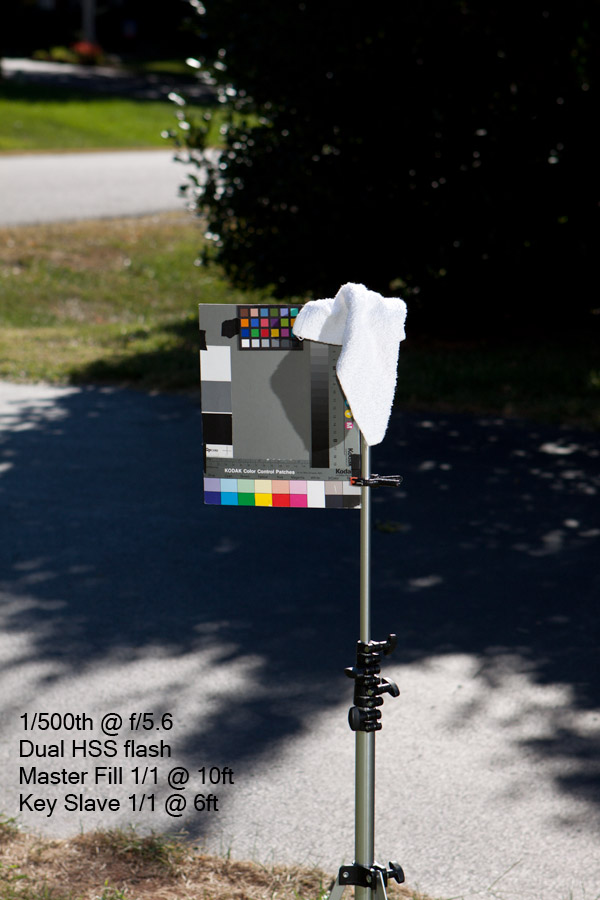
With a bit of testing I found that with two flashes the effective range increased from 7ft to 10ft. The flash on the bracket was producing the same amount of light as in the single flash test, but here it only needed to raise the front to the point the shadow cast by the towel no the gray card in front was lighter. The overlapping Group B Slave/ key flash from the right the side, also at 1/1 power but placed at 6ft. to make it about 2-3x brighter than the Group A Master/Fill took care of lifting the highlights.
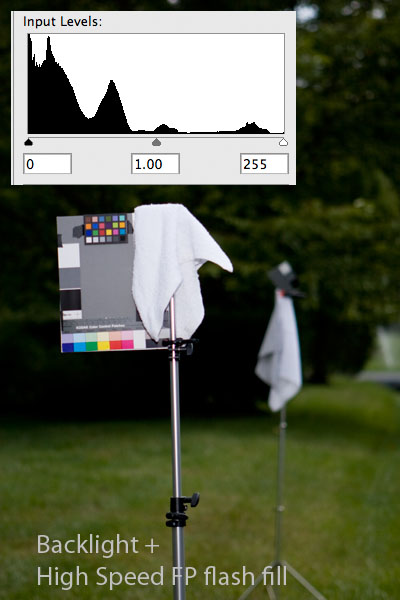
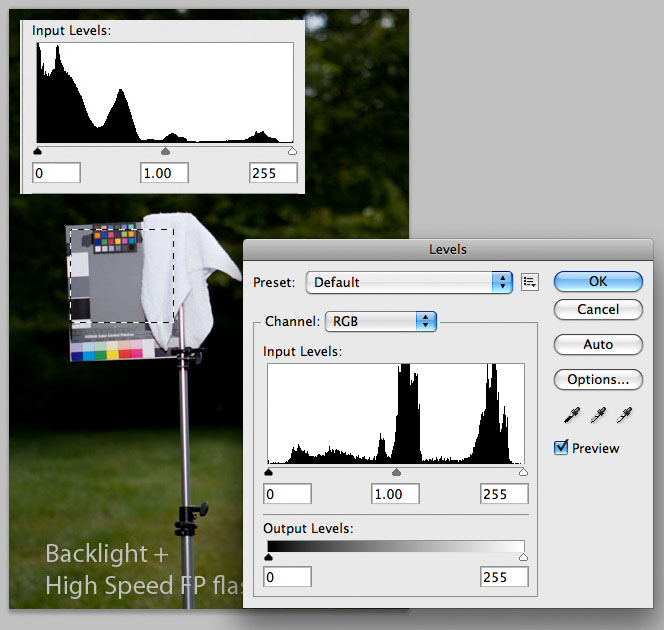
The primary rational underlying the creation of High Speed Sync isn't to allow faster shutter speed to artificially darken backgrounds to turn day into night, but rather to use wider apertures to help blur distractions in outdoor backgrounds. The faster shutter speeds are just a result of keeping the overall background exposure below clipping in the sunny highlights as the aperture is opened wider. So when I opened the lens from f/5.6 to blur the background more I had to reduce the shutter speed to 1/2000th to keep the sunlit parts of the towel at the point of barely clipping in the playback:
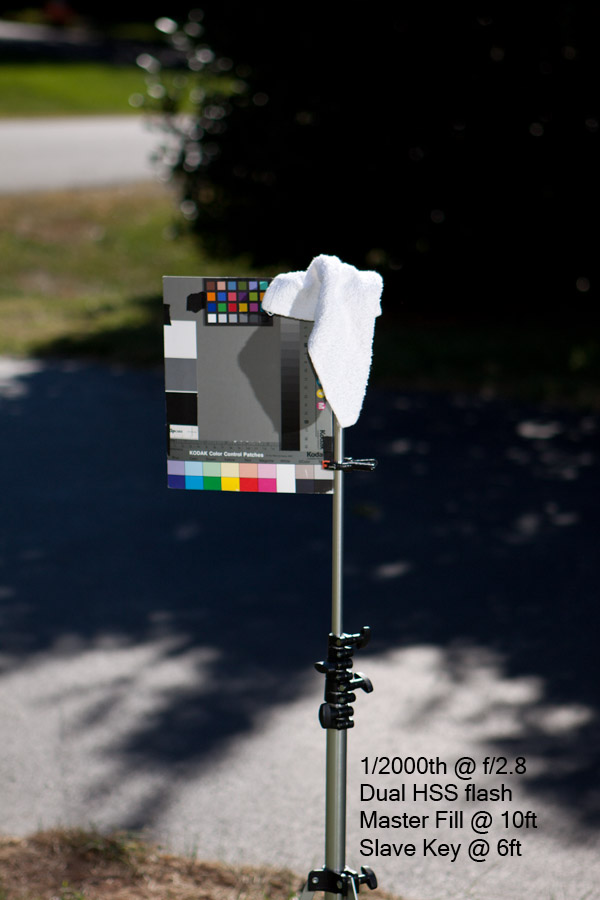
In HHS mode the sensor sees the flash like a continous source and shutter speed will affect the flash exposure in HHS mode, but here the reduction in shutter time was compensated by the wider aperture. If you compare the two shots closely you'll see there is a slight drop in overall exposure in the f/2.8 shot vs. the f/5.6 shot. But the same difference seen in the flash lit foreground is also seen in the street in the ambient background so it appears the difference is due to the shutter/aperture variance.
Conclusions:
- Shooting into the shadow side is necessary to prevent overlap of flash and sunlit highlights
- I have found that shooting Av mode around minus 2 EC is usually needed in backlight situation to keep the ambient highlights below clipping. I also find there is less variation and more consistent results if I keep the camera body in M mode and adjust shutter and aperture manually based on the clipping warning. It's actually faster to start at "Sunny 16" and adjust manually than letting the metering guess then second-guessing it with FEC adjustments.
- When the first two steps are taken and the sunny highlights are kept below clipping evaluative flash metering does a very amazing job at getting the foreground exposure correct. If you have done some testing with Manual power it is also quite easy to use, if you operate systematically and use the flashes at similar distances consistently.
- The power of High Speed FP flash is adequate 7ft. with single flash and from 10ft when dual flash is used. Ambient lighting conditions and modifiers will affect those ranges. Testing with the flash gear and modifiers you use in manual flash mode at 1/1 power will quickly reveal its range limits.
The reason I do so much testing is to know the limits of my gear. That allows me to mentally shift gears and strategies for using it when shooting. Outdoors I'll usually have my flashes set in HHS mode, but control the ambient exposure manually. That way I'll know if I select a shutter speed over 1/250th that HSS will kick in and flash range will drop. Knowing the single flash range is 7ft. and dual flash range is 10ft. at full power tells me I need to live with narrower apertures to keep shutter speed at 1/250th and below beyond those distances.
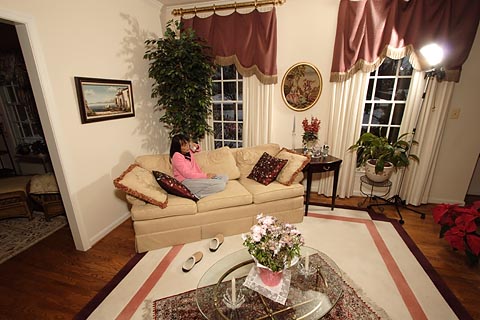
HSS doesn't have enough power even with dual flash to make the use of modifiers practical. But using dual flash for 40 years taught me that when neutral fill is used to lighten the shadows and you know how to position the off cameara flash to naturally model the face you really don't need huge modifiers. This isn't a HHS shot but it illustrates the type of lighting which can be obtained indoors with dual flash and my small DIY diffusers:

Here's wide shot showing the the placement off the off axis light and the small diffuser used. Note the spill off the ceiling. The diffuers are designed to bounce as much of the light forward as possible, but there is still a lot of spill and that plus the over-camera fill, not the diffuser size is what helps to make the overall lighting softer looking. The main contribution of the diffusers is to make the highlights less specular.
Outdoors there is no bounce off the ceiling to assist with diffusion but there is God's Own Softbox, the wrap-around soft light of the sky on the side opposite the sun. So when the backlight strategy is used and the subject's face alighed to the skylight first before adding flash the combined effect of the soft skylight and the directional flash and flash fill is very acceptable with direct flash, no diffusers.
Here's an example using the same set-up as in the dual flash test shots above: Master-Fill on Bracket / Slave-Key to the right - no diffusers used:
Holistic Concepts for Lighting
and Digital Photography
This tutorial is copyrighted by © Charles E. Gardner.
It may be reproduced for personal use, and referenced by link, but please to not copy and post it to your site.
You can contact me at: Chuck Gardner
For other tutorials see the Tutorial Table of Contents