How I Use It
I've been using pairs of speedlights for 40 years since learning the technique by apprenticing with and second-shooting for Monte Zucker, who introduced and popularized the idea of off camera flash soon after optical slaves make it possible to remotely trigger the off camera flash.
For the last seven years I've been using and teaching people about the Canon flash systems. It's quite logical and works very well if you understand how fill and key need to work together to: 1) fit the range of the flash lit foreground to the sensor to create a realistic full range of detail; 2) create realistic 3D modeling, and; 3) create natural looking flattering modeling on faces.
There seems to be an aversion to keeping any flash near the camera nowadays, but that's the secret to buttery smooth shadow transitions. What makes lighting seem harsh and hard are the clues provided by the tone of the shadows. Fill controls the tone of the shadows in a photograph. If fill is moved too far away from the camera axis the camera starts to see shadows the fill source casts and those spots in the lighting pattern on the face or other things become harsh dark voids that look hard.
It might seem logical to someone learning themselves by trial and error to place key light and fill at opposite 45° angles to a human face, but that results in one light canceling the shadows of the other and all the clues about 3D shape. The low spots on the face such as the smile lines, corners of mouth, teeth, inside of open mouth and base of nostrils get no light from either source and become black and devoid of detail in the photo.
Fill is like the foundation of a house. It's not seen but it holds the parts of the house you do see up and keeps them level. The only way to keep fill ideally flat and shadowless is to keep it over or under the lens, about chin level to the face so all parts of the face get filled.
When I went to work for Zucker he handed me a camera with a flash on a bracket that put the flash head about 16" above the lens and another identical flash on a rolling stand which was actually a modified medical IV stand. With it he taught me how to record detail in the white dress of a bride and the folds of the groom's black tux at the same time - fit the range to the film or sensor.
It's actually quite easy...
Start with flat fill and raise it until shadow detail is recorded. With digital that's easy to see via the playback and the histogram. There's no 3D modeling and the highlights are under-exposed but that's OK because the fill is only the foundation for the lighting pattern. The key light does the modeling...
Next overlap the key light on top of the foundation of fill. By adjusting fill power you can make the shadows and mood of the lighting as light or dark as the message of the photo requires BEFORE adding the key light. That in turn means you really don't need a HUGE MODIFIER on the key light to achieve soft lighting....
A lesson in cause and effect...
This is a single flash shot taken with a bracket and and 8" round diffuser that bounces all the light forward...
The ceiling was high in the room so there was very little bounced "spill fill" from it, which accounts for the dark background. But the modeling on the face is quite natural and flattering. Why? The downward angle of flash from the bracket matches the direction of natural and indoor ambient light most of the time. It looks soft on the face because there are no harsh shadows. Raising the flash on the bracket casts the shadows down out of sight: why wedding photographers started using them 50 years ago.
Here's another single flash shot, same equipment....
It's a guy I worked with who was the employee of the month. To make his white shirt non-distracting I put him close to the white wall off my office to keep shirt and background light in tone. Then to fit the entire range from white shirt to the shadows on his dark skin to the sensor I knew I needed a lot of fill. But I only had one flash with me on the bracket with the small DIY diffuser. The solution? I stood on a chair with the top of the diffuser pressed to the 8' ceiling and had him look up at me....
This blurred copy shows the cause and effect of what the lighting from the single flash did.

Raising it on the bracket and using the diffuser to bounce it forward from a relatively small controlled source created the natural looking "mask" pattern of highlights on forehead, cheeks and chin that make our brains recognize the 3D shape of a face in a 2D photo. Contrast defines shape in a photo. But too much contrast makes the lighting look "harder" than normal, which is why I positioned the flash to get maximum wrap around bounced fill off the ceiling and four walls of my 8' x 12' office.
The lesson for you here? 1) Fill controls the detail in the shadows and beyond that the mood of the lighting; 2) with speedlights most of the fill they created actually comes from the light they spill and bounce around the environment raising the ambient level, and 3) fuzzy shadows like the one cast by his head on the wall are the result of the fill light coming from all different directions off walls and ceiling, not a large modifier on the source.
Spill fill, while always helpful is not predictable because ceiling heights and room sizes vary. Outdoors there is nothing to bounce and create spill, so you must learn to use the skylight for fill...
That's also a single flash shot - same gear. As with my colleague at work the first thing I did is find a light background to make the clothing non-distracting: a backlit river.
I exposed to keep the sunny backlit jacket and hair below clipping using the camera warning, turned on the flash then raised FEC until the front of the white jacket clipped then reduced it two clicks (2/3 stop) to keep the front slightly darker than the sunny parts.
Technically it was a no-brainer to get a full tonal range and perfect exposure. Contrast was controlled and range fit to sensor by putting her back to the sun so the flash DIDN'T OVERLAP THE SUN. The flash independently created HIGHLIGHT MODELING over the sky fill on front. The flash wasn't fill, it was the frontal key light because it was raised off axis by the bracket to create what is known as a "butterfly" or "glamor" pattern on the full face pose, The fill on the sides of the face is coming from the skylight from above and light bouncing up off her light clothing. Had she been wearing black there would be no bounce fill off the jacket and the shadows on the face would have been darker
The lighting is flattering because I first raised her face into the skylight to get in past the brow into the eyes then added the flash from the same downward angle with the flash on the bracket.
Start with the goals, find the best strategy for clothing/background then use the lighting strategy most effective for modeling the camera angle relative to the face.
As those examples show single flash can work quite effectively in FULL FACE poses because the front of the face is highlighted. The key to making the frontal lighting flattering with natural downward modeling via the highlight and shadow clues is raising flash over the head of the subject so the flash mimics the angle of natural lighting on faces we see all the time ? the baseline for "normal". What makes flash on camera look unnatural? The angle relative to the face is too low.
What is the best investment you can make for flattering lighting with speedlights? The tool Zucker wisely put in my hands 40 years ago: a flash bracket...

The diffuser is my design. It's big enough to be effective, small enough to be logistically practical. It raises the center of the source 16" above the lens creating natural downward modeling. The top flap overhangs the flash head and bounces most of the light forward, which makes it efficient and controlled, but I can also flip the top open when I need more of a "spill fill" effect off the ceiling.
So flash near the camera is not a bad thing, even with a single flash...
The common denominator of all those single flash shots is that to control fill I needed to use strategies where I had some level of control over the bounce spill fill effect, or as in the first shot of the birthday girl use the dark background created by the fall off and lack of bounce fill to contrast her from an unimportant distracting background.
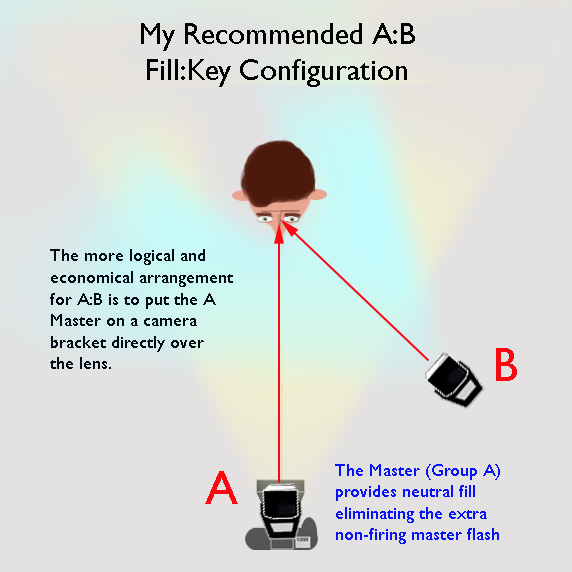
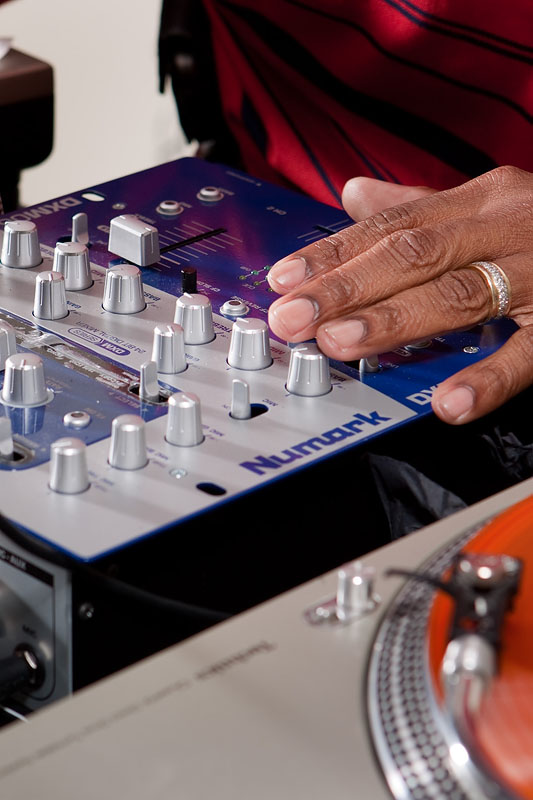
But by using the flash on the bracket for fill in a dual flash configuration I don't need to rely on bounce for my fill and can control the lighting ratio at will by simply reaching up on the master flash on the bracket and changing the A:B ratio...
For a "normal" look I use A:B = 1:2 A is master fill / B the key light 2x stronger. When the two overlap the ratio per the portrait convention is 3:1 because the convention indicates how the REFLECTED light differs in the highlights from the shadows which are always "1" in the ratio..
H:S
1:1 Group A Fill from bracket - even on entire scene
2:0 Group B OCF is 2x brighter than fill (incident strength)
===
3:1
Key overlaps Fill, highlights will be 3x brighter (1.5 stops) if measured with a spot flash meter. Range fits sensor exactly, everything in the photo looks "normal"...
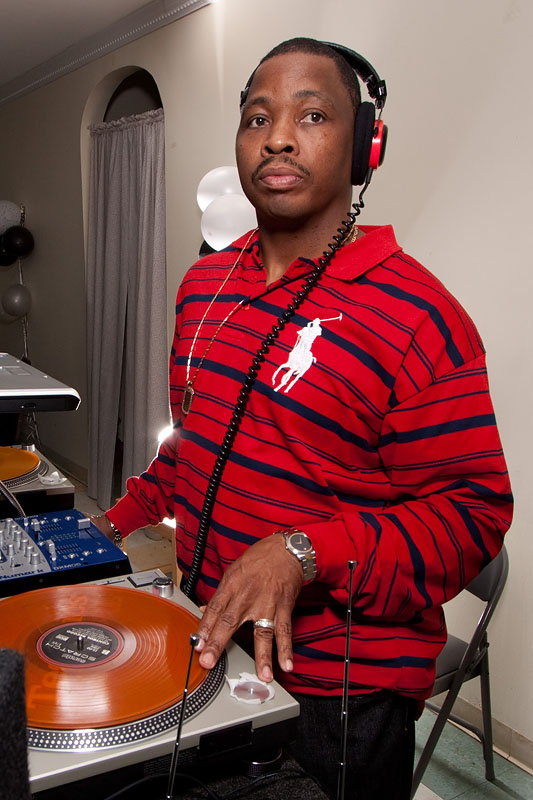
These are some shots I took of a DJ at a wedding reception one of my wife's co-workers which show two different ways dual flash can be used. These were taken with the off-camera flash 45° from the nose for the first and from about 135° from the lens for the second. In both the fill lifts the shadows to where the camera can record noise-free detail in the shadows, not interfering or canceling the modeling of the off camera flash:
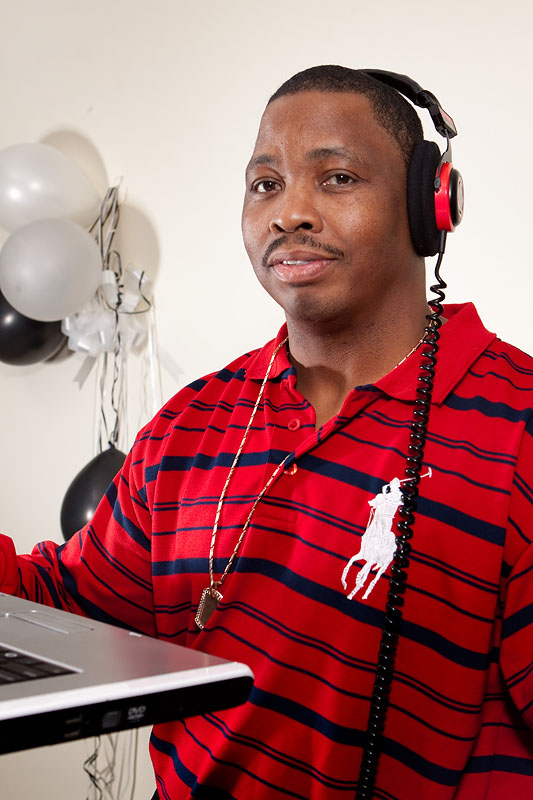
Here to get a more dramatic effect I put the OCF behind on the floor for rim light and opened the flap of the diffuser for more bounce off the ceiling to light his face from a natural downward angle with less specular highlights on the skin. In that situation the off camera flash changed role from "key" to "accent rim-light" and the flash on the bracket, by splitting it between forward and up off the ceiling became both "fill" (direct off diffuser) and "key" bounced down off the ceiling. The role of light changes depending on placement.
Those shots illustrate an important concept about diffuser on speedlights. The most significant effect modifier size has on the character of the light (hard vs. soft) comes from the highlights. Specular highlights will make the overall lighting seem harder. Bouncing the light in the last shot above increase the size of the "key"source to be the spot on the ceiling and as result the highlights on his face were less specular. Could the same effect be achieved with a big umbrella or softbox on a stand? Yes, but that wasn't practical in that situation.
The same cause and effect is seen in this comparison of my speedlights and studio lights but with opposite results: the bigger modifier created more specular highlights on the face...
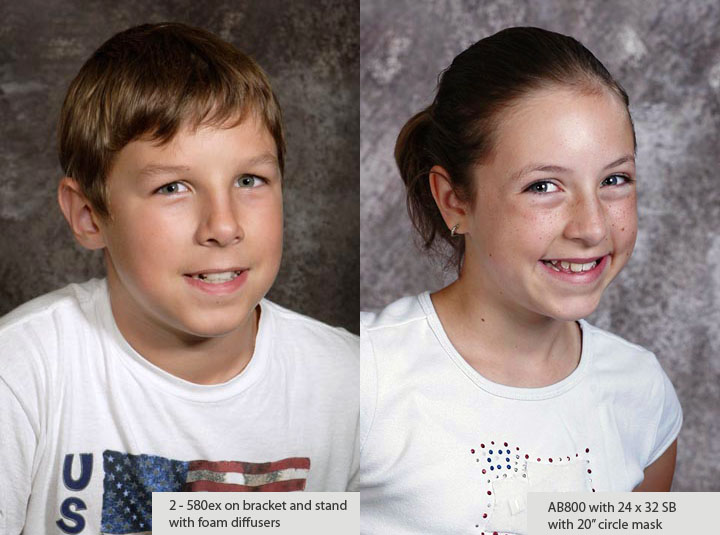
The kids were visitors who arrived after a day of sightseeing in DC in hot humid weather. I grabbed the camera and speedlights to shoot the boy then decided to switch to the studio lights. The lighting on the girl looks harsher and "harder" despite the much larger modifiers and lighter toned shadows than the boy because her face a oily. The boy had washed his, she wearing make-up didn't.
The lesson here? Skin reflectance is a more of a variable than modifier size and oily skin will trump bigger key light modifier. You can control the skin reflectance in a studio setting but not in candid situations, so for candid shooting the best solution is the one that is simplest logistically. There's nothing simpler in logistically than shooting with one flash on a bracket and the other on a rolling stand...
I'll see a subject who will be looking in the same direction for a few minutes then roll my off camera slave around until its 45° from where their nose is pointing and I can see a perfect oblique view of the face if I stand behind the light and use the stand like the front sight of a gun -- my eyes become the modeling lights because everything I see from there will be highlighted ? simple, no?
Key light places I walk back around front and take the shot with nice natural looking "short" lighting modeling the 3D shape of the face naturally.
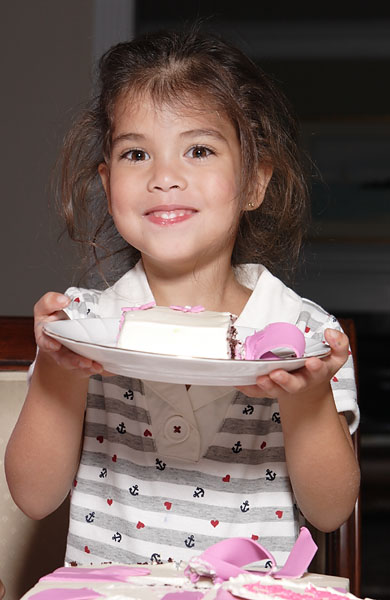
If I want lighter shadows for a happy little girl I reach up and change the A:B ratio to 1:1 which when overlapped produces a 2:1 H:S reflected ratio..
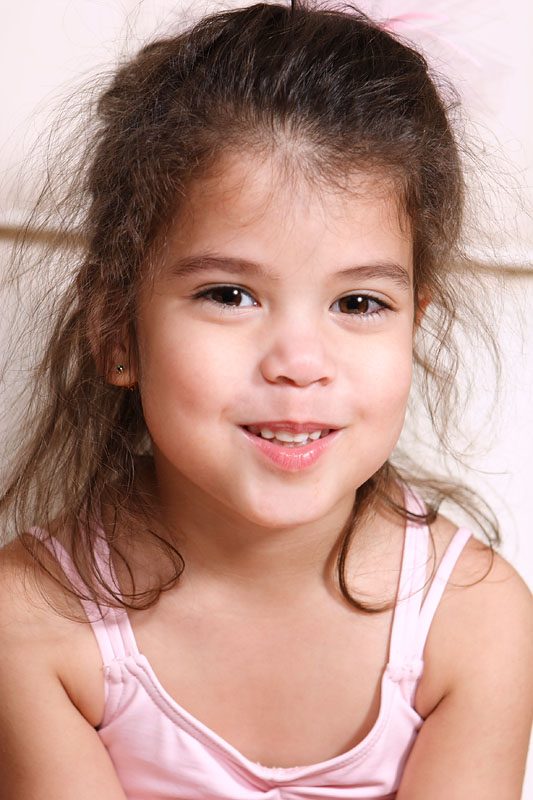
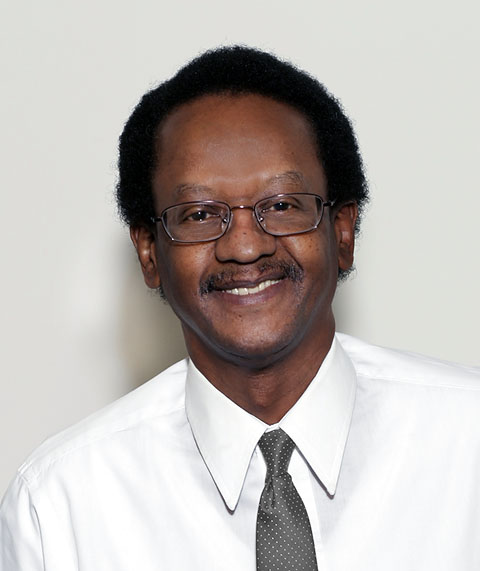
If the mood of the subject gets darker I can convey that in the photo by reaching up to the Master and reducing fill to A:B = 1:2 to darken the shadows. I also changed the color balance to a more neutral balance in post processing.
The Canon ETTL system gives me complete control and the two light strategy I learned from Zucker based on the foundation of even fill from a flash bracket allow complete control of tonal range and mood without needing to drag around large modifiers...
The best advice I can give you is:
Don't throw money at solutions before you understand what is needed to solve the problem. It's not the gear that produces good results, its understanding how to use it effectively.
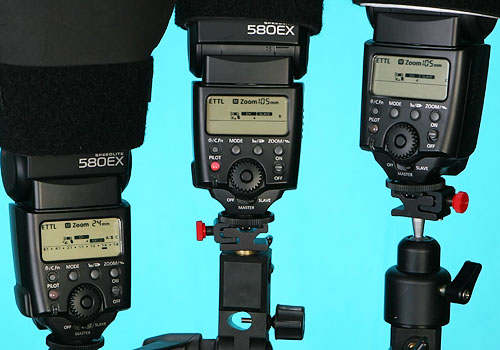
Hopefully I've shown you by example that most lighting problems within the scope speedlights can handle power- and range-wise can be done quite well and simply using two 580ex speedlights, a bracket, OC-E3 cord, a single stand and some diffuser you can make yourself for about $5.
The diffusers while small, are really all that is needed in most speedlight situations. By virtue of being on the top they raise the flash more and keep the sensor on the slave unobstructed and make it easy to always keep the sensor facing the master on the camera bracket, then swivel the diffuser towards the subject: what allows the Canon wireless to work as designed out to about 50ft. indoors and 30ft outdoors (master to slave distance) and saving you the $600 to $1000 you'd spend on radio triggers...
Distance is not a problem if you use a 580ex/580exII as Master and keep the slave sensor clear because the range of the flash lighting-wise isn't any greater than the signaling range. I recommend against using the ST-E2 or built-in flash as Master because their size, power and light footprint limit signaling range. Another reason using a 580ex on a bracket with one of my DIY diffusers is an ideal solution is because it will put any slave in front of the camera in the signaling footprint of the 580ex's pre-flash. All of these were done with ETTL and A:B ratios with only the Canon flashes.
Direct line of sight isn't needed, the slave just needs to see the Master's pre-flash and it can be bounced off walls and off doors through doorways like this...
Try it, you'll like it and save a lot of money by not buying radio triggers; enough to buy a couple of studio lights which will give you two sets of tools, one ideally suited for "run and gun" photojournalism and another for serious studio style portraits for which speedlights are a poor substitute due to their low power, slow recycle times and lack of modeling lights.
There are no rules, just cause and effect, and no one-size-fits-all-tasks lighting solutions.
Holistic Concepts for Lighting
and Digital Photography
This tutorial is copyrighted by © Charles E. Gardner.
It may be reproduced for personal use, and referenced by link, but please to not copy and post it to your site.
You can contact me at: Chuck Gardner
For other tutorials see the Tutorial Table of Contents