Flash Be Used?
The first step in the transition from taking snapshots to making photographs is being aware of the lighting. Ask yourself these questions in each new shooting situation:
- What is the dominant ambient light source?
- Sunlight, room light? What color temp is it?
- What is its direction?
- Shadows create the illusion of depth in a photo and also create the biggest distractions. Paying attention to the direction of the light creating the highlights and shadows on the faces informs you where the camera needs to be to capture them in a flattering way.
- How much fill is there in the shadows?
- Two things make shadows unflattering and distracting: where they fall, and how dark they are. Paying attention to the direction takes care of the first, but you also want to avoid dark lifeless eye sockets. Your camera records less detail than you can see. You must expose to get the highlights correct and that will cause shadow detail to be lost. How much will be lost? Look at the playback. That will tell you what the camera is capable of recording.
Candid shooting is when a photographer shoots a scene as it might be observed naturally. It differs from a snapshot because the photographer is aware of the same qualities which make an more formal portrait or still-life study visually effective: good contrast between the center of interest and the background; a flattering angle; and lighting which creates the illusion of depth in a natural flattering way. Taking an effective candid photo requires putting the camera in the spot where the subject has a flattering lighting pattern on the face (i.e. the face is oriented nicely to the light) and the camera is seeing the most flattering angle of the face. Usually it involves the check list above.
Finding the direction of the dominant light informs us how the white balance should be set and which direction the shadows will be cast. The illusion of shape is created by the highlight and shadow pattern and shooting into the shadows reveals the shape of an object. That means the camera should be positioned on the side opposite the dominant light source.Then it is mostly a matter of finding the most flattering angle for their face and ensuring there is enough fill light to put detail in the shadows. If the face of the subject isn't oriented to the light in a flattering way then there are three choices:
 1) Move the shooting position: People move, so just wait until the face is aligned to the light at the spot where the angle will also be most flattering. For example if shooting candid shots at I'll first note the direction the person is looking when the light creates a flattering short lighting pattern on it. Next I'll put myself where I can also capture a flattering angle of the face:
 2) Move the people: In many candid situations it is possible to ask the subjects to change their location or orientation to the ambient light so it will hit the face in a flattering way. A simple "Could you please stand here and look over at that _______ ..." is all it takes to turn what would have been a lousy snapshot (i.e. just shooting what is there) into a well lit and posed candid portrait:
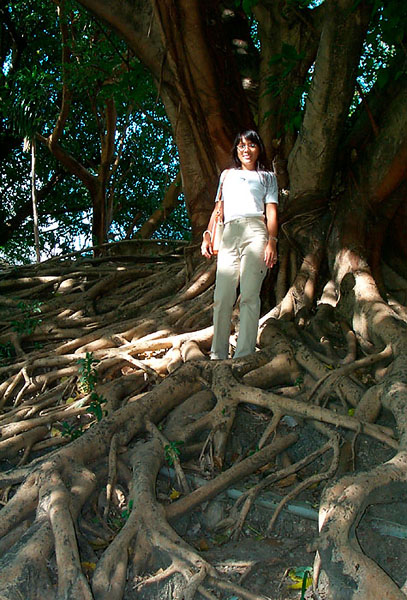
One of my favorite portraits of my wife was taken at a Manila tourist park in 2001 during the spur of the moment visit. Here is a "snapshot" the setting I was dealing with. The tree reminded me of a Ansel Adams portrait of Edward Weston at the foot of a tree and that was the look I was going for.
Here is the final result:
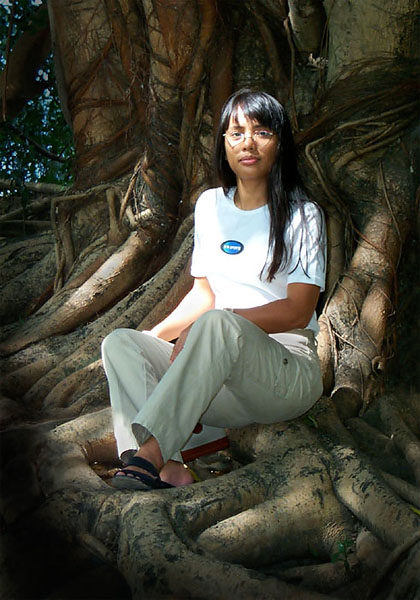 A good deal of experience and planning when into this shot. I had to shoot from about 20 ft. below her. To avoid the near/far distortion seen in the wide-angle snapshot I shot from as far away as the telephoto in my 2.1MP Kodak DC290 point and shoot would allow; about 30 feet. Then I had Belinda lean forward at the waist until her chin was out over her knees. That aligned the plane of her upper body and face with the upward tilt of the camera and put her face and feet the same distance from the camera to eliminate near/far size distortion. In the photo she looks like she is sitting bolt upright, but she was actually leaning forward about 35 degrees from vertical.
3) Use Flash to Change the Lighting: Outdoors there may be lots of light and it may be hitting the face of the subject, but it is also creating dark shadows which exceed the range of the camera. Indoors the light level is typically to low for a good exposure and often coming straight down from the ceiling creating dark unflattering eye sockets. Just refer to the mental checklist above. When any of the conditions on the list are unfavorable, that is when you want use flash.
Using Flash EffectivelyWhen flash is used in combination with ambient light the goal should be to make it appear to be part of the naturally lighting for that setting. Outdoors flash is often necessary to overcome the limitations of the camera and the best flash shots are those which it is difficult to tell flash was used at all. Indoors all the lighting is artificial, which is why I think its rather foolish to try to light up the room like an overcast day with one of the "Tupperware" modifiers which seem to be so popular. Personally when mixing flash with ambient I try to match the flash to the character of the ambient light, but it shooting with flash alone and it will be obvious to the viewer it is a flash shot, I'll try to light it as I would in a studio setting. In other words I don't try to make a dark room look like high noon on an overcast day, which is what light bounced off a ceiling winds up looking like.
One FlashOne flash on the camera or a bracket can be used to fill the shadows and supplement the existing ambient light. Outdoors the best strategy is to put the back of the subject to the sun and shoot into the shadows, using the flash to reveal the detail in the front:

Single Vivitar 285HV flash on a bracket.
But this can also be done indoors in some situations where the ambient light is placed behind the subject in a similar way:
Single Vivitar 285HV flash on a bracket.
There will also be situations where you will want the flash to provide most of the light in the photo, but balance it to the ambient light so they blend together naturally to record the photo -- overcoming the limitations of the camera - as you perceive the scene by eye:
Single Vivitar 285HV flash on a bracket.
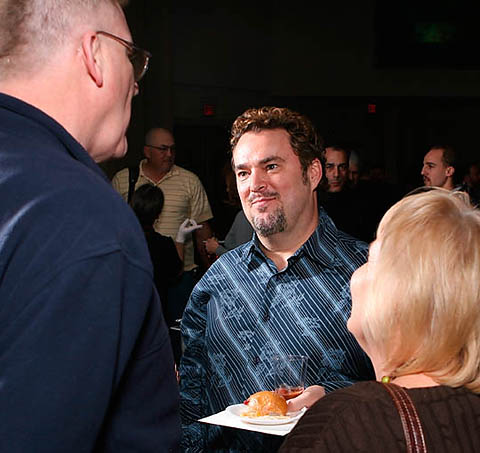
Please use a flash bracket: The worst possible flash situation is where a single flash on camera supplies 100% of the light. The lighting is flat and the photos wind up looking the same way. A simple solution to that problem was discovered by wedding photographers about 50 years ago; raise the flash about a foot directly over the lens on a bracket to hide the shadows and create flattering modeling on the face:

The photo above is an "employee of the month" head shot taken with a single diffused Canon 580ex flash on a bracket.
Two FlashesThe best possible candid flash lighting is obtained by adding a second flash on a stand to the one which is on the camera bracket. Using two flashes allows precise placement of the highlights and shadows and independent control of how dark the shadows will be in the photo. Those two factors are critical for creative control of the lighting and creating the illusion of depth and shape in a photo. Also by controlling the contrast and where the key light is aimed the photographer can better define the intended center of interest and eliminate unwanted distractions by placing them in the shadows:


Holistic Concepts for Lighting
and Digital Photography
This tutorial is copyrighted by © Charles E. Gardner. It may be reproduced for personal use, and referenced by link, but please to not copy and post it to your site.
You can contact me at: Chuck Gardner
For other tutorials see the Tutorial Table of Contents