Studio Exercise
The illusion of 3D in a photograph is created with contrast between highlights and shadows. When viewing a photo our brains match the patterns of contrast in the photo to memories of patterns experienced in person. Because the light we see in person comes from overhead most of the time the brain is conditioned to interpret highlighted areas as being higher than shaded ones.
The highlight-on-top contrast pattern becomes our perceptual baseline for "normal" and "natural". When the light hitting an object does not come from overhead the resulting pattern of contrast will not look normal. That is the main reason why a photograph taken with a single flash close to the camera lens axis looks fake and unnatural: the direction of the light creates highlights on the front of the subjects and very few shadows. The resulting pattern does not match the what the brain expects a 3D object to look like. But by simply raising the single light source higher above the lens the location of the highlights moves to the top of the surfaces and shadows are created beneath them forming a pattern of contrast the brain of the viewer will more easily recognize.
In this exercise I show a four light scenario typical for conventional portraiture. The goal is to show what each light contributes individually and how they combine to create the illusion of 3D via contrast. The terms I use to describe the roles of the light, and how I define their roles are shown below to eliminate any confusing over terminology:
Fill Light
The role of the fill light is to raise the shadows in the foreground of the image to the point where the film or digital sensor can record detail. Ideally fill should not create any shadows because if the fill is shaded its shadows will either have no detail if no other light hits that area, or will have darker shadows in the shaded areas.
Key Light
The role of the key light is to create the illusion of 3D shape on foreground of the photograph by creating highlights over the top of the fill source. In portraiture the key light is placed in front of the face to highlight the front of the face and model its shape. A light in this role is sometimes also referred to as the "main" light.
Background Light
The role of the background light is to create spacial separation between the foreground and background of the image to create the illusion of 3D space in the photograph. On dark backgrounds a spotlight or vignette effect created with a grid or snoot will help draw attention to the head of the subject. When a uniform white background is desired it may be necessary to use two background lights on opposite sides to achieve even lighting.
Accent Light
The role of the accent light is to acts as a secondary key light to further enhance the illusion of 3D shape in the photograph by creating a rim-light effect which defines the overall shape of the foreground subject. Whenever an accent light is used its role relative to the frontal key light should be a supporting one and the areas highlighted by the accent light should not pull attention away from the area highlighted by the frontal "key" light. Accent lights are referred to by a variety of names - hair light, kicker, etc.
Here we start with a fill source over the camera, raised in intensity until the darkest areas in the foreground are recorded with detail by the camera sensor.
Next add a background light with a grid to create separation between the foreground and the black background.
Move the mouse over the image to see a before / after comparison with fill only.
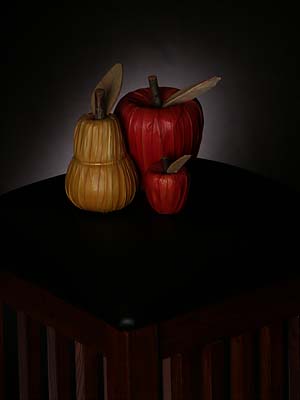
Next add a frontal "key" light create highlights over the even fill. The overlap of the top independently controlled sources is what allows the foreground range to be matched to the range of the sensor.
Move the mouse over the image to see a before / after comparison the previous step.
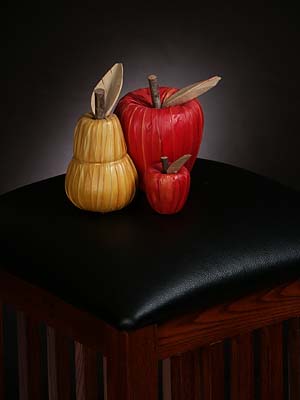
Adding an accent source from behind the foreground is a effective way to enhance separation with the background and the illusion of 3D in 2D reproduction. When an accent light is used the areas it illuminates should still be below the point of clipping, except in areas where mirror-like specular reflections are desired to enhance the 3D effect in light toned areas.
Move the mouse over the image to see a before / after comparison the previous step.
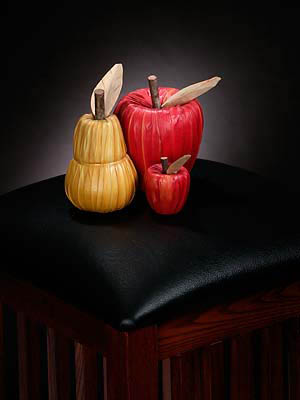
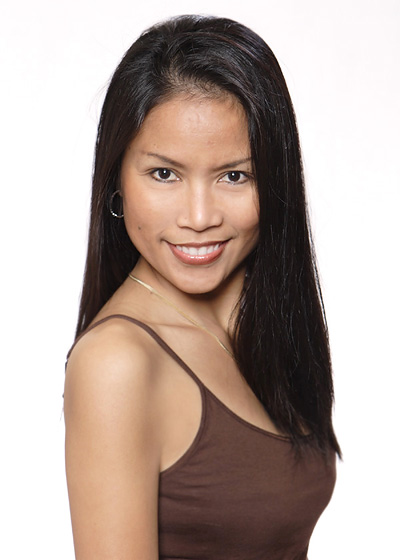
Here is a portrait taken with the same four light scenario:
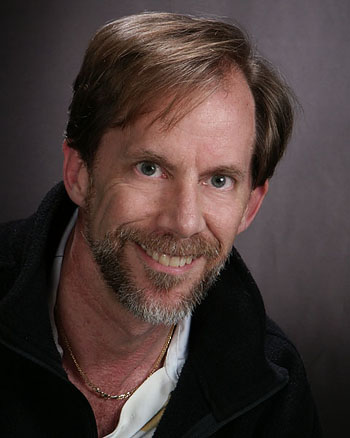
The fill allows the camera to record detail in the black clothing and the key light is raised to the point where the highlights it creates over the fill are also reproduced accurately.
Combined, key overlapping fill match the range of the foreground to the range of the camera sensor. The background light creates separation and the accent light enhances the illusion of 3D.
This exercise probably differs from the way you think about lighting and set the lights because it started with the fill. But if you try a similar exercise the same way you will understand why I set fill first. Its similar to building a house where the foundation must be in place and level to support everything which is built on top of it. If you start with the key light then at fill you may not even realize that the key light is overlapping the fill. If you put fill on the side opposite the key light you might not realize how the fill is being shaded and causing harsh unfilled shadows on the faces of your subjects.
Starting with the fill will allow you to grasp what it is actually doing and where it is reaching. Ideally the fill should be shadowless but that isn't practical and also isn't natural. In nature the "fill" or secondary ambient light wraps around objects completely but generally comes from above. Natural fill often comes from so high above the head of a subject standing in open shade or back to the sun that the brow will shade the fill from the eyes. In that situation outdoors the solution would be to raise the face into the light to get the skylight into the deep eye sockets, the also raise the camera to maintain a flattering camera angle - bring a small ladder along on any outdoor portrait session. Indoors with artificial lighting the closest thing to natural fill is a fill source placed just over the lens of the camera. Since a source placed there creates few shadows a huge modifier on the key source isn't required. A smaller source creates a secondary catchlight in the center of the pupil which is easily removed with retouching: a single catchlight from the key light is more flattering.
If you are accustomed to setting the key light and exposure then adding fill you will have no doubt noticed that as more fill is added the exposure must be adjusted in the highlights by reducing the power of the key light. That is a function of the two lights overlapping. Adding more fill to the shadows also adds the same amount of light to the areas the key light is highlighting over top of the fill. Starting with the fill, and setting to to point detail is recorded in the shadows based on the camera playback eliminates that "cat and mouse" game of balancing ratio (shadow tone) and getting correct exposure. Getting a natural looking lighting ratio and correct exposure becomes a "no-brainer" which can be done without a hand-held meter, entirely with camera feedback.
If the shadows are adjusted per shadow detail in the playback getting correctly exposed highlights is simply a matter of raising the key and accent lights until they are just below clipping in the camera playback. Most digital cameras will show overexposure by blacking out play-back where clipping is occurring. After comparing an exposure test on the computer while also viewing the same files in the camera its easy to corollate the point where loss of detail starts to disappear in the RAW images based on the clipping warning in the camera. To make it easier to see when clipping is occurring put a test target on a stand where your subject's face will be when setting the lights.
Here is an example of a four light scenario on a white background:
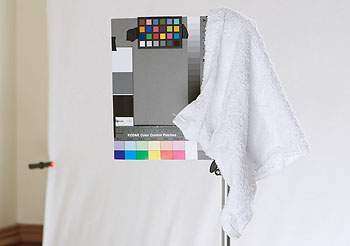
I started by setting the foreground lighting, setting the fill to reproduce the darkest areas on the target, adjusting the accent light behind and to the right just below clipping, then setting the frontal key light so perceptually the front parts of the white towel were a bit darker than the rim lit outline.
I left the background light off when setting the foreground lighting. Once the foreground was set I turned on the background light and raised it to the point where the background was a bit darker than that rim lit border of the white towel. This runs counter to the common practice of "nuking" white backgrounds, but that would negate the 3D effect of the rim light.
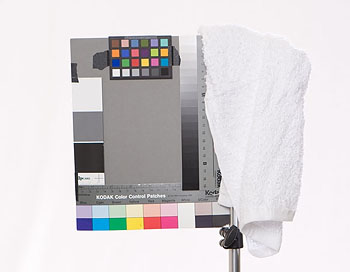
Once the lights were set using the target my subject was able to step into the light and we started capturing optimally exposed images.
Using the target to set the lights spares my subjects the boring task of setting up the lights. When I switch lighting scenarios I have the subject take a break while I reset the lights with the target. The technical stuff doesn't get in the way of connecting with the subject.
Review:
The goals of this exercise were to show the roles of the four lights typically used for conventional portraiture and to explain how they can be combined to overcome the technical limitation of camera sensor range by overlapping key and fill and create the illusion of 3D shape and depth. If you take the time to try this method for setting exposure you may find it eliminates the many of the technical roadblocks you are encountering and yields full range of rich detail from brightest highlight to darkest shadow.
You might notice I didn't mention lighting ratios here. Part of the magic of the photographic process is that when the ends of the tonal range are reproduced correctly everything in the middle winds up looking normal. For example go back and look at the test shots on the white background and the portrait taken with the that set-up. This exercise will reveal the "native" ratio the camera produces. The values the middle tones such as the facial shadows and gray card are reproduced with this "fit the scene to the sensor" approach will vary from camera-to-camera with the actual range of the camera sensor.
You might be thinking "What if I want the shadows on the face lighter or darker?" What makes the shadows light or dark? The fill. So to modulate the tone on the face, without affecting the detail in dark clothing, the ideal approach would be to either feather the fill so less hits the face or add a small reflector bounce more light into the face selectively.
Holistic Concepts for Lighting
and Digital Photography
This tutorial is copyrighted by © Charles E. Gardner. It may be reproduced for personal use, and referenced by link, but please to not copy and post it to your site.
You can contact me at: Chuck Gardner
For other tutorials see the Tutorial Table of Contents