to Portraiture
Holistic
adjective (chiefly Philosophy): characterized by comprehension of the parts of something as intimately interconnected and explicable only by reference to the whole.
The mark of a professionalism in any enterprise isn't the fact money is changing hands, but that the hands doing the work appear to do it effortlessly as if on automatic pilot. The "pro" knows how all the various pieces of the photographic puzzle fit together and also knows how to interpret and use body language in poses to trigger different emotional reactions in the mind of the target audience. My "holistic" approach is designed to help photographers on all skill levels line up all the ducks, get them quacking in unison, and understand on a cause and effect level what in the flock is happening to trigger the reaction in the viewer's brain. It starts with the process of human perception and works backwards.
Most of what I've learned makes a photographic portrait, or any portrait, effective wasn't learned behind a camera but by studying related and seemingly totally unrelated fields. On a basic level a photograph is like a joke or telling a story. First it needs content the audience understands and can relate to from personal experience. Secondly to be an effective the most important content that reveals the "punchline" needs to be delivered with timing and inflection in the voice to set up the reaction. Some jokes are short "one-liners" like Henny Youngman's classic, "Take my wife (long pause) PLEASE!" something any husband can related to. Other jokes are long rambling narratives where the listener is lead down a winding path the surprised by punchline at the end.
In a photograph composition and contrast gradients are the tools used to control the timing and inflection of the delivery. Making any photograph more effective is simple a matter of asking these questions before putting eye to viewfinder:
- What is the message or most important content in this scene?
- How do I want the viewer to react when they find it?
- How can I make what is important contrast strongly with the background?
- What other things in the frame will compete with the focal point and how can they be eliminated?
- What angle of "key" lighting will created the desired illusion of 3D shape in the 2D photo?
A conventional head and shoulders (H&S) portrait is like a "one-liner" joke: Find the face and PLEASE STAY ON IT! Reading about and seeing eye motions studies in TV documentaries where people are shown random photos have revealed a trait of human perception that gave me a "slap on the forehead" epiphany about how to make a portrait more effective. When shown a photo containing a face the eyes of the viewer will track immediately and directly to the front of the face and eyes if the photo contains one. That in itself isn't too surprising, but it made me realize that finding the face is more or less an automatic reaction then everything else in a portrait is a potential distraction that will lead the viewer off the face. The leading line of a bright bare arm is more likely to lead a viewer AWAY from the face after it is seen than towards it. So the most important question of the four above when compositing the shot in the viewfinder is the last one; what will distract from the face and needs to be cropped out to avoid distraction? Or looking at it another way what can be changed to minimize a distraction which can't be eliminated? If a subject shows up for a portrait wearing a white shirt it will be a huge distraction from the face on a dark background. One solution is change the shirt. The photographer can't usually do that, but can change the background the shirt is seen against. Even outdoors it is possible to find natural settings which are uniformly dark or light. Then working up the checklist the photographer simply needs to select a lighting strategy for the face that will make in contrast strongly with the background. The overall contrast of the front of the face with the background, and the hair that frames the face, leads the viewer to it and more importantly holds their attention on it. What supplies the "magnetic" attraction? #4 - the fact the photographer eliminated all the potential eye catching distractions.
I've read dozens of often heated debates on Internet lighting fora on the topic of light in the eyes of portraits, some advocating it and others saying it isn't necessary. This brings us to #2 on the check list. How do you want the viewer to react after they've found the face and locked onto it? Another ingrained trait of human perception is making "eye contact" when meeting a new person to "size them up". Have you ever stopped to consider exactly how hat works on a cause and effect level?
When meeting a stranger they will either meet your gauze and stare directly back into your eyes, or divert their eyes away and avoid contact. In person the length of time they make "eye contact" is an very important clue we use to evaluate their level of confidence, willingness to engage, etc. That critical clue is missing in a still photograph. What replaces it is how long the attention of the viewer of the photograph is held on the eyes in the photo. What factor more than any controls the "hang time" on the eyes? Whether or not there is light in the eye sockets and a 3D shape defining catchlight on the actual surface of the eyes. If both eyes of a subject in a portrait are clearly visible and well lit, and there are no other strong distractions, the viewer will focus attention on them longer than if they are partially hidden behind a nose by the camera angle or shaded from the key light by the nose or brow. Shaded eyes in a photography will trigger a reaction similar to that when meeting a person and they don't look you back in the eye. Light in the eyes will create a reaction similar to meeting a stranger and maintaining eye contact during the interaction. So the answer to the debate over light in the eyes is the one for #2 above: how do you want the viewer to react to the face?
There's more to "eye contact" than just eyes. We get more clues from the flexing of the muscles of the face around the eyes and mouth, the expression of the person. But like the eyes in a photo there needs to be contrast between the background and the front of the face to enable the viewer to first find the front of the face and hold their attention. Many commonly used lighting patterns will make the side of the head very bright by adding a "kicker" light from behind to define the 3D shape of the head. But what the photographers who do that don't take into account is that the contrast that kicker creates acts to pull attention off the darker front of the face towards it. What contrasts the most with the background sends a subliminal clue to the viewer that it is what is most important. Understanding that dynamic of human perception I create lighting patterns on the face which make the front of the face contrast with the sides of the head.
Lighting a portrait on a dark background is very easy. First make sure the subject is wearing clothing darker than the face so it does not distract. Next select a background which is slightly lighter than the clothing and hair to create spacial separation, but dark enough that the highlighted parts of the face of it contrast. Simply put the front of the face is the star of the show and you put it in the spotlight. Lighting a dark background is like lighting an actor on a dark stage. But to make it work you must be able to control the tone of the clothing and background.
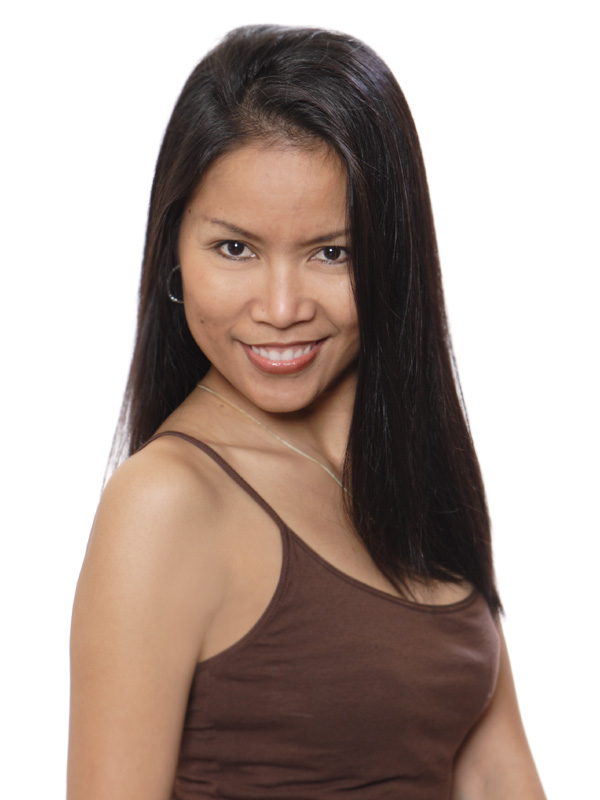
There is a scene in the ballet "Swan Lake" when the stage is filled with prancing white swans and a single black one. Can you guess where the attention of every eye in the audience is focused? To create an effective photograph of any kind on a light background you need to grasp that it is the contrast of the darkest and most colorful objects against the background that will grab and hold attention. The simplest way to make a very effective portrait on a white background is to cover the subject from toe-to-neck in white clothing. The tonal contrast of dark hair and the color contrast of the face and lighter hair will automatically pull the viewer to the face. The lack of any other distracting contrasting objects in the frame will keep the viewer on the face.
It's really as simple as that if you approach the problem holistically with a clear set of goals outlined in the first four questions above.
Lighting The Human Face
Regardless of whether the subject of a portrait is seen full-length, close-up, fully clothed, or totally nude the viewer will instinctively be drawn to the face, usually first, then wandering off it to see everything else of interest which hasn't already been noticed traveling to the face. So #1 on my check list above is always THE FRONT OF THE FACE. That is the most important content in a conventional portrait and what creates the emotional reaction. There are of course many other types of "people" photo such as environmental portraits showing the subject in their element or editorial photojournalism where the background provides context to the story and may in fact be more important to it than the people. In fashion and advertising the garment, accessory or make-up product is the star of the show and the model wearing it the prop supporting it so making the face less noticeable may be more in keeping with the goal for the shot. But by first understanding how to make the front face the "star" of the show in a photograph it is very easy to know how to diminish its realative importance.
The shape of a human face is unique amongst animals. The brow and nose evolved in the ways they did to project and protect the eyes, but that creates a challenge for the photographer: getting light past the brow into the recessed eye sockets and minimizing the distraction created by the contrasting shadow cast by the nose over the brighter highlighted parts of face. Another challenge is creating a realistic impression of the 3D shape of the face with the 2D pattern of light and dark contrast created by the angle of the light, #5 on the goal checklist.
Have you ever considered what makes lighting create the illusion of 3D shape in a photo that looks "natural" and why flash lighting often looks fake and artificial. The cause and effect of the reaction to the modeling created with lighting is the result of the clues provided by highlight placement and shadow angle. What seems "normal" is a function of how we are accustomed to seeing faces and all other objects illuminated by natural light.
Natural light has one source, the sun, but two functional components: the direct collimated (parallel) rays of the sun which during daylight hours has a downward angle of about 45°, and the diffuse indirect light reflected off the atmosphere and clouds. With the diffuse skylight there also two functional components: the entire sky will create a wrap-around "fill" effect on the shaded side of anything in the direct sun, but the light on the shaded side will will have a dominant "key light" direction from overhead at a 45° downward angle and a sideways angle from area of the sky opposite the direction of the sun, and a more uniform wrap around "fill".
The common denominator for both direct sun and skylight is its average downward angle of 45° during the hours between 10AM and 2PM. That angle of light puts highlights on the upper surfaces of 3D objects and casts shadows downward. So when artificially lighting a face or object with flash the lighting will seem more natural and "normal" when the key light is placed above the object at a 45° downward angle. That's not to say the light always needs to be at 45°, only that's the angle that matches our baseline for normal lighting in daylight hours. In the morning and late afternoon the sun is lower in the sky and as a result the highlights will appear lower on the cheekbones and the nose will cast a sideways shadow rather that downward. Create an illusion of afternoon sun with flash would require placing the light at a similar angle to the face.
The sideways angle of the light source relative to the face creates the shadows clues.
A ring light, directly from the lens axis, creates very few shadows the camera sees and as a result a ring lit full face view will look very flat. That lighting strategy is commonly used for glamor and fashion photography because the flat lighting provides a "blank canvas" for a make-up artist to create the illusion of 3D shape of the face with the make-up by applying highlights to the ridge line of nose, top of cheeks and above the eyes, and shadows of darker makeup under the cheeks to create the illusion the 3D shape and making the sides of the face darker to make the brighter front of the face contrast and appear thinner.
Keeping the light centered but raising it above the eye line does two things on a cause and effect level on a face. First raising the light over the head makes it more natural in that same way that natural light comes from overhead. That's clearly seen if you do the opposite, dropping the light down below the face. That will cause the highlight / shadow pattern created on the face to be the reverse of the natural pattern and as a result it will look odd and unnatural. Again that's cause and effect not good or bad. If for dramatic effect you want a person to look scared or stressed or in a dangerous environment a low light angle will sent a "something is not normal here" subliminal message to the viewer. To make faces look normal you raise the light so it about 45° from the eye line, taking care the brow over the eyes does not shade it. Brows vary so you need to adjust the height relative to the face by eye. The distance of the light to the face also affects angle so the wider you crop and move the lights away to keep them out of the shot the higher you need to raise them to maintain the same angle to the face: something most beginners to lighting don't understand.
The second thing that happens when the light is centered but raised is the nose, cheeks, brow, chin and other parts of the face begin to cast shadow the camera sees. In terms of overall lighting goals I think of shadow in terms of both how they model the 3D shape of the face, but also whether they showcase the most important eyes and mouth, or distract from them. By far the most distracting shadow on the face is the one cast by the nose because it sits between the eyes and mouth. The advantage of aiming the subject's nose directly at the camera and also placing the key light directly in line with the nose is that the nose shadow is cast down below the nose. If the camera is also raised above the eye line so the top of the nostrils are seen they will often hide the nose shadow from view. That pattern, called "butterfly" after the shape of the shadow the nostrils cast downward will naturally model the shape of the forehead, cheeks, mouth and chin while at the same time hiding the distracting nose shadow - a win-win combination which models the face and makes the eyes and mouth contrast and become the stars they should be in the full face view. The centered light, by virtue of falling off front-to-back will also automatically make the sides of the face darker framing the face symmetrically. The closer the key light is placed, the more rapidly it falls off making the shadows on the side of the face darker. Dish reflectors with a plate over the flash tube are ideally suited for the butterfly strategy. The plate creates a "dead zone" in the pattern which if aimed at the forehead keeps it darker than the eyes and mouth below it. The same overhead centered placement of a more uniform source like a softbox would overexpose the forehead closest to the source. That illustrates that artificial light requires constant situational awareness of the distance between the lights and parts of the face. To make the eyes and mouth the brightest, most contrasting areas in the entire photo the overall lighting and posing strategy must wind up putting them closer to the light than any other body part.
Beginners and even seasoned self-taught pros who haven't considered the perceptual reaction to contrast will often place the key light slightly off center, often because they have not noticed the subject moved after the light was set-up directly to the nose. What happens when the light isn't exactly centered with the nose and the nose isn't pointed directly to the camera is that the nose gets a shadow on one side. That has two effects on perception of the face: the shadow makes the viewer notice the nose and the shadows don't model its shape naturally. The shadow, poorly placed, becomes a distraction compared the the more precise centered pattern of angle and light. The "loop" pattern is one commonly seen in classic painting and lighting books and is widely used, but does a long loopy shadow hanging off the nose model the 3D shape of the nose accurately or flatter the subject more than the centered "butterfly" pattern which when combined with camera angle from above hides the nose shadow? I think not and use butterfly and avoid "Loop" because relatively speaking it's less flattering and the goal is flattering the subject.
As mentioned the challenge in lighting a human face is getting light into the eyes and making the nose shadow non-distracting. As the key light, still about 45° above the eye line, rotates around to the side of the face the nose between the eyes casts a shadow like a sundial. My goal when moving the key light to the side is to watch the nose shadow and try to position it so it falls along the base of the nose where it meets the cheek, and over the top of the nostril without hanging out past it. If a face is naturally symmetrical and the nose straight it will usually be modeled ideally when the key light is 45° to the side of the nose. The position of the key light on a full face subject can be tracked by looking at the position of the catch light reflection of the light in the eyes and will be at 10 o'clock or 2 o'clock when the nose is modeled naturally.
The camera needs to be above the eyes to see the top of the nose. If the nostrils are seen they will distract. For some upturned noses it is impossible to hide the nostrils, but the higher the camera angle the more they will be hidden. It's a matter of consciously being aware that nose holes are distraction for the similar shaped round iris of the eyes above them and trying to eliminate the distraction. I always have a stool handy to raise my camera above the subject. Outdoors I use a ladder because it's necessary to tilt the face up to get the skylight past the brow into the eyes before adding the flash.
The contrast of highlight and shadow is what creates the illusion of 3D shape. The shape seems normal when the light comes from above at a 45° angle and the nose and other features of the face are modeled naturally when the light is 45° to the side of the nose. But when a full-face view is lit that way from the side at 45°/45° there is another aspect of human perception that will affect the overall appearance. If you look at a face lit that way critically in terms of symmetry and balance on, compared to the centered "butterfly" strategy for a full face pose the sideways 45° key light angle makes the face look lopsided and asymmetrical. It's an optical illusion: on a dark background the brighter side of the face will seem larger than the shaded side. On a white background the shaded side will seem larger the the brighter side which blends into the background.
Is this "good" or "bad"? No, just another cause and effect to be used in different ways. I look critically at the face of my subject before shooting. If they have a naturally symmetrical face I'll know they will look good full-face with butterfly lighting. If one side of the face is wider than the other, knowing how the sideways pattern skews perception of size I will put the key light on the narrower side of the face and keep the wider side in the shadows to fool the brain of the viewer into thinking they are more equal. Or I will use an oblique camera angle.
A full face view stacks the planes of the face. In flat light the nose shape is hidden but the surrounding cheeks and shape of the cheeks is hidden by the wider sides of the head seen behind them. Heads vary in shape and if the skull is large and sticks out wider than the eye line the face will look very round or oval in a full face view. What happens when the camera moves around the face is that the shape of the front planes and nose get seen at an angle. In person our 3D vision detected the shape via parallax. In a photo of 3D shape clues come from lighting and near/far perspective.
Some camera angles are more flattering that others. The most flattering oblique angle is one where the entire far eye is seen (not blocked by the bridge of the nose), the curve of the cheekbone is slight notch at the eye on the far side is seen, and the overall far side of the face, especially the chin behind and below the mouth, looks balanced compared to the near side. The balance of the near and far sides is affected by the lighting angle.
As in the full face view the side of the face which contrasts more with the background will look larger perceptually. When a face is turned 45° to the camera AWAY FROM THE KEY LIGHT side facing the camera highlighted and will look much larger than the shaded far side. The far side eye is also hidden in shadow, diminishing the "eye contact" emotional reaction factor. When a face its turned 45° to the camera but TOWARD THE KEY LIGHT the far side of the face the light highlights the entire front plane or "mask" the face. What is the "mask"? Imagine the face cut-off vertically, just behind the eyes: you'd see the eyes and cheeks, but not the wider part of the head behind. That's what the lighting pattern does with an oblique camera angle when the subject is posed toward the light and it hits the face at a 45° angle from above and 45° to the side. The camera shoots into the shadow side of the nose with its 3D shape modeled naturally. The combination of the camera angle revealing the shape of the face on the far side and the lighting defining it on the near side creates an optical illusion which makes a face on a darker background look more narrow than when seen full face and symmetrical, even if it is naturally uneven.
THE IMPORTANCE OF FILL LIGHT POSITION
The nose shadow will be least distracting if it is the lightest tone shadow on the face. That's accomplished by keeping the fill source, which controls shadow tone, closer to the tip of the nose than any other part of the face. KEEP THE FILL CENTERED NEAR THE CAMERA AT THE SUBJECT'S CHIN LEVEL. I stress that because its the least understood aspect of flattering light: keep the nose shadow light and non-distracting.
Lighting Ratios by the Numbers
The ratio convention used in portraiture describes how bright the highlight side of the face is compared to the shaded side. It is a reflected ratio, not the respective incident strength off the key and fill lights. The shadows are always expressed as 1 unit, with the highlights always 2 or greater. The highlight number represents the number of times brighter the highlights are. Two light identical is all respects produce a 2:1 ratio under this convention because key overlaps fill to create highlights:
H:S
1:1 Flat chin level fill hits entire face
1:0 Same strength key light overlaps fill
===
2:1 Highlights reflect 2x more light
If the key light strength is doubled to twice that of the fill the ratio becomes:
H:S1:1 Flat chin level fill hits entire face
2:0 2x (1 f/stop) stronger key light overlaps fill
===
3:1 Highlights reflect 3x more light - shadows look darker
As the ratio increases from 2:1 to 3:1 to 4:1 and beyond the highlights wind up looking the same in all of them after exposure is adjusted to keep the brightest non-specular highlights below clipping at capture. A very simple way to set exposure is to have the subject hold a small white towel next to their face at eye level on the key light side and take test shots with the cameras until the towel is just below clipping in the playback. I use a towel because loss of it's fine texture due to overexposure is easy to see.
Lighting Ratios by the Emotions they Evoke
Photographers tend to think of and describe light as either being "hard" or "soft" based on the size and distance of the sources, with direct / closer sources creating "hard" light and larger/closer diffuse sources creating "softer" light. But in terms of perceptual cause and effect the difference is a reaction to the shadow and highlight clues. But if the same face is lit with the same modifiers and the only variable between shots is the numerical ratio, as it changes from 2:1 to 8:1 and the shadows get darker, most would say that it got "harder".
As with most decisions picking the best ratio is a subjective decision which must be made by eye based on experience. Back in the days of film a photographer might take a model, shoot her with various carefully metered lighting ratios, then after developing the film and prints evaluated them to create a "playbook" approach for conveying mood and emotion with lighting ratio. But it's not that simple because what seems "normal" for a lighting ratio will vary depending on the context of the environment seen in a photo, and how the viewer normally perceives the lighting of that environment.
Different ratios don't really change the impression of the physical shape of the face as being "harder" or "softer" in the imagination of the viewer. Shadow tone and highlight specularity are metaphorical clues to the mood of the subject and the type of environment they are in.
Technical Considerations - Fitting Scene to Sensor
Let's pause to consider the broader goal of photography; tricking the brain into accepting a 2D pattern of contrasting highlights and shadows as the real 3D objects which the light hit. In a photo we expect to see the same level of detail in highlights and shadows as seen by eye. When highlights are blown or shadow detail blocked in a photo it will not seem as real as one with a full tonal range. That is especially true for B&W photos where all the clues come from tonal variation.
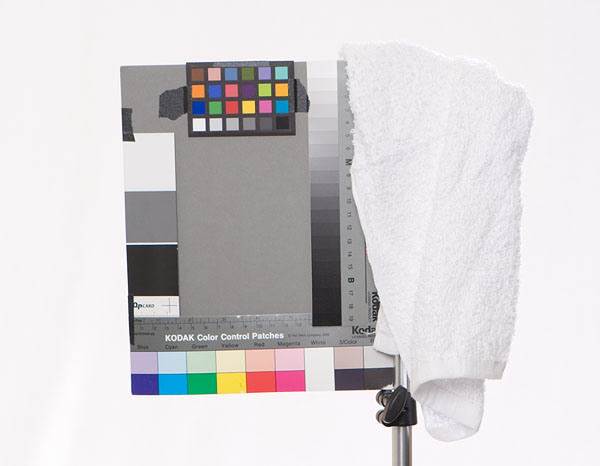
For any digital camera sensor there only one lighting ratio which will record the full detail of a cross-lit scene. One of most technically challenging genres of photography is shooting weddings, where a the highlighted fine lace and beadwork details of the bride's dress and the shadows in the folds of the groom's black suit must be recorded accurately, as seen by eye, for the photo to look "normal" and real. The only way to discover what lighting ratio fits both to the sensor is by empirical testing with each camera body, or by using a full range test target when setting lights.
I use the target below, placed where the face will be, to set my lights so my camera will record a full range of detail with the lighting strategy I am using. Most the the time I start with a centered butterfly pattern with key light directly above the camera and fill light below it at chin level with the subject to keep it as shadowless as possible. It is a pattern which is very flattering for full face views and allows freedom of movement without the lighting getting unflattering due to poorly placed shadows. In addition to key and fill I use rim lighting from behind to define the outline of the subject. The rim light, not the key light or the background tone winds up being the brightest thing in the photograph that everything else is adjusted to perceptually. I do the adjusting by eye, not with a meter because I find it quicker and easier.

The foundation of fill in a lighting pattern is like the foundation of a house; it reaches to slightly above ground and is level. So starting with just my fill light I raise it until I can see details in the shadows on the darkest parts of the target in the playback. I've compared the camera playback to the RAW files and can corollate the two. That gets the shadows above the noise level of the sensor.
Next I turn on and adjust the brightest light, which for that set-up was the rim light from behind and raise its power until I see clipping indicated o the camera playback warning. Then I back down the power until the warning disappears and I can see the micro texture in the white towel. Why set the fill first? In the studio setting it makes the shadows easier to evaluate
At that stage the target is rim lit and the front flat lit and quite dark, only up to the point the detail is seen in the shadows. But that makes it much easier to judge what the key light is doing when it is turned on and overlapped, especially in a centered butterfly pattern. I raise the key light in front until the point of clipping in front then back it down until is is slightly darker in the highlights it creates than the detail retaining highlights of the rim light. If the key matches the rim lighting exactly the illusion of 3D separation the rim light creates would be lost.
I left the background lights off when setting the foreground because I also adjust my white background intensity perceptually relative to the baseline brightness of the rim light. As with the key light the background tone can't be brighter than the rim lit parts or the effect of the rim-lighting effect is lost. This flies in the face of conventional wisdom of forcing the background past clipping, but that makes no sense perceptually if rim lighting is used and also increases lens flare, which reduces contrast.
I raise the background lights until the background clips. That makes it easy to see if the lighting on it is even. When lighting on a background is even it will clip everywhere at the same time. Once its as even as possible I reduce power until it is slightly darker than the rim-lit parts of the target.
What is the numerical ratio?
Does it matter if the goal is fitting the entire range of the scene to sensor and doing that produces natural, as perceived by eye results? I have meters and have written tutorials teaching how to used them, but like film they have been replaced by better more convenient tools to gauge exposure and I've changed with the times and use them.
The ratio can be measured with a reflected spot meter off the face once it replaces the target, or inferred via incident readings of the key and fill taken one an at time with the meter held in front of the face and pointed at key and fill separately. Since the dynamic range of sensors vary, different ratios of key to fill will be needed to fit scene to sensor. I've found that a conventional key overlapping even fill 3:1 ratio will result in a full range on the DSLR cameras I use (Canon 20D and 50D) in much the same way it produces a full range of tones with the color negative film/print medium.
When everything on the target fits the range of the sensor exactly the target is replaced by the subject who never gets a meter stuck under their nose and never sees my futzing with the equipment. From the starting baseline of detail everywhere in the image, resulting from using the empirical procedure above, I will replace the target with the subject, take a few test shots and pause and evaluate whether or not that baseline works for the message I'm trying to create or the emotion I want to evoke.
If I want lighter shadows to convey a happier mood I'll add a bit more fill and feather it more towards the face than the body. If doing character study style portrait of an older gentleman I'll feather the fill away from the face. But in either case there needs to be enough fill in the shadows of the clothing to render them with detail at capture.
Fitting Scene to Sensor Outdoors in Sunlight
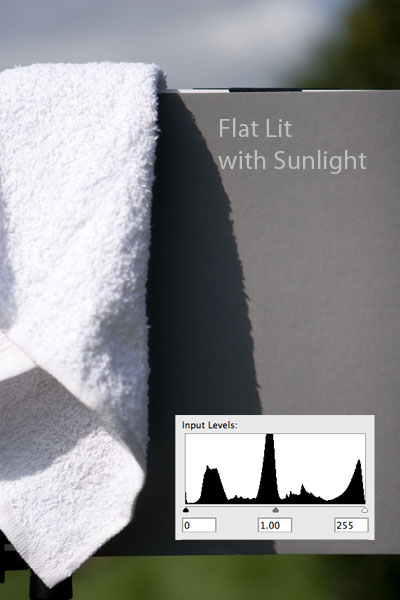
Outdoors the cause and effect is the same. To create a realistic rendering a full range of detail must be recorded. Current DSLRs can record about 6-7 f/stop range of brightness between the highlight with detail and the point shadow detail is lost. If the sun is hitting the subject flat and creating few shadows the camera can record enough of the scene content for it it look "normal" despite having some shadows without any detail...
But the same light with the same exposure for highlight detail produces this result when the camera faces the opposite direction.
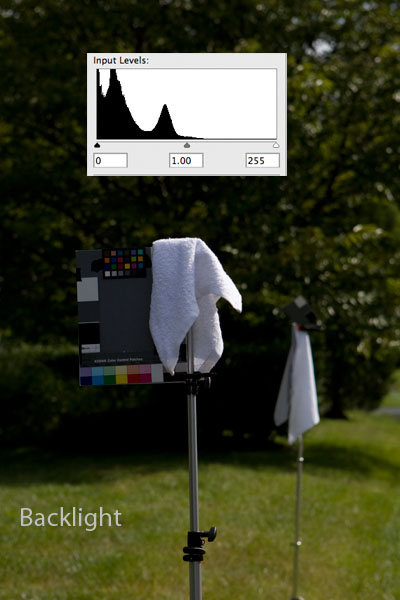
That's the technical stumbling block of outdoor photography with the fixed range digital sensor: most cross-lit scenes exceed what the camera can record. The same dilemma occurs indoors if a single flash is moved off camera, except the fill, to the extent there is any to lighten the shadows comes from spill bouncing off the walls and ceiling. Outdoors the "spill fill" from the sun comes from the sky. The front of a shaded subject in direct sunlight is actually only 3 stops darker than the sun, but on a sensor with a range of 6-7 stops of detail that causes the front of the white towel on the target to be rendered as gray when detail is retained in the sunny parts.
Confronted with the need to shoot a portrait outdoors in sunlight without flash the photographer would need to expose the shot "perceptually" based on the most important content, the front of face. In backlight I would raise exposure to the point where the front of the face started to clip in the shaded white clothing and skin highlights the reduce it 1/3 to 2/3 stops, respectively to keep both below clipping. But exposing for the front will blow out the hair and any sunlit white clothing and skin by several stops. That's why I always have a 580ex flash on a bracket when shooting outdoors.
In the shot below I selected sunlit hitting a river as a background to eliminate the white clothing as a distraction from the face. I could have done the shot without flash, exposing for the highlights on the shaded front side of the coat but that would have blown out the sunlit parts and the hair. So instead I used flash to match scene-to-sensor.
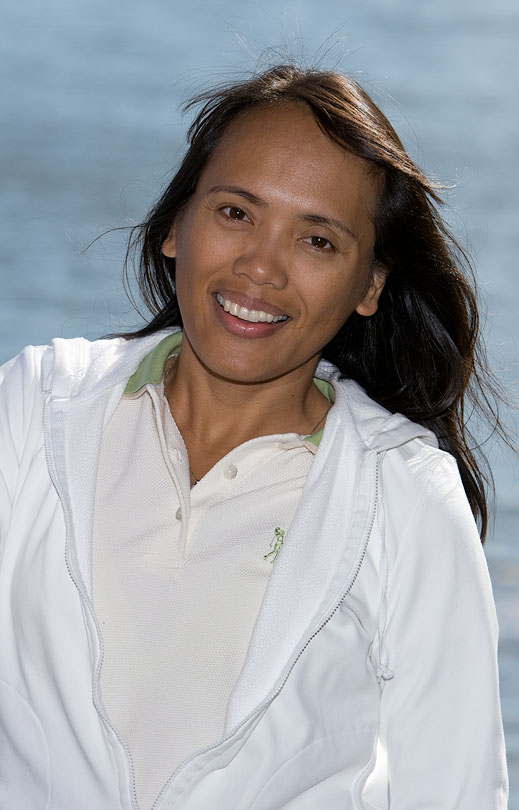
I learned portraiture by window light so outdoors I instinctively use soft skylight the same way, finding its dominant direction and posing the face into it at the angle needed to create a centered "butterfly" pattern of highlights on the face and get light in the eyes. Outdoors getting light in the eyes requires having the subject look up to get it past the brow if the brow is shading the eyes. So before even picking up the camera I posed the face to the skylight. The skylight, having a dominant downward direction and a 360° wrap-around effect functions as both key and fill in open shade and backlight if the face is aligned to it's dominant direction. The contrast in the pattern is very slight so you must train the eye to see it.
Once the face was posed to the light the first technical task was getting the sunny highlights below clipping which I did in Av mode with a - 2 EC adjustment. Exposure in front with the flash was set in the same way as the target in studio light: raise flash power until I saw clipping in the white coat in front then reduce it slightly.
Did I add "fill" flash in that shot?
The answer to that question lies in the direction of the flash and what it actually did. The face was already aligned to and modeled by the "key" direction of the skylight with shadows darker, but filled to some extent by the wrap around component. Because the flash was raised on the bracket and I was shooting from above her on the river bank my flash on the bracket was above her head matching the downward angle of the natural skylight. The flash because it falls off per the inverse-square law overlapped the pattern of the natural butterfly modeling and the areas on the sides of the face where it didn't reach remained "filled" by the skylight alone. So based on the fact the flash was creating modeling highlights from a downward angle, not at chin level lighting all parts of the scene equally it is more accurately defined as a "key" flash not fill.
Like the numerical ratios its important not to get so hung up on definitions and labels for the action you take that you lose sight of the cause and effect of what they are doing to meet the goals of the exercise. The goal was to make the lighting look as natural as possible with the one flash I had. The strategy was to keep the sunlit parts below clipping then match as much of the shaded foreground to the range of the camera with a single flash. I could have matched the range with flash in a hot shoe, but the angle of the light in portrait mode would be too low relative to the "normal" baseline of the downward natural light. That's why flash shots which are "filled" from near the camera axis wind up looking fake. But the time the flash raised the exposure enough to render the tone of the face correctly it overpowers and cancels the natural modeling.
There are many important lessons in that single flash example:
Find a background that makes the clothing non-distracting and makes hair and face contrast.
Don't fight the contrast sun head on, but it behind the subject and complement the skylight on the front.
First pose the face to the skylight as when using window light - get it in the eyes.
After raising the face to the light find a way to raise the camera to hide the nostrils: bring along a ladder.
Expose the sunny parts below clipping to retain detail. The clipping warning makes this a no-brainer.
Add flash from the same "key" direction as the natural light; downward. A bracket makes this a no-brainer.
Adjust flash power until the highlights it front over the skylight are slightly darker than the sunny ones. Raise to clipping then reduce 2/3 stop.
What makes that strategy work with single flash is the same one that makes it possible to record the range of a sunny scene without flash: keep the lighting flat so all the important content of the scene fits the range of the sensor. Flash on a bracket highlights the entire front of the face in a full-face view. The shadows which occur on the sides of the face, while dark, work to frame and slim the face making it look narrower and more attractive than when seen in the flatter skylight alone.
But turn the face obliquely to the camera and move the single flash off axis to "short" light the face by shooting in the shadows and the skylit shadows will look too dark and harsh when the flash increases contrast by making the highlights brighter. The solution to that problem is the same as lighting indoors where fill is needed to fit the scene to the sensor: use fill flash.
When is a flash key or fill? It's a key light when it creates highlights and shadows seen by the camera. It is fill when it is as shadowless as possible, seen from the lens of the camera. The optimal place for fill is at about nose level with the subject so it reaches everywhere without creating any odd unnatural shadows.
Key Light Modifier Size vs Fill - Use One light or Two?
Most start out in flash lighting with either the flat built-in flash of the camera or a single flash in the hot shoe which changes position relative to the lens when the camera is shifted from landscape to portrait. The light is flat and in portrait mode the shadows are projected up and sideways opposite the direction of natural light. Natural light is our perceptual baseline for "normal" modeling of everything we see. It varies in angle with season and time of day and contrast with the weather conditions. Even in direct sun the lighting is never actually flat except at sunrise or sunset, it comes from overhead at angle the rest of the time in a very predictable way and part of the learning curve outdoors is gaining situation awareness of the direction of the sun and skylight and using each to maximum advantage to meet the message goals of the shot with the equipment available; natural light, one flash, two flashes, reflectors, scrims, etc.
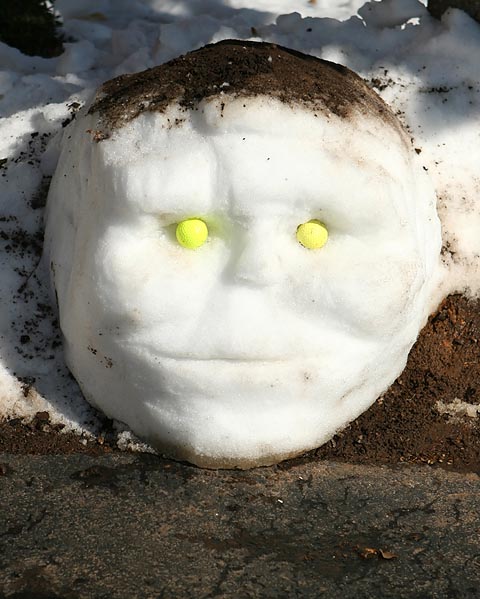
One winter I did this lighting exercise, "posing" my subject's face to where the sun would be in the sky when I finished creating it with a trowel...

Oblique from "broad lit" side:

Full face:
Oblique from "short lit" side:
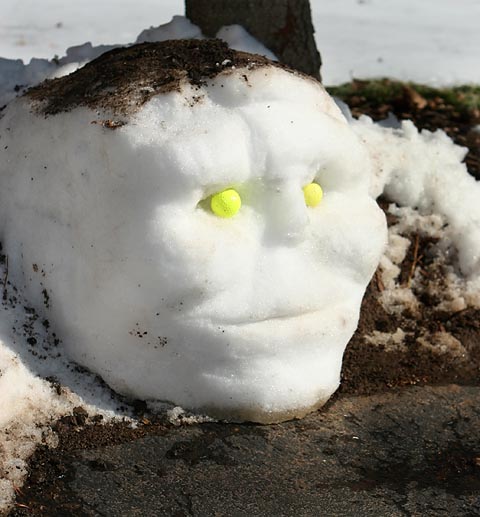
Profile from "short lit" side:

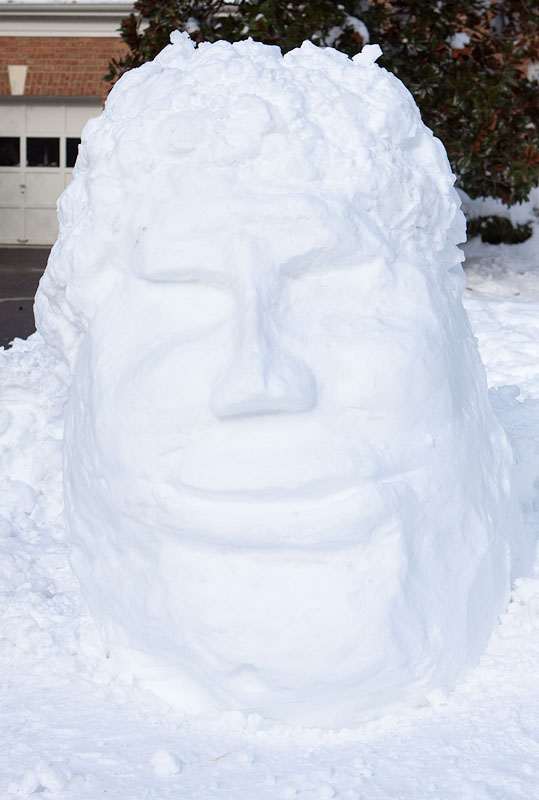
The following year I opted for butterfly lighting aligned to the Winter Solstice...
A Typical Lighting Learning Curve
The first instinct of any photographer is to get the flash off the camera an angle so it can create more natural modeling. Most beginners don't think in those terms, they just know the flat light sucks and looks fake and think moving the flash anywhere away from the camera and making it "un-flat" will make it will look better. Most don't immediately grasp the importance of making it look natural or how the natural angle and character of light form the baseline for "normal" everything else sis compared to in a photo.
The natural light baseline one source, the sun, but two components: the dominant downward direction of the sun which creates the shadows, and the downward fill from the sky which reveals detail in the shadows the sun creates. We have no problem seeing the detail in sunlit shadows in person because our eyes scan and adapt to the different intensities of reflected light but in most outdoor lighting the camera, exposing for the highlight detail, loses the shadows. Portrait lighting pattern conventions evolved because of the need for eye contact and natural looking 3D modeling. In most naturally flattering patterns — butterfly for full face and short lighting for oblique and profile views — the key light winds up at a 45° downward angle to the the eye line. Butterfly centers the light on the nose to create symmetrical modeling. For oblique and profile views placing the key light 45° from the nose highlights only the front "mask" of the face in a way which fools the brain into thinking a face is slim and symmetrical despite the fact it is actually turned wider to the camera than in a full face view. The brain focuses more attention on the highlighted eyes and mouth and tunes out the side of the face and ear in the shadows.Moving a single flash off camera onto a stand 45° vertically and 45° to the side of the nose of the subject will produce a natural lighting, but not the natural lighting ratio of 3:1 that matches what our eyes and brains normally perceive. To the extent the shadows are lightened it is a result of light spilling and bouncing off walls and ceilings.
To remedy the hard light the photographer will then put a modifier on the flash to make it larger thinking that alone will magically "wrap" the light and fill the shadows. Distinct or fuzzy-edged shadows are a function of how large the source is relative to the object casting the shadow. As a source gets larger and closer the number of angles the light comes from increase causing it to hit more of the surfaces. But a light placed at 45°V/45H will not wrap around the tall nose leaving it with a dark shadow on its side that can be very distracting and unflattering when contrasted between the brightly lit cheeks.
In simple terms flattering portrait lighting is mostly a matter of getting light in both eyes and on the mouth so the expression is clearly seen, then making the sundial-like nose shadow as light in tone as possible.
A simple test to see how much shadow modification is the result of modifier size and how much is the result of bounce fill is to shoot a subject indoors then repeat the same set-up outdoors at night where there is no spill fill. Absent the spill fill the shadows will be darker and more distinct that indoors. Repeat the test during the day outdoors in open shade and the lighting will softer than indoors due to the ambient skylight.
The more direct affect modifier size has is changing the character of the highlights. One of the perceptual clues which make flash near the axis look unnaturally "fake" is the fact the reflection of the flash bounces off the front of the cheeks, chin, forehead and tip of the nose straight back into the camera. The are both lower and more specular (mirror-like) that how we are accustomed to seeing faces in natural light which puts less specular highlights higher on those raised parts of the face. That dynamic is one of the reasons raising a flash on a bracket makes the lighting pattern seem more natural, even with direct flash: the highlights wind up in the same places seen it natural light.
Most of the clues interpreted as hard and soft come from shadows tone. Spill bouncing off the ceiling will make the nose and other shadows on the face lighter in tone and make the overall lighting seem softer, but there is little the photographer can do to precisely control it. Reflectors can only reflect a fraction of the light from the source because the source-reflector-face distance is greater. Also it is physically impossible with some lighting patterns to aim the key light at the face and reflector at the same time if it is placed in front of the face to keep the fill shadowless as seen by the lens.
When driving nails do you position the hammer to hit the head of the nail effectively, or where it's convenient to swing the hammer comfortably? The mistake many make with reflectors is placing the reflector back around the side of the head where it can catch the key light instead of near the camera; the only place a fill source is shadowless. So all things considered whenever one flash is used as a key light for modeling 3D shape its best to use a second identical power flash for fill.
Fill strategy affects modifier size. I mentioned previously I learned lighting via window light and a reflector kept forward of the face. That's the way my mentor Monte Zucker shot all his formal wedding portraits in the early 1970s when I assisted him. Everything else was shot with two identical direct flashes, one on a bracket over the camera as fill with the other off camera on a rolling stand. A 3:1 ratio was created by shooting from 8ft the off-camera flash rolled 6ft and 45° from the nose making it 2x brighter (2K+1F:1F = 3:1 ratio). Shooting at 11ft, I'd move the slave flash to 8ft to maintain the same 3:1 ratio and open the lens to maintain the same exposure.
I learned from real world experience how to create "natural" looking lighting with primitive single power unmodified flash gear by laying down a foundation of even shadows with the fill and precisely controlling the direction and modeling of the key light. It taught me that huge modifiers are not needed to create "soft" lighting with smooth transitions.
For starters if the fill source is kept near the lens axis it creates few if any shadows so there's no compelling need to add a large diffuser apart from also bouncing the fill off the ceiling in the same way cap style speedlight diffusers create fill. Since the fill will create highlight reflections on the skin and it is unnatural to have them falling two low on the cheekbones its actually better to place the fill slightly above the camera so any highlights and shadows it creates are placed similarly to the downward natural fill seen in skylight.
Secondly when centered "neutral" fill from over the camera is used to lift the shadows naturally like skylight, there is no compelling need to attempt to wrap the light around the nose (which leave the core of the shadow in the side quite dark) or create a large footprint of light bouncing off the walls and ceilings creating spill fill. Sometimes, such as when shooting on white backgrounds lots of spill fill helps, but when trying to control shadows on a dark background independently controllable key and fill sources are more desirable.
Moving outdoors changes the dynamics of modification because the fill from the sky works to soften all the artificial light added on top of it. For informal portraits and candids with speedlights its possible get natural looking results without any modifiers on the flash. To illustrate this one day in the middle of forum discussion I grabbed the lights, when outside and dragged the lovely in-house model out to the garden for this test shot taken with a pair of direct 580ex speedlights...

It's the same overall strategy to deal with the contrast of the sun at the single flash shot. The difference is that in addition to the flash on the bracket I added a second flash as "key"to the right. Technically there is no entirely neutral shadowless fill in the shot because both the skylight fill and the flash fill were hitting at a downward angle. That's the cause of the dark shadows under the chin where the target she was holding was also blocking the light. But on the front of the face across the cheekbones the gradient is much more gradual and softer looking that the off axis key flash would have been without any fill. Could I have achieved the same lighting or better with a large modifier on the key flash? Certainly, but I probably would not have had enough flash power to balance the contrast of the sun and the logistics would have been much more difficult than running and grabbing the camera with flash on bracket and a single light stand with the bare speedlight.
I don't advocate shooting that way for serious portraits, only to get a baseline understanding of what is possible without any modification outdoors. ould I have achieved the same lighting or better with a large modifier on the key flash? Certainly, but I probably would not have had enough flash power to balance the contrast of the sun and the logistics would have been much more difficult than running and grabbing the camera with flash on bracket and a single light stand with the bare speedlight. As mentioned previously I start with the goals of natural flattering lighting and work the problem with whatever tools I have available based on my understanding of cause and effect.
The Holistic Decision Tree
Subject walks in, says "I'd like a portrait" made.
My first question would be, "What will it be used for?". Is it an anniversary present for a spouse, or a business headshot?
Next I look at the clothing.
Clothing is the biggest distraction from the face in a portrait. I select the background based on the clothing so the two blend together. If the clothing is lighter than the face I know I'll need a light background and lighting strategy. If the clothing is dark I know in advance a dark background and lighting strategy will be needed to contrast the face.
If the clothing is going to create a problem the background can't solve, such as a red shirt and blue jeans, I'll be up front and tell the subject the clothing will not work and spoil the shot. I always do a clothing consultation before shooting a formal portrait. People wear short sleeve shirts and shorts in the summer but adding two bare arms and legs to a photo adds four unnecessary distractions competing with the face in the photo so I always suggest long sleeves and pants for photos. Color contrasts will also distract. A family might wear jeans all the time, but the cool tone of the jeans will be a distraction from the warm toned faces in a group shot. Tan pants work well with green foliage and at the beach because the color blends it. The ideal tone for the clothing would depend on the tone of the background; light tan for the beach, darker brown for foliage. When shooting candids I use the lighting and cropping to mnmimize and eliminate the distraction as much as possible.
The next step is looking at the face critically. I do that while talking and will walk around the face from profile-to-profile paying attention to whether or not the face viewed full is symmetrical, and if not which of the oblique views is the more balanced looking. That 30 second analysis tells me what facial angle and lighting strategy will work best.
At that point I know the background and lighting strategy that will be most flattering given the intended usage. In some cases there is a requirement for white background or a full face view. It might not be ideal for than subject's face or clothing, knowing that in advance allows planning alternatives, such as which side to put the key light on to minimize an unbalanced face. Having the plan in mind I tell the subject to do their final touch up, and relax while I set the background and lights. I use a target on a stand where the face will be to set the lighting ratio and exposure.
A few minutes later I call in the subject, they step in front of the lights, I pose the them to the light according to plan and capture what I predicted would be the best combination of angle and lighting or the face using various body poses. When all those possibilities are exhausted I tell the subject to take a break and relax and set-up for the next most flattering combination I've determined from the pre-shoot evelation or during the first set.
I do what analysis predicts will be most effective first while the subject is fresh, then try as many other possibilities as time allows. With kids I will usually start with a centered buttery pattern and let them goof off and mug for the camera to start. That relaxes them and gets them interested because its fun and creates a connection that is often the stumbling block between subject and young subjects. For full length shots and groups I also use the centered pattern because it allows freedom of movement while maintaining flattering lighting on the faces and for groups it keeps the lighting even on all the faces with the same pattern.
Posing
I play golf and watch a lot of it on television. More often than not I can identify the golfer in a long shot of them standing on the fairway from the shape of their body and posture because I have a stored mental inventory of what golfers I know look like. If I recognize it is Tiger Woods or Freddy Couples I don't give it much more thought because I already have a clear mental picture of what they look like. But if I don't recognize the person immediately from their body shape and posture my mind shifts gears into information gathering mode to create a new entry in my mental database of known golfers. The same thing happens with faces. Once you recognize a face you will be less analytical and reactive to it than when meeting a stranger for the first time.
When meeting a stranger their body language will provide many clues about their mood and attitude. Ever walk down a narrow path and meet someone coming the other direction? One of three things needs to happen: they turn sideways and let you pass, you turn sideways and let them pass, or you both turn sideways. Which occurs speaks volumes about the personality of each, whether by nature they are aggressive and competitive, or more passive by nature. Can you identify each in that example?
Posing a subject for a photo is simply a matter of learning how to consciously interpret the subconscious way you react to them. What makes a guy look tough or wimpy or a woman look demure, sexy, or aggressive and athletic to you?
A torso square and wide to the camera will look more aggressive and strong than one made narrow by turning it sideways at 45°. Beyond 45° the angle is becomes less flattering and face more difficult to light because the shoulder points directly at the camera and winds up closer to the key light and brighter than the face creating a two-fold distraction.
Angling the hip, shoulder and eye lines in a photo makes the subject look more relaxed and dynamic that standing flat footed with everything level. That dynamic can be used both ways to make a person seem rock solid, serious and reliable or loose and relaxed and lots of fun.
The clues for creating those same looks for subjects and emotional reactions in the mind of the viewer are in the position of the feet, the shifting of the weight between them. Try this:
- Stand in front of a mirror. Turn your body 45° and point the front foot at the mirror.
- Note how by changing the spacing of the feet you can eliminate any visible gap between the legs if you put one leg slightly in front of the other and make the hips and legs look narrower. If you space the feet wider and create a gap it will be a distraction, an arrow pointing to the crotch in a full length pose. That's great for a glamor shot, not so much for a business shot or senior, or any photo where you want attention on the face
- Next shift your weight to the back foot and hip, raising the front heel up slightly to get the weight off it. That will automatically tilt the hips and shoulder lines higher in front than in back. That sends a passive reserved "feminine" body language message than the opposite angle leaning into the camera.
- To get the opposite angle with shoulder tilted towards the camera, simply reverse the weight shift. Instead shifting weight to the back foot and hip put the weight on the front foot and bend slightly forward at the waist. That shoulder-down, tilted into the camera shoulder line looks more aggressive and dynamic than the shoulder line tilted up. The eye line relative to the frame also creates body language in a photo. If a person stands flat footed their eye line will be horizontal. That looks static. If you tilt the shoulders and keep the eye line tilted the same way, it creates a unified masculine / confident vibe. If the eye line tilts opposite the shoulders it will send a different message. Try both ways.
The Holistic Workflow
- Put the subject on a background where the clothing is not distracting. For bathing suits or nudes the entire body should contrast with the background with the face contrasting the most.
- Indoors decide which facial angle is most flattering based on the shape of the face and position the key light accordingly, keeping the fill centered over the camera to keep the nose shadow the lightest on the face and avoid unfilled dark shadows anywhere. Camera distance affects perspective. Start at 8ft. then look at the face through the lens as you move the camera closer and further away. Find the most flattering shooting distance then pick the focal length for the desired crop in camera. A wider shot from further away can be cropped in editing but a face make to look wider by shooting from too close can't be make slimmer after the fact.
- If outdoors put the subject's back to the sun and then find the direction of the ambient skylight and raise and align the face to it. Bring a ladder, you'll need it to raise the camera above the eye line and hide the nostrils. After posing the face to the skylight to model it put the "key" flash so it hits the face at the same angle. As the crop widens the lights must further away to stay out of the shot and higher to maintain the same flattering angle to the face. 12-13 foot stands are needed outdoors. As indoors you will need fill to control the tone of the shadow the "key" flash does not hit. Keep it centered at chin level for the same reasons mentioned above
- The #1 priorities are light angle on the face and camera facial angle. Set those first then conform the pose to it. With experience you will learn how the two come together and set the pose so the face winds up in perfect light. While learning set the pose first, then adjust the entire pose towards the key light until it is flattering on the face - centered for full face "butterfly" or 45° from the nose for oblique / short-lit
-
To understand how to pose the subject you first need a clear idea of what message you want the body language to convey. If you start with a man or a woman in a basic "masculine" or "feminine" posture of hip, shoulder and eye angles you change the implied message by message making those angles more or less titled relative to the vertical and horizontal lines of the frame. An experienced model will understand how look sexy, but for ordinary subjects or unskilled wannabe models you'll need to learn how to direct every movement from the feet up. It's actually quite simple: show them how to stand and shift their weight and hip and shoulder follow predictably. Then it's just a matter of aligning the eye line with or opposite the tilt of the shoulders.
- Once you get the pose and lighting set you will move, the subject will move to follow you and the face will not be in the best light or at the best angle. It happens... The remedy is communication. After setting everything tell the subject find a spot directly in front of them and remember it. When the move you can verbally instruct them to "look back at the spot" and get the face back into the light precisely. To get a dynamic look in a photo it is necessary to tilt the eye line, but subjects not skilled at posing and holding a pose between shots will reflexively re-level their eyes with horizon making them look static and need constant reminders. Make sure the subject understand the need to keep the head angled, either will the shoulder line (men) or opposite it (women). They will better understand this if you explain to them why the pose works by shifting the weight and angling the parts. That way you get better results and train the model at the same time, a win-win when working with new models on a Time-for-Prints basis.
- Refining the camera angle by eye. Vary the position of the camera left/right/up/down and see how it changes the appearance of the face. For full face views point the camera directly at the nose, not slighting off center which makes the face look lopsided. Balance the far side in oblique shots so the far eye is seen beyond the nose, the cheekbone shows and the chin looks balances and not disappearing beyond the mouth on the far side. For profiles split the face EXACTLY in half - nothing hanging out and distracting past the nose. If you can see the far side eyebrow its not a precise profile and will look unbalanced.
- The last thing to pose are the eyes. Eyes look more natural when centered. For oblique poses have the subject "cheat" their eyes by looking at a spot between the camera and key light and until they look more natural and centered in the photo. For profiles cheat the eye towards the camera until the iris is visible. It is necessary to fake it to make it look natural. Subject will move their eye to track your movement so again have them find a reference spot you can refer to verbally.
Don't consider this advice hard and fast "rules" to follow to the exclusion of all other options.
It's simply a starting baseline based on cause and effect logical decision regarding the goal of flattering a subject in a conventional portrait.
If you've taken the time to read it I suggest you try it, then try everything else and decide what works best for you.
Holistic Concepts for Lighting
and Digital Photography
This tutorial is copyrighted by © Charles E. Gardner.
It may be reproduced for personal use, and referenced by link, but please to not copy and post it to your site.
You can contact me at: Chuck Gardner
For other tutorials see the Tutorial Table of Contents