Studio size:
Finished 12 x 18 room in basement with an 8 ft. ceiling. A wet bar in the back keeps me hydrated but limits light placement and shooting options.
Camera Equipment:
Current cameras and lenses:
Canon 50D
Canon 20D
50mm f1.8
85mm f1.8
10-22mm f/3.5
24-70mm f/2.8 L
70-200mm f/2.8 L IS
Previous cameras (date purchased):
Minolta D7Hi (2001)
Kodak DC290 (1999)
Pentax WR90 (1997)
Nikon N8008 (1992)
Nikonos V (1985)
Minox B (1979)
Mamiya 645 (1978)
Rollei A110 (1975)
Rolleiflex f/2.8 (1972)
Nikon F (1970), Nikon Ftn (1970)
NikonosII (1969)
Hot Shoe Flashes:
Canon 580ex (2)
Stroboframe Flip Bracket
DIY refection-diffusers
Vivitar 283 and 285HVs w. Wien optical triggers
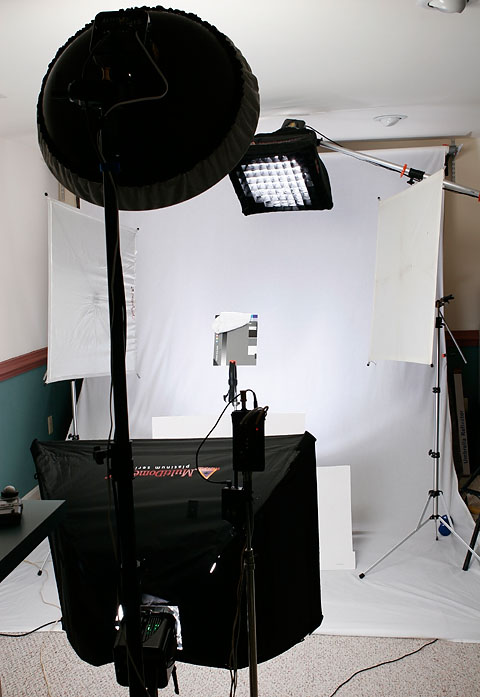
Studio Lighting Equipment:
- Flash heads:
- 4 - Alien Bee 800s
- Flash head modifiers:
- Large Photoflex Multidome Q3 (louver, masks), Medium Photoflex Multidome Q3 (louver, masks), Small Photoflex Multidome Q3 (circle mask, 40-degree fabric grid), Alien Bee 22" Dish w. sock, White umbrella, 10-20-30-40 degree grids, AB barn doors, AB modifier base (holds filters / barndoors), assorted gels.
- Light Stands:
- 3 - Alien Bee 13', 2 - Bogen 8', 3-6' generic, 1- AB background light stand:
- Light Path Modifiers:
- White and silver fabric folding reflectors, assorted DIY flags and gobos
- Backgrounds and supports:
- White muslin, hand painted low-key muslin, black king sheet
- Light Measurement:
- Sekonic L-358, Kodak grey card, QPCards, Kodak color separation guides, white towel.
- Accessories:
- Alien Bee wired remote, Pocket Wizard transmitter / receivier
Background
I got interesting in photography in high school in the late 1960s as a way to document my SCUBA diving adventures. In college I taught myself the zone system and did my first remunerative work in photo journalism for school publications. I also did an independent study spending a semester in rural Wisconsin documenting an off-campus "Farm Term" program. I quit college after two years and moved to Washington, D.C. to find a job in photography, landing one with renowned wedding photographer Monte Zucker. I learned a great deal from Monte but got an even better opportunity two year later, working in the photo labs at National Geographic. There I became immersed in the technical aspects of photography and process control. My experience there led to an offer to teach a college class on technical photography and then into a career in printing management. By age 30 I was in the U.S. Foreign Service working as production manager of the USIA printing operation in Manila, Philippines. For the next 25 years I moved back and forth between Washington and Manila every few years. I retired from the Foreign Service in 2007, but still work for the State Dept. on a part-time basis.
After leaving Monte creative photography became an avocation, not a vocation, which waxed and waned over the years. The the late 1970s I was able equip a darkroom and bought a medium format camera to renew my interest in the B&W zone system, but was forced to put that gear in storage a few years later when my job at USIA sent me overseas. I served three tours in Manila and renewed my interest in diving and underwater photography. I didn't do much above water photography again until 2000 after getting my first digital camera. About the same time I started getting actively involved on Internet fora, mostly to offer advice to others not as far along on the learning curve.
I never had the desire to do photography as a side business because I didn't have the time, was making a good living with the day job, and had other more interesting things to do with my free time. Over the years I continued to use the techniques I learned from Monte - window lit portrait and dual flash candids - and never had a need for studio lighting equipment. But in 2004 after finally buying a house with space for a small home studio I decided to by a set of studio lights to expand my lighting options.
My experience makes me every knowledgable but my goals and needs are rather simple and studio space limited, on par with most hobbyists on a limited budget. Those things where factors in my equipment choices.
I noticed that Alien Bees flash heads were recommended other brand for their value and the outstanding customer service. But there were equally strong caveats about the quality of the stands and modifiers. What tipped the balance towards the Bees for me was a web page written by an electrical engineer who took his Bees apart to analyze their construction. He concluded the design very solid and quite brilliant in some respects.
There were cheaper options and more expensive ones but the ABs represented the best value for my needs, and the AB folks have provided excellent customer service; even replacing the cover for my beauty dish for free when I mistakenly tossed it out with the shipping box.
AB400 would have been adequate for my needs but I opted to buy AB800s, justifying the extra cost as insurance against finding I needed something more powerful later.
I followed the general consensus to steer clear of the AB softboxes, opting for Photoflex Multidome Q3 Med and Large for key and fill on dark backgrounds. I don't have space for full length or evenly lit white background so I didn't even consider using umbrellas but bought one anyway to experiment with. I also bought the set of 4 grids, barn doors and holder (modifier base) ABs sells and AB speed rings which are half the price of the ones Photoflex mades.
The Photoflex SBs have more features than I really need (I've yet to use the silver or gold inserts) but are better constructed than those sold by AB, easier to disassemble and adequate for any need I can foresee in the future. More expensive but a better overall value. The also have a wide variety of compatible accessories.
My only regret was opting for the 13' AB stands instead of the Bogen-Manfrotto which were the general consensus in my research. The AB stands are adequate, but the 90 degree pinch locks for the extensions are not as good as the Bogen tangential pinch collars and the walls of the tubes are quite thin and prone to sticking if dented. I already had a couple 8' Bogens and was able to compare after getting the ABs. The ABs would be fine if you don't plan to break them down and transport them a lot. The Bogens are nearly 2x the cost, but a better long term value. I got the 13' stands not so much for the height, but the stability of the wider base when use a big SB or boom. The AB 13' stand has a 42" diameter footprint.
I opted for the AB boom for the hair light. The boom attaches to a 13' stand and is a PITA to adjust, but I don't adjust it much. A wall-mount Bogen boom my an alternative I considered but I didn't want to put any holes the the finished wall to mount it.
The AB background light stand has a very small base and is easily bumped over if not weighted down. After knocking over for the umpteenth time I kicked it behind the background and haven't seen it since.
I bought the wired remote because my space is small, I don't move my lights much and I didn't want the hassle of five sets of batteries to keep everything running. It controls the power via telephone extension cords and connects to a Pocket Wizard receiver. That combination allows me to trigger all the lights with a single set of Pocket Wizards.
I bought a Sekonic L-358 meter. It is a fine tool exposure and ratios and adding the Pocket Wizard module made it more convenient to "rough-in" the lighting. But I rely on the camera feedback for the final, critical decisions on exposure and base lighting ratios on the way they look and whether they match the context of the age and gender of the subject and the message implied by the mood of the lighting.
The cost to equip my home studio was about $2,500. A little more than my $2,000 budget target but I wanted all the things I needed to experiment and learn how the studio gear corrollates to my daylight and dual-strobe experience. I approach things systematically not by trial and error so with a bit of testing I discovered what each modifier was capable of at various distances and was up and running.
Initially I just bought a king size black flat sheet at Walmart for $15 to use as a backdrop. I later bought 7 yards of 9' wide white muslin to use as a white backdrop and another 7 to paint my a low-key background with latex paint. I built my own wall mounted background holder from a pair of shelf brackets, 2" PVC pipe, and expandable plugs that plumbers use in the PVC pipe to pressure test it. I works OK to hold them but the winding them up is a bit of a chore. In retrospect I should have bought the Bogen roller system.
With my initial set up I did low key background portraits using the Med. SB with a circle mask as fill and the large SB neat the camera for fill. The circle mask on the key light creates a nice vignette and round catchlight. For the hair light I used a 10 degree metal grid, but the low ceiling made it difficult to position for tall standing subjects. I used a 40 degree grid for the background. Shots on white backgrounds proved to be problematical due to the small space. I had trouble lighting the background evenly and controlling flare. Even with the dark background I found I had to flag the shadow side of the subject due to bounce off the wall.
There was discussion on the lighting forum about beauty dishes so I decided to buy one from AB to try it out. I also bought small Photoflex AB and 40 degree egg crate grid to try as a hair light because I didn't like the hard specular look of the metal grid. The color was cooler than the key and fill, and the reflections too specular.
When I received the new gear the first thing I did was a comparison test between the dish and medium SB with the mask. I posted the test on DPR to get second opinions on the difference I saw (not all that much). It may have been due to the test protocol, using the dish at the same distance as the SB. But
I didn't see any reason to switch from using the med. SB as key for the dark backgrounds I use due to the spill issue alone. But I discovered the the dish was ideal as neutral fill in my small space. I could position it right over the lens with a regular light stand. The large SB found a new home in the corner, reserved for groups and the occasional white background shot I do.
I liked the look of the small Q3 with a fabric grid as a hair light but positioning it under the 8' ceiling is next to impossible for standing subjects. I suggested to the wife that we move the studio to the upstairs family room with the 12' ceiling but she vetoed the idea.
I'd been shooting with my Minolta D7Hi. It's 28-200mm equivalent lens was a good fit for doing portraits but its small sensor gave it too much DOF and a minimum aperture of only f/9. I found I had to use a 8x (-3 stop) neutral density filter to shoot at f/4 - f/5.6. Fortunately Canon lauched the 20D at the 8MP / $1,500 resolution/price point I'd been waiting for so I jumped whole hog into DSLR land buying all but the 10-22mm, only because it wasn't available. Fortunately I made a wise career choice 30 years ago and have a day job which can accommodate large spikes in the AmEx bill.
Equipment Recommendations for beginners?
When advising beginners I suggest buying whatever they will get the most use out of. Everyone wants to learn studio portraiture and have a set of studio lights, but unless a person is shooting professionally they will quickly exhaust the supply of willing subjects. Also, doing studio work with limited space and marginal tools can become frustrating. Space is the most significant problem. For flattering lighting on faces the lights must be placed overhead. A ceiling height of 10' is a minimum and 12' more more is even better. Full length standing shots and white backgrounds require a minimum of 20' x 40' to get the lighting even and the perspective looking natural. If you don't have that kind of space think about scaling back your expectations and lighting needs.
Based on personal experience I think photographer starting with no lighting gear will get more use and value out of a set of hot shoe flash than a set of studio lights. I use my Canon Flashes 10x more than my studio gear. For learning the basics of lighting all that is really needed is a window; that is how I learned portraiture from Monte Zucker, who in the 1970s used window light for all his formal portraits.
If you do opt for studio lighting sit down and make a list of everything you think is needed for a four-light configuration and how much you are willing to spend over a period of a year or so. Then shop for the brand flash head you find fits your needs and budget. There's no need to by all the modifiers at once and better isn't better. I suggest starting with a medium 24 x 36 softbox for the key light because it makes the key light easy to control the key light with a minimum of spill. It isn't a traditional usage but I think a "beauty" dish makes a great neutral fill source. The light is diffuse and the catchlight (which you need to retouch out) is very small. Add a white umbrella with black liner as an optional fill source So the SB and dish can be interchanged as key light as needed and you'll be able to handle a wide variety of lighting situations. Hold off on purchasing of the monster soft- and octoboxes until you learn to control the small ones and reach the limit of what they can do for you. And if you don't have a 10-12 foot ceiling forget about using a boom and hair light. Instead use a snoot an bounce the light off a spot on the ceiling behind the subject on the key light side.
Holistic Concepts for Lighting
and Digital Photography
This tutorial is copyrighted by © Charles E. Gardner.
It may be reproduced for personal use, and referenced by link, but please to not copy and post it to your site.
You can contact me at: Chuck Gardner
For other tutorials see the Tutorial Table of Contents