There are four basic roles a source performs in portraiture:
Key Light: Creates the highlight pattern on the face
Fill Light: Illuminates the shadows not hit by the key light
Background Light: Controls contrast between subject and background to
create the illusion of depth
Backlight Accent (aka hair light): Creates separation between subject and
background defining its overall shape and reveals detail in areas other than
the face.
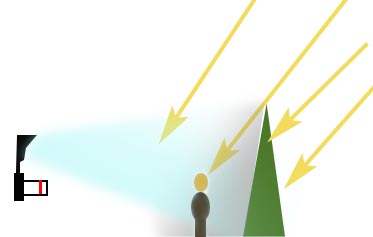
The ambient light outdoors usually performs 2-3 of them at all times.
Its always illuminating the background and providing some fill from light
bouncing off the sky wrapping around the subject's face. The direct rays
of the sun can either be used directly or diffused with a scrim as key
light, or as back-rim light. Direct sun as a key light doesn't work well for
the simple reason it makes the subject squint, so its more often used as
backlight unless the photographer has a phalanx of assistants to hold sail-like
scrims to diffuse it.
Exposure Control Outdoors
Outdoors when flash is used there are two exposures to control. The
ambient light which is not affected by camera /subject distance and the
flash exposure which changes with the distance of subject and flash.
Flash duration is so short it is not affected by camera shutter speed,
which allows the background ambient exposure to be controlled with the
camera shutter /aperture / ISO speed, while the flash lit foreground
exposure is controlled via flash power.
The ability to control background and foreground lighting independently
offers many creative possibilities, but there are some technical limitations
the photographer must be aware of and work around.
The X-sync limit for flash
A DSLR camera has a focal plane shutter consisting of two moving
curtains. When the shutter is pressed the first curtain opens exposing
the sensor, then a second curtain closes to end the exposure. It takes
the curtains about 1/400th sec. to cross the sensor. The flash can't be
triggered until the first curtain is completely open, and the second curtain
can't start closing while the flash is firing. That physical limit inherent in
the design of the shutter limits shutter speed with conventional flash to
1/200 or 1/250th for most cameras and 1/500th for pro-level cameras.
Indoors the shutter limit, called "x-sync speed" is never encountered
because the ambient light levels are low. But outdoors on a sunny day,
shooting at ISO 100, a camera with an x-sync limit of 1/250th sec. will
require an f/stop of about f/11 to obtain correctly exposed highlights.
Shooting at f/11 present to problems, one technical and the other
creative. The technical problem with regard to flash is that it takes a lot
of flash power to get past the small aperture. The creative problem is
that f/11 creates a relatively large zone that is in focus, which for
portraiture can result is unwanted detail in the background.
Camera manufacturers discovered a way to get around the x-sync limit
with their hot shoe flashes by creating a mode which pulses the flash
rapidly, turning it into a continuous source. But here
we will assume a conventional "one-pop-per-exposure" flash is being used. I have a tutorial on high speed FP mode flash in the Canon flash section
Control the Ambient Exposure First
Common sense should tell you that if you start with an ambient exposure
which is blowing the highlights, adding flash on top of the ambient will
blow them even more. A problem conceptually with learning flash is that
most ambient only photos taken outdoors have blown highlights and
photographers have come to accept that as "normal".
The dilemma of the photographic process, both color film and digital, is
that the recording medium can't record the full range of detail of an
outdoor scene. An outdoor scene typically has a range of brightness of
10-12 stops. Some, such as cross-lit scenes of snow or sand may have a
range of 15 stops. Digital camera can record a range of about 7 stops
with detail.
So faced with an ambient only lighting situations of 10 stops the
exposure can be set to preserve highlight detail, which will make mid-tones
such as faces in shadow look too dark and cause shadow detail to be lost,
or set so the faces are exposed normally (i.e., as seen by eye) and letting
less important parts of the photo such as the sky or small highlights get
blown out without any detail.
Photographers who use ambient light only will usually do the latter, keying
the exposure to the most important thing in the photo - the face in a
portrait - so it looks normal. That works in most cases because the
human visual system only focuses on what is in the center 2-degrees of
our vision, twice the width of a thumb held at arms length, and mentally
tunes out the rest.
Taking the harsh direct sun out of the equation of lighting a face allows the flash to complement rather than fight the sun, making it a more effective solution for flattering lighting outdoors.
Adding flash to the ambient lighting allows a photographer to overcome
the technical limitation of the short range sensor by changing the
contrast of the scene to fit the range of the sensor. But that can only be
done when the camera is aimed into the shadow side of the ambient
lighting. That is an important concept to grasp because it explains why
some flash strategies are effective and natural looking and others are
ineffective and artificial looking. The cause and effect is related to how
the flash changes the contrast of the lighting. Shooting into the shadows
of the ambient light allows the flash to lift the areas it hits without
affecting the exposure of the sunlit parts.
Shooting into the Shadows
Flash can only reduce contrast of the ambient lighting if does not overlap
the ambient lighting. A common situation illustrates this. Put a person
in direct sun with it hitting their face and the angle of the sun will usually
cause the brow to shade the eyes. When the exposure is set to keep the
highlights from clipping the camera can record detail in the eye. If flash
fill is added in that situation it will lift the shadows and highlights equally,
blowing the highlights as it opens the shadows. Shortening the shutter
speed (up to the x-sync limit) would get the highlights back down below
clipping, but it will also cut the amount of sky fill that was illuminating the
eyes. If more flash is added to open the eyes again, the highlights get
blown again. What happens in that situation is flash replaces the ambient
light, but doesn't reduce the contrast range of the ambient light because
the flash affects highlights and shadows equally.
Photography has many such technical dilemmas where the solution is
either to change the orientation of the subject to the light, or completely
overpower the ambient light with flash. Overpowering direct sun requires
a great deal of power and also results in backgrounds which are
underexposed and darker than normal. That look is currently in vogue,
but from a practical standpoint the simpler solution to the dilemma is to
put the sun at the back of the subject and keep the direct sun off the front of the
subject entirely, using one ore more flashes to illuminate the face.
When the back of the subject is towards the sun the sun becomes the accent light and how the flashes must be used to light a face in a flattering way is similar to lighting a face with flash indoor. The only difference is the assist from the light coming down from the sky wrapping around the subject which assists both the key and fill flashes. Taking the harsh direct sun out of the equation of lighting a face allows the flash to complement rather than fight the sun, making it a more effective solution for flattering lighting outdoors.
Sunny 16 / Shady 5.6
There is a rule of thumb for outdoor exposure which says that correct
exposure in direct sun will be obtained if the camera is set to f/16 at a
shutter speed equal to 1/ ISO speed. So at ISO 100 and f/16 the shutter
speed needed for a correctly exposed sunlit subject would be 1/1OOth
sec. Because the sun is constant that rule of thumb is pretty accurate
wherever the sun shines. Equally constant is the fact the shaded side of
the face will always have three stops less light.
Natural light has two components: direct light from the sun and reflected
light from the sky from the opposite direction. When a subject is placed
with there back to the sun exposure must be set to the prevent the sun
lit parts from blowing out, with the flash then used to raise the - 3 stop
shady side up to a level which is slightly darker.
Perception vs Meter Readings
When setting lights for a photo the goals should be based on the
perception the lighting creates compared to how the same scene would
be seen in person. When we look at a backlit subject in person you'd
normally expect the shaded side to be a bit darker that the sunlit parts.
So when adding flash to the front the goal should be a good perceptual
match, not an exact match of intensities in the scene of making the
meter readings the same on the back lit by the sun and the front lit by
the flash.
The perception of the ideal balance for the frontal flash will vary greatly,
depending on the relative sizes of the foreground subject and background
in the photo and the tone of the background. The amount of fill used for
a shot of a subject on a sunny beach would look grossly overfilled if the
same amount was used against a dark background. In the same way if
the subject is very large in the photo with very little background
perception of the photo will be based on how the face looks, but in a
wider shot the exposure of the background will influence the perception
of the lighting of the subject.
Finding the right balance is a creative judgement call the photographer
must train their eye to make. Back in the days before digital it took a
great deal of experimentation and experience (or lots of Polaroid test
shots) to make those judgements. Today you simply need to look at the
playback to see how whether or not not balance of flash to ambient is
natural, matching what is perceived by eye.
Situational Awareness of the Ambient Light
It is the direction of light that defines shape. Things look shapeless in
flat lighting because there are no shadows. Its actually the shadows
which provide most the clues in a photo the brain uses to match the
pattern of contrast with the memory of a real 3D object.
In most photographic situations light comes from more than one
direction. Outdoors the dominant direction is dictated by where the sun
is in the sky, but there is also soft light from the sky wrapping around the
subject. Indoors the dominant direction comes from the lighting fixtures,
but there is also varying degrees of wrap around fill created by refection
off ceiling and walls.
Before adding flash to a scene its important to have situational awareness
of the ambient light. What is its dominant direction? What if any natural
fill is the there? What is its color temperature? Does the color
temperature of the indirect fill match the direct light? Are there any
external factors such as foliage affecting the color of the light?
When you train yourself to run down that pre-flight check list before
shooting you will notice things which will inform your lighting strategy.
Very quickly those things will become ingrained in your intuitive
situational awareness.
You will notice that even when a subject is standing in open shade the
eye sockets will be shaded because the light illuminating the face, while
coming from the fill reflecting from the sky is hitting the face from such a
steep angle that the brow is shading it, just as it does when a face is in
direct light. Direction of the light is just as critical in open shade as it is in
direct sun. As with a face in direct sun adding flash will not solve that
problem because it will hit both the highlights and shadows equally.
The solution for shaded eye sockets for a face in direct sun is to get the
face out of the direct sun. The solution for shaded eye sockets in
indirect lighting is to raise the face up into the light so it reaches the
eyes. Raising the face into the light requires the camera also to be
raised to maintain a flattering above the nose view of the face. The
most valuable "lighting" tool you can have on an outdoor shoot is a small
step ladder.
Posing a person under a tree results in the ambient light having a green
color cast from the foliage. You usually will not see it in person because
your eyes will adapt to it. Many don't even notice it in the photos, but
the will notice the skin tones look flat and gray. The root cause of the
problem is that pink skin under green light looks gray. Adding flash to
that situation makes it worse because then there is a mixture of color
temps. If camera white balance is set to match the ambient light using a
custom white balance off a gray card the flash lit parts will have an
opposite magenta cast. If the color balance is set to the flash the
ambient lit shadows will have a greenish cast. As with other photographic
dilemmas the best strategy is to avoid the problem entirely by finding a
location where there are trees in the background but the subject is not
standing under them. The same situational awareness of color
temperature effects is need if posing subjects next to painted or brick
walls, brightly hued cars, etc.
Face and Clothing - What Contrasts the Most With the Background Will
gets the Most Attention
As with indoors portraiture one of the primary goals outdoors is to make
the face contrast strongly from the overall tone of the background and
clothing. Since clothing is the biggest potential distraction from the face
and bare arms and shoulder the next biggest, the tone and style of the
clothing dictate what the most effective background will be. Light
clothing and bare shoulders and arms will distract from the face on a dark
background but will barely be noticed on a light one. Conversely a black
dress or shirt on a light background will distract from the face on a light
one.
Indoors you'd solve the problem of distracting clothing by changing the
background to match and complement the tone of the clothing.
Outdoors it is possible to find light and dark backgrounds at most
locations. In the US the sun is always to the South as it tracks East to
West so dark backgrounds can be found on the north side of trees or
buildings and light ones on the south side where they are illuminated
directly by the sun.
For a person wearing dark clothing an ideal location is one where the
background is in its own shade but the subject is out in the direct sun,
placed at their back as back-rim lighting.
In that situation the sun
supplies the background light, accent light, and most of the fill that is
needed. All you need to do with flash is to raise the level of the fill a bit
and add a key light over the fill to create the "mask" pattern of highlights
on the face which defines its 3D shape in the mind of the viewer.
If a person is wearing light clothing the ideal location is one which is
similar in tone so the clothing and background blend together.
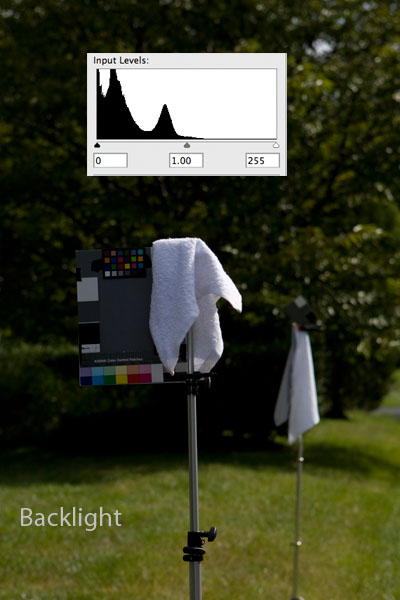
When a subject is placed with their back to the sun exposure in the
camera must be set so the sun lit highlights are below clipping to retain
detail.
As mentioned previously when that is done in a digital camera is
that the middle tones of the face will be rendered much darker than our
eyes would see the same lighting. That's due in part because our eyes
adapt their exposure to whatever part of the scene they are looking at
and the brain, stitching those snippets of scene together makes us
perceive the scene is more evenly exposed than it actually is. When a
backlit scene is correctly exposed for the highlights the front of the
subject will look grossly underexposed:
The underexposed foreground is a result of the camera only having a
range of detail of 6-7 stops while a sunlit scene has a 10-12 stop range
of lighting with the shady side about 3 stops below the sunlit side. There
is lots of soft diffuse fill which completely wraps around the face of the
subject, but its too dark for the camera's limit range to record it as our
eyes perceive in person so it wind up not looking "normal" in the photo.
So on the basic level what flash tries to do is to overcome the technical
limit of the sensor to raise the shadows in the range in the photo which
matches our expectation based on real life experience of what lighting in
that situation looks like.
The Flash Becomes the Key Light, Not Fill
When flash is added to the front of a backlit head it creates a highlight
pattern on the face on top of the sky fill. The areas the flash doesn't hit
only get illuminated by the sky. Thus the flash is performing the same
role the key light would indoors: creating the highlight "mask" which
defines the shape of the face. Realizing that distinction, that the flash is
the key light, is important because it will help you understand where a
single flash used outdoors needs to be positioned relative to the face and
when a second flash is needed.
The reason many flash shots look fake isn't due to the level of illumination
on the front of the subject but rather from the fact the flash is too low
relative to the face. Our brains are accustomed to seeing faces
illuminated by overhead light sources: the sun and sky outdoors and
ceiling lighting fixtures indoors. So when adding a single flash to that
ambient backlit subject you'll need to position it the same place you put
the key light indoors.
Facial Angle dictates Most Flattering Lighting Pattern
In the simplest terms people are flattered in photos when the facial angle
to the camera and the lighting pattern combine to make the face look
slim and symmetrical. The angle and lighting pattern need to complement
each other to do that.
The facial angle determines where the key light must be place. It can be
placed anywhere, but will produce the most flattering results when it
illuminates both eyes and models the shape of the face naturally making
the face look symmetrical and slim.
If the subject is full face to the camera you'll get a very flattering and
complementary symmetrical lighting pattern on it by simply raising the
flash above the camera, keeping the light aligned with their nose so the
shadows fall down (i.e. butterfly pattern). What you wind up with is the
highlights created by the flash illuminating the both eyes and the mouth
with a minimum of distracting shadows. The most distracting shadow,
the one from the nose, falls down and hides itself under the nose if the
camera angle is high enough to hide the nostrils.
Outdoors a full face butterfly pattern can be executed effectively with
one light. A single hot shoe flash raised on a bracket with a diffuser will
suffice. Without any additional fill source the shadows will be quite dark
due to the 8:1 difference between the sunlit highlights and sky lit
shadows the flash doesn't hit, but there aren't many shadows and those
on both sides of the face will tend to make the face look slimmer than a
full face view in flat light.
The Catch-22 of a full face pose is that it is only the most flattering angle
for subjects like models who have naturally slim and symmetrical faces. If
the face isn't slim or symmetrical that will be most obvious in the full face
view with symmetrical lighting. Its possible to use short lighting with a
full face view to compensate for asymmetry. Perceptually the brighter
part of the face in a short lit face will look slightly larger than the shaded
side so by putting the key light the narrower side of the face the two
sides can be made to look more even.
An oblique facial angle with short lighting is also a good strategy for wide
or asymmetrical faces look slim. Because the brain focuses on the
highlighted parts of the face and tunes out the shadow side its tricked
into thinking the face is slim and symmetrical. To pull of that optical
illusion the photographer needs to first select the camera angle which
makes the far side of the face appear in balance with the near side, then
arrange the key light to the face so only the front of it is illuminated.
Adding a Second Flash
With a flash near the camera an oblique facial angle will result in the light
hitting the broad side of the face. To highlight the front of the face the
key light must be moved off axis around behind the face so it only hits
the front of the face - the center of interest of a portrait.
Aiming the off camera light is actually rather simple, even when there are
no modeling lights. By standing behind the light as its is moved, putting
the stand between your eyes and the face of the subject, you will see
where the light will hit. What you don't see from behind the light will be
in the shadow of the key light.
The problem using only a single flash outdoors and moving it off axis is
that the fill from the sky which illuminate the side of the face towards the
camera will be about three-stops darker than the highlights created on
face with the flash. That's a very harsh 8:1 lighting ratio.
What many seem to do in that situation with a single flash used off axis is
overexpose the ambient to let the highlights clip, which also raises the
sky fill by the same amount. The problem with that approach is that the
blown highlights and nuclear halo in the hair can become undesirable
distractions from the face - the desired center of interest.
The better strategy, from the technical standpoint, is to correctly expose
the ambient lit highlights to keep them below clipping then augment the
sky fill with a fill flash from the direction of the camera to keep it
"neutral" and shadowless.
Adding a fill source over the camera allows the photographer to lift the
8:1 ambient sun-key / shadow-side ratio to whatever ratio the mood of
the shot calls for. He has the option to use minimal fill to maintain the
harsh moody look of the contrasty natural light, or open the shadows
almost to the point of matching the key light to create a flattering soft
look for women and children. With a fill source on the camera the
photographer has more creative control over the mood and character of
the lighting because the tone of the shadows can be manipulated.
Exposure
When flash is used effectively outdoors there is no need to blow any
highlights for the sake of making the shadows and mid-tones lighter.
First set the shutter at the x-sync speed, then find whatever f/stop it
takes to keep the sun hitting the back of the subject from clipping. The
easiest way to do this is visually using the overexposure warning in the
camera playback.
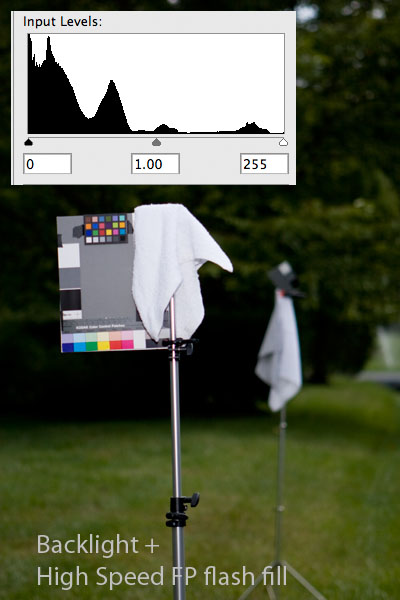
A very easy visual way to determine when that ideal point of exposure is
reached is to have the subject hold a white towel next to their face in the
test shots. Adjust the aperture until the sunlit parts of the towel are 1/3
stop below clipping in the playback.
When the ambient exposure is correct, turn on the flash and again using
the white towel next to the face adjust flash power until the shaded, flash
-lit parts are also about 1/3 stop below clipping in the overexposure
warning.
At that point the balance between the flash and ambient becomes a
judgement call. Both the sunlit and flash lit parts of the towel - a proxy
for the highlights on the subject - should both be below clipping, but
perceptually the flash lit "shadow side" should be slightly darker for it to
look "normal".
The net result will be a photo in which there is detail in all tones of the
subject in the foreground from brightest highlight to darkest shadow. If a
bride and groom were photographed that way there would be detail in the
bride's dress and the groom's black suit because the flash,
complementing the natural light (instead of fighting it) altered the
contrast range of the foreground to match the limited range of the
camera.
Learning to use the sun as backlight, the simplest outdoor strategy, isn't
the only one, but its a good baseline for evaluating the effectiveness of
everything else. By the time it is mastered you will hopefully learn
enough about the cause and effect of mixing ambient and flash to figure
out for yourself when other things you try work better or not.
Equipment Choices
Beginners tend to throw equipment and money at problems they don't
fully understand. As you develop situational awareness of the ambient
lighting outdoors --which simply requires looking around and thinking
about what you are seeing and what roles the ambient light is playing --
you will likely find ways to achieve desired results with less equipment.
On the most basic level making a photo effective is mostly a function of
deciding what is most important then finding ways to make it contrast in
tone, color, sharpness, size, etc. with everything else. Sometimes the
best solution to make the face the contrasting center of attention is
simply to change backgrounds to one which makes the clothing less
distracting.
Within the face we want the most attention focused on the
eyes and mouth, not a brightly lit ear or a nose with a long dark shadow
hanging off of it. A subject in backlight from the sun will usually have
darker eye sockets because the fill from the sky is shaded by the brows
making them wind up being darker than other parts of the face. If you
want attention in a portrait on the eyes you need to make them the
brightest area on the face so the first step before adding any flash would
be to raise the face of the subject into the light and stand on a ladder to
take the portrait from a flattering facial angle.
Most lighting equipment choices are a compromise between budget,
quality and character of the light, and convenience. The choices are
subjective and everyone needs to find their own balance point. Some
might find it necessary to haul a 7 foot octobox and 50 lbs of sandbags
needed to keep it from blowing away up a mountain to overpower the sun
to get the lighting they desire while others might tackle the same task by
using the ambient light to full advantage augmented with a pair of hot
shoe flashes. Only you can decide what works best for you and how
much you want to spend.
The best way to understand the cause and effect of combining ambient
light and and flash outdoors is to experiment, starting with direct flash
then add progressively larger modifiers and noting how the character of
the lighting changes.
The biggest difference outdoors vs indoors with the backlit scenario is
how the wrap around fill supplied by the sky augments whatever flash you
add. Where its necessary to use large diffusers on the lights indoors to
create diffuse light, outdoors the subject is surrounded on all sides by
God's own softbox, the sky. If you experiment using flash outdoors you
will find that because the foundation of sky fill is very diffuse you can get
very soft looking lighting with no modifiers at all.
If you experiment with progressively larger modifiers outdoors you will see
the most significant visible effects are the specular character of the
brightest highlights and the size and shape of the catchlights: direct flash
is more likely to produce hot spots if skin is oily or damp, while more
diffuse modified sources will produce more diffuse highlights. At some
point you'll find a balance between all the gear you need to haul and the
visible difference in the results it produces that meets you personal needs
and standards.
|