Digital Exposure
Digital exposure and dynamic range is pretty simple to understand. Nominally correct exposure occurs at the point where the brightest textured highlights in a scene are reproduced correctly, white with texture, and any more exposure would result in a loss of texture. It is very easy to nail your exposures at that exact point by the simple expedient of including a white terry washcloth or towel in your test exposures. When the texture is retained and any more exposure would obliterate it the file is correctly exposed. When the towel is reproduced correctly everything else down to the limit of the sensor will be and the maximum range of the sensor will be utilized. You can see the texture in the enlarged playback, the towel will usually create a visible spike on the right side of the histogram, and when correctly exposed for RAW the very brightest parts of it will be blacked out in the overexposure warning.
So throw in the towel, increase exposure until you see the first indication of overexposure in it with the OEW and bingo - perfect exposure. For a margin of error for shot-to-shot variation back off 1/3 stop which is easily corrected in post processing. So there's really no excuse for ever blowing a highlight if you just learn to use the evaluation tools the camera provides.
What is the range of the sensor? That is quite easy to determine with just your camera, a gray card, and a fast lens. First do a custom WB on the card. Then bracket exposures with the card filling the entire viewfinder in one stop increments starting with the lens wide open at a shutter speed which reproduces the gray card as white. What can be determined using the histogram and overexposure warning. As you stop down the lens the spike on the histogram from the card will march left across the LCD. If you start at with a fast f/1.4 lens by the time you've stopped down to f/22 the spike will usually be on the left edge or beyond.
Open the files in Photoshop and cut / paste the patches of tone from each - which will vary from white to black -- into a fascimile of your camera histogram and you wind up with a map of how exposure and tone relate to each other and the highlight exposure point.
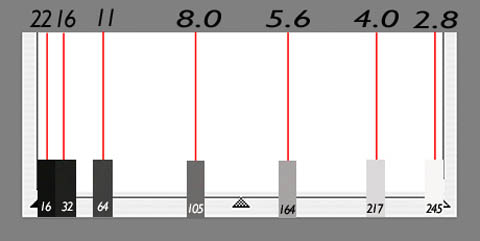
Six stops is about the same as color negative film and more that color transparency film. It is much shorter than black and white negative film which can be manipulated with its development to record scenes with 12 or more stop ranges.
A typical outdoor sunlit scene will have about a 10 stop range. That means that with digital about 3 stops of detail are lost in the shadows.But the more you understand about what attracts the eye in a photo the more you will realize that contrast plays a very large role. In a predominantly low-key scene the eye will be attracted like a magnet to steel to the brightest area in the scene. Thus the darker the shadows are the more effective they are at "pushing" the viewer towards what is really important in the photo. Too much shadow detail has the potential of pulling the eye of the viewer off what is really important to go check out some trivial detail.
In practical terms the 3 stop DR deficit is no big deal. If you want to pretend you are Ansel Adams and record detail in every crevice of every rock in Yosemite then put your camera on a tripod, expose a file normally for the highlights, then slow down the shutter by three stops and take another. Copy and paste the overexposed file on top of the normal one. Add a black mask. Erase the mask where more shadow detail than the normal shot has is desired. Dead simple... No need for spot meters, HDR software, etc. Takes about 5 min. and the only skill required is dragging a mouse using the eraser tool.
If you have a flash on the camera or are in the studio the limited range of a digital sensor is no big deal either. The whole point of using a key and neutral (over camera) fill arrangement is to control the overall highlight / shadow contrast of the scene. That is done with the fill light which is why it should be over the camera where it can illuminate everything the camera sees.
Getting the most out of a digital camera distills down to exposing the file so the highlight detail is just below the point where the detail would be lost with any more exposure. Where the shadow detail will disappear will vary depending on the camera sensor range. If the scene you are photograhing exceeds that range there are two solutions:
1) Add flash: Adding flash will effectively reduce the range of the scene so it fits the range of the camera.
2) Bracket and Blend: A typical outdoor scene will exceed the range of most cameras by about three f/stops. Place the camera on a tripod and shoot two exposures: one normal for the highlight and a second overexposed by 3 stops to record the detail which is lost in the first. Change exposure using shutter speed not aperture so there is no change in depth of field between the two shots. In Photoshop copy and paste the second file over the first and add a black mask. Erase the mask in the areas where more shadow detail is needed.
Holistic Concepts for Lighting
and Digital Photography
This tutorial is copyrighted by © Charles E. Gardner. It may be reproduced for personal use, and referenced by link, but please to not copy and post it to your site.
You can contact me at: Chuck Gardner
For other tutorials see the Tutorial Table of Contents