TTL E-TTL E-TTL-II ?
Through The Lens metering, of TTL is a generic term used to describe any camera which uses an internal metering system to control exposure in an automatic or partially automatic way. Canon used "TTL" to describe the metering system it is film cameras, then designated the metering in early digital cameras as "E-TTL". The newest generation (since the 20D) have ""E-TTL-II" metering. The goal of this tutorial is to explain the difference and they affect the operation of the Canon flashes.
Ambient (non-flash) Exposure
A pixel (sensor site) of a digital camera is very much like a bucket. When the shutter of the camera opens and exposes the sensor to light photons fill the pixel buckets. Not all of pixels get filled at the same rate. Those in the shadows of the image fill slowly. Those in the highlights fill very rapidly. The rub, as they say, is that the camera can't see the buckets filling up to turn off the tap by closing the shutter. The camera CMOS sensor doesn't dump the buckets to record the data until after the shutter closes. The camera determines how to expose based on light measured on the viewfinder before the shutter is opened. During the exposure the viewfinder is blacked-out by the camera mirror.
In the middle of every lens there is an adjustable aperture which controls the amount of light which reaches the sensor. If we look into a lens the aperture will not be seen because digital cameras keep it retracted in the fully open position at all times except when the image is actually being recorded. If you want to see what the aperture in your lens looks likes set it in M mode to f/16 and 1 second, look into the lens and press the shutter.
The f/number for an aperture is actually the actual diameter of the opening divided by the focal length of the lens. The f/system was devised so a photographer didn't need to worry about such details. All that is really necessary is to learn the progression of f/stops which cut the amount of light in half with each incremental step. Although few f/1 lenses have ever been made, that is were the series starts. This is the progression of full-stops:
1, 1.4, 2, 2.8, 4, 5.6, 8, 11, 16, 22, 32, 45...
What confuses some neophytes is that today's digital cameras allow adjustments in 1/3 stops. Some think a click of the adjustment wheel from say f/8 to f/9 is a full stop when it is actually 1/3 stop. The next full stop after f/8 is f/11. Memorize those numbers if you have not already.
Together the speed of the shutter and the aperture are used to control exposure for creative purposes. Most frequently the photographer will first select the f/stop needed to produce the desired depth of focus (i.e. depth of field) to keep both the subject and background sharp (e.g. f/11) or keep the subject sharply focused but blur a distracting background (e.g. f/2.8) to make the subject contrast and allow the camera to select the shutter speed needed for correct exposure (Av mode). To freeze (e.g. 1/2000th sec) or blur (1 sec) moving action the photographer will instead first select the shutter speed and let the camera select the aperture needed for correct exposure (Tv mode). There is a third variable, the ISO speed, which affects exposure. The photographer will usually use the lowest ISO possible (e.g. ISO 100) because the image quality is better, and only raise it when working in low levels of light.
Flash Exposure
The duration of a flash is very short. When the shutter button is pressed the first of two curtains opens. The flash fires, then a second curtain follows the first to end the exposure. Shutter speeds faster than about 1/250th (varies depending on camera) do not give the flash time to fire before the shutter starts to close. If that speed, referred to as the "x-sync" speed is exceeded one side of the photo will be blacked out by the shadow of the second rapidly moving shutter curtain.
Flash power is regulated with a simple electronic on/off switch. Thus the difference between the "Full" power manual setting of "1/1" and "1/128" a Canon 580ex flash isn't the brightness of the flash burst, but how long it lasts.
How the Camera Controls Exposure
AMBIENT:Regardless of whether the camera is in M, Tv, Av or any of the other modes the start and end of the AMBIENT (i.e., sun or room light) exposure is done via the shutter. Either the photographer decides in advance what speed to use (M and Tv modes) or the camera decides how much time is needed (Av, P).
FLASH:Regardless of camera mode the amount of flash light reflecting from the subject is used by the camera metering system to instruct the flash to flip the "off" switch.
Film vs Digital Camera Metering systems
With the first automatic systems the shutter would open and a photocell would trigger it to close when enough light was received. In most cases the measurement was done from light reflected off the surface of the film as it was exposed. As in-camera metering evolved more and more sensor cells or zones were used. Since photographers tend to put the more important stuff in the center, more sensors would be placed there resulting in "center weighted" control of exposure. Spot metering would revert to a single sensor measuring a small circle in the center of the viewfinder.
The advent of digital caused Canon to rethink the metering process. The sensor did not lend itself to real time control based on light reflected during the exposure, so Canon changed the entire system to meter off the viewfinder instead. But that created a new problem, how to measure the flash which only fired after the shutter opened. Early flash systems solved the problem by putting the sensor in the flash not the camera (e.g. Vivitar 283, 285HV). Canon and others solve the problem by using a "pre" flash before the shutter opened to measure the flash intensity.
Now with that background it is easier to understand the evolution of Canon flash from TTL to E-TTL to E-TTL-II:
TTL: Metering in earlier Canon film cameras was done using light reflected off the film when the shutter opened exposing it. Canon designates these cameras "Type B" and calls the metering "TTL". TTL is also a generic term applied to any camera or flash which utilizes "through the lens" metering.The earlier EZ series of flashes were designed to work with TTL film cameras; they will not work with digital cameras. However the Canon 580ex can be made backward compatible with TTL "Type B" cameras by setting its C.FN 03 to "1".
E-TTL: DSLR cameras prior to the 20D meter exposure using light from the viewfinder in the camera. A multi-zone sensor above the viewfinder reads the light prior to the shutter opening. When flash is used the pre-flash occurs when the shutter button is half-pressed to lock focus. The main flash occurs just after the shutter button is fully depressed and the shutter opens. On camera bodies with E-TTL metering the active AF point is used when calculating the amount of flash needed. The time lag between pre-flash and main flash may produce unpredictable results if the camera is focused on one spot to lock focus, then moved to recompose the shot before the button is fully pressed. This practice, which is necessary when using the center AF, can lead to erratic flash exposures. For E-TTL "Digic" era cameras Canon recommends moving the AF rather than recomposing or using Flash Exposure Lock (FEL) which unlinks the focusing and pre-flash.
E-TTL II: The 20D and more recent cameras with Digic II processors use an exposure method designated as E-TTL II. E-TTLII flash exposure has two modes: evaluative and averaging. When the shutter button is fully depressed,The E-TTLII system takes an ambient reading (separate from the one controlling the shutter in Av mode) then fires the pre-flash which allows it to meter and compare both ambient and pre-flash in the split second before the shutter opens and the main burst of flash fires. E-TTLII also uses focus distance information transmitted by some USM lenses to determine flash power, but only if the flash is used directly in the 0° horizontal position. When the flash head is tilted for bouncing or diffuser use there is no longer any direct correlation between distance and exposure and the metering relies entirely on the comparison of the ambient and pre-flash at full shutter press over the 35 or more metering zones on the viewfinder.
When a camera is used in Av mode with E-TTLII flash just turning on the flash will cause the indicated shutter speed as if the metering anticipates the flash will overlap and clip ambient highlights correctly exposed before the flash was turned on. But the metering used to set the shutter in Av mode is not linked to flash metering.
When set at the "out-of-the-box" defaults the half press of the shutter in locks both focus and ambient exposure (AF/AE lock). In Av mode the the shutter speed is determined and locked before full-press of the shutter which takes another ambient reading then fires the pre-flash for comparison. That can result in incorrect exposures if the photographer uses the center AF point and recomposes after locking focus. For example if focus and shutter speed are locked in a dark area and then the camera is recomposed to a lighter one the shutter speed will be based on the darker area. The flash exposure, based on comparison of a second ambient reading at full shutter press and the pre-flash occurring immediately after it will meter flash based on the recomposed scene. The net effect will be gross overexposure because the AE lock in the darker area will cause the shutter to drag and overexpose the ambient, even if no flash were added.
I suspect that Canon engineers thought that the introduction of selectable focus points would break photographers of the habit of using the center AF point with focus-recompose but it didn't, in part because the center AF point is the most sensitive on many cameras. Exposure errors with flash due to focus-recompose can be minimized three ways:
1) Use the camera in M mode with flash: Using M mode eliminates the variable of camera control of the ambient exposure
2) Separate AF and AE lock: By using a Custom Function the AF lock can be moved to the * or AF-ON button of the camera. That allows the photographer to lock AF with * then recompose without also locking the ambient exposure and shutter. After the camera is recomposed the shutter is half-pressed to set shutter speed in Av mode, then fully-pressed to initiate the flash metering and take the photo. The ambient and flash metering will both be done on the same scene the camera captures. That will eliminate focus-recompose induced exposure errors but not necessarily ensure correct exposure. See my tutorial on using flash outdoors for an explanation why.
3) Use M mode for camera and flash: In many static situations such as portraits or product shots more consistent results can be obtained by using manual mode on the camera to control the shutter and ambient exposure of the background and manual flash power settings to control the exposure of the flash lit foreground. Once exposure is set based on the playback clipping warning it will remain consistent unless the ambient light level or the flash-subject distance changes.
All EX series flashes are E-TTLII compatible. The 580ex flash will detect whether the camera body uses E-TTL or E-TTL-II and switch automatically. There is a two-way "handshake" between camera and flash to sort out how to operate. As mentioned above the Canon 580ex can also be made backward compatible with TTL "Type B" film cameras by setting its C.FN 03 to "1".
The flash relies on the camera body to do the metering and instruct it how long to fire. The accuracy of the flash exposure will vary with the price and sophistication of the camera body. Cheaper cameras have less sophisticated metering so its just not realistic for a Rebel to be as good as an EOS 1. But the gap performance is continually getting narrower. The 20D, 30D, 400D and 5D all have 35 metering zones which are compared when evaluative metering (the default) is used.
The display on the 580ex will show "ETTL" regardless of whether E-TTL or E-TTL-II is actually in use. Don't worry about it. Do not change C.FN 03 to "1" (TTL) on a digital camera just because you read somewhere you should be using "TTL" mode. Remember TTL is a generic term for metering through the lens.
A Test of E-TTL II Exposure Modes - 20D
There are two different metering modes for E-TTL II flash - Evaluative and Average - which on the 20D are selected via Custom Function 14. The 20D also has three metering modes for ambient light: Evaluative, Partial, and Center-Weighted. How they relate to each other during an exposure is not explained by Canon so I did a test comparing the different combinations.
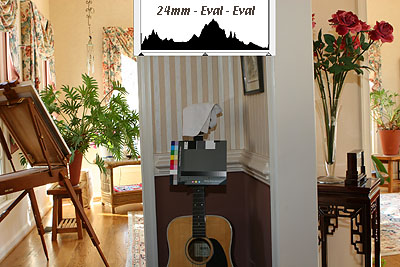
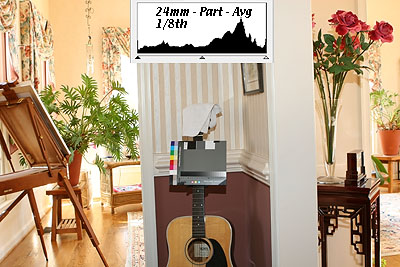
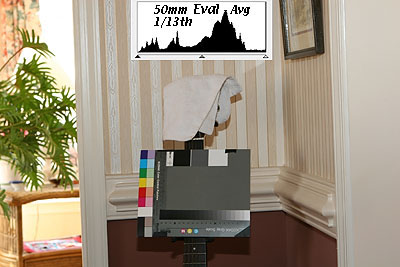
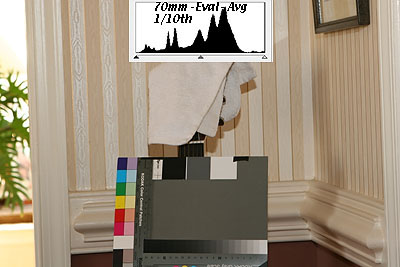
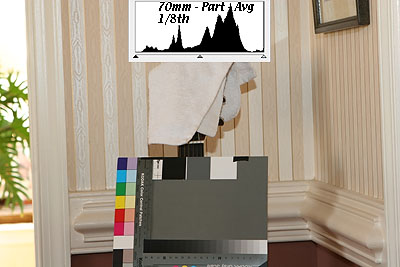
I set up a difficult lighting situation with bright ambient light on either side of a guitar sitting in a corner. I placed a white towel and gray card in the scene for a reference and shot it at 24mm, 50mm, and 70mm focal lengths so the bright background light would have more or less influence on the exposures. I used my 20D in Av mode at f/5.6 at ISO100 with EC set to zero (0). Flash lighting was provided by a single 580ex mounted on a Stroboframe bracket in normal direct zooming mode with FEC set to zero (0).
The purpose of the test was to compare the complex interaction combined ambient / flash metering variables from the camera's "zero" baseline. I normally use M mode on the camera when using flash indoord but if M mode was used for this test the ambient part of the camera's metering wouldn't have been a factor in the outcome and that is what I wanted to examine.
The camera baseline is zero EV and zero FEC. I wanted to see how well the camera would handle a difficult scene at those default "out of the box" settings with Evaluative Ambient / Evaluative Flash metering, and what if any difference the other non default modes metering and flash modes would have. Thus the initial goal wasn't a perfect exposure, only to see how close the camera would come to one with zero EV and FEC in the various metering modes. None of them got it right.
The 18 different combinations are shown below in the montage below.
Click it to open a larger version in a new window.

These are the same photos as in the montage:
Camera metering: Evaluative / E-TTL Mode: Evaluative
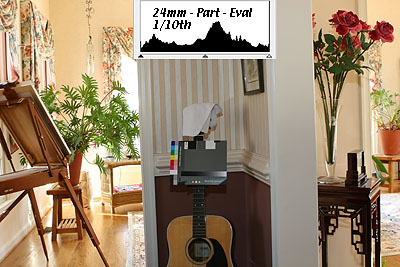
Camera metering: Partial / E-TTL Mode: Evaluative
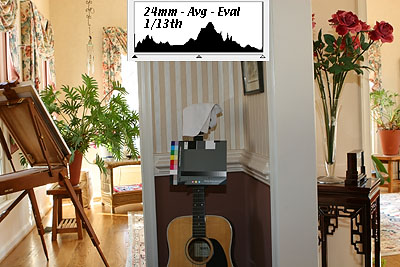
Camera metering: Center Weighted / E-TTL Mode: Evaluative
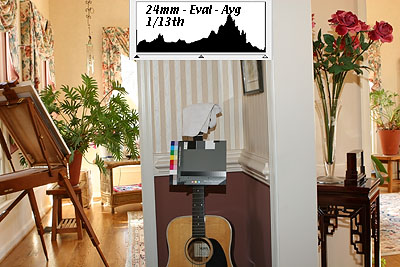
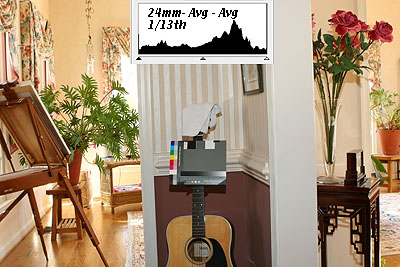
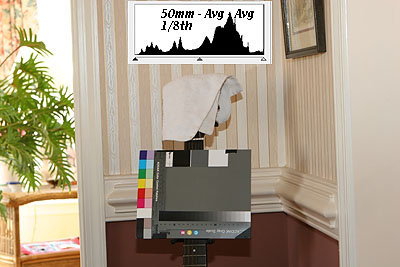
Camera metering: Evaluative / E-TTL Mode: Average
Camera metering: Partial / E-TTL Mode: Average
Camera metering: Center Weighted / E-TTL Mode: Average
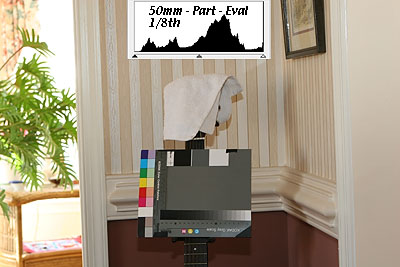
Camera metering: Evaluative / E-TTL Mode: Evaluative

Camera metering: Partial / E-TTL Mode: Evaluative
Camera metering: Center Weighted / E-TTL Mode: Evaluative
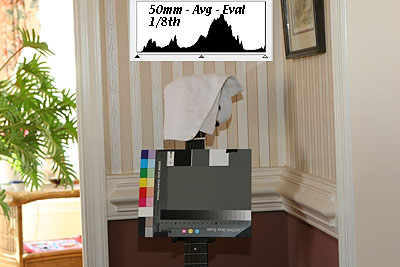
Camera metering: Evaluative / E-TTL Mode: Average
Camera metering: Partial / E-TTL Mode: Average

Camera metering: Center Weighted / E-TTL Mode: Average
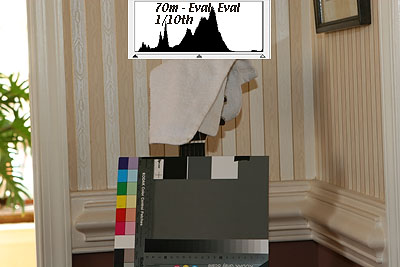
Camera metering: Evaluative / E-TTL Mode: Evaluative
Camera metering: Partial / E-TTL Mode: Evaluative

Camera metering: Center Weighted / E-TTL Mode: Evaluative
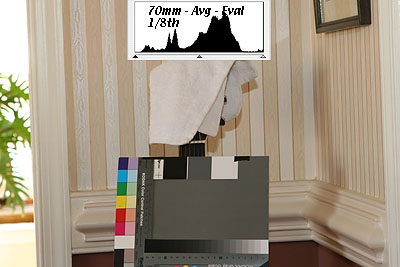
Camera metering: Evaluative / E-TTL Mode: Average
Camera metering: Partial / E-TTL Mode: Average
Camera metering: Center Weighted / E-TTL Mode: Average

Evaluation of the Test:
The average E-TTL II mode shots are a bit brighter overall and it the flash lit foreground but they also blow more of the background detail. Evaluative seems to do a slightly better job on the background. The underexposed foreground is a function of the FEC being set to 0 and something which is easily correctable via evaluation during shooting.
The eyedropper reading on the white patch of the QPCard show partial and center weighted metered shots in both of the E-TTL II flash modes have slightly more exposure than the evaluative metered shots. Partial is the brightest by a few points over center-weighted. It would appear that the darker area in the center influenced the exposure triggering the output of more flash to compensate for the fact it was darker. But while the metering mode does appear to have some effect, it does not appear to be different enough to really worry about in an actual shooting situations involving ambient and flash. The evaluative flash metering did a better job of exposing the highlights in the ambient background but also underexposed the flash lit foreground. The average flash metering made the images brighter overall, but at the expense of the highlight detail.
The shutter speed varied from 1/13th to 1/6th is a full one-stop difference in exposure. The reason is wasn't as apparent the test shots as it would be in an ambient only exposure is because the flash was illuminating the foreground almost identically in each shot. That causes us to not notice the variation the shutter speed had on the ambient lit right and left sides unless we look at them closely.
The evaluative metered shots at 1/13th didn't preserve the highlight detail in the right side of the photo. Average and center-weighted metering changed the shutter to 1/6th which brightened the ambient component blowing the highlights on the right side worse than evaluative metering. But the goal of the test wasn't a perfect photo but rather to see how the camera interpreted the scene in different exposure modes at zero EC and FEC. The different metering modes weighted the exposure differently. The center section was darker, so partial and center-weighted lengthen the time to from the 1/13th in the evaluative shots because it was trying to expose the darker center section correctly. But the metering also reacted to the increased ambient level when calculating how much flash was needed. There was no way to measure the actual flash output but we can infer since one more stop of ambient light reflected from the guitar but the exposure stayed the same, more or less, than less flash must have been used. In that respect the camera reacted exactly as I though it would.
My conclusion is that: 1) None of the modes can expose that type of scene correctly at EC=0 and FEC=0; 2) Regardless of the meter mode used I'd still need to use EC and FEC adjustments to get everything balance, and;3) In my view evaluative preserved more background detail.
Lighting is so situational I think the best approach is to pick one mode and work from its baseline rather than constantly jumping between the 6 different combinations. Overall I feel evaluative is the best choice. It may not appear to be in this test, but I am influenced more by the its better rendering of the background. Keep in mind that the test was done with FEC = 0.
After the comparison test I did a FEC bracket test at 24mm, 50mm, and 70mm with Evaluative Metering / Evaluative Flash with my DIY diffuser on the flash and found that FEC = +1 stop yielded the best foreground /background balance. That is consistent with the results I've been getting, aiming for about 240 in the towel and white patch on the QPCard. This shot is pretty good balance if the flash lit foreground with the ambient lit background. The right side is blown out, but that's a result of keeping the EC at zero rather than changing another variable.
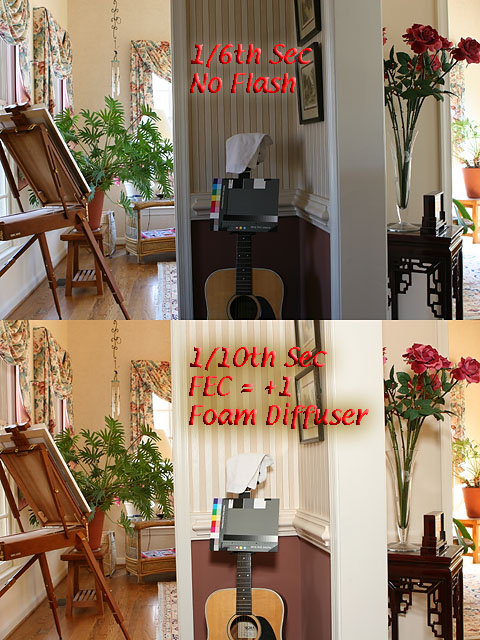
The FEC correction of +1 corrected the foreground but the camera set on its default baseline of EC=0 is overexposing the right edge of this very difficult to meter scene. That is to be expected with the center of the photo being much darker than the edges because I was using evaluative metering which will tend to discount brighter highlights on the edges. I reshot the test scene the next day. Overnight we got 6 inches of snow and it was overcast instead of sunny which accounts for the difference in exposure and color balance. I bracketed and found that on that day a -1 EC adjustment got rid of the blown highlight on the right. I also decided to reduce the FEC a bit to make the middle a bit darker, reducing it to +2/3 stop. This was the result:
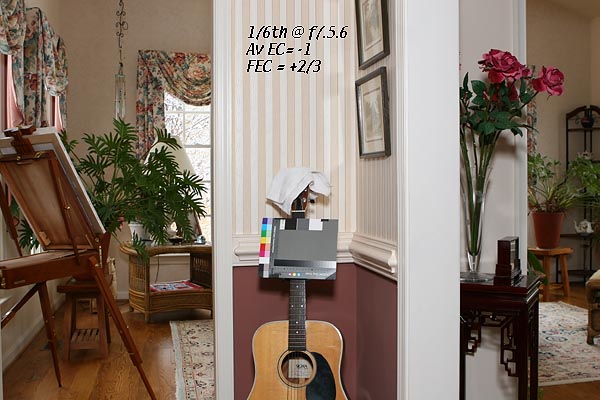
Overall I feel it is a good seamless match of flash and ambient for a shot where the subject in the foreground such as the guitar in the intended center of interest. Even the detail on the snow covered trees outside the window was retained. Making the flash lit foreground a bit brighter than the background makes it more visually dominant than the background which is there mainly for context. Hopefully it isn't immediately obvious flash was used. If the towel and card were not in the photo there would be few shadows to provide clues flash was used. Putting the flash on a bracket 12" above the lens throws the shadows on the body of the guitar down and out of sight behind it.
The steps I took to get a well balanced ambient / flash shot illustrates how we should realistically expect TTL exposure to work. It will never be 100% perfect when set at the camera defaults and no two scenes will require the same adjustments. We just need to shoot, evaluate using playback and histogram (i.e., chimping) and make creative decisions regarding how to override the camera's "best shot" at getting everything in the frame exposed correctly.
How I Shoot
I find the best approach is to shoot and adjust from the camera's baseline. All TTL (through the lens) exposure systems involve the camera guessing and then the photographer "second" guessing via EC (in Av mode - shutter speed if in M) and FEC adjustments if flash is used.
Since I paid lots of money for a camera with sophisticated metering I figure it makes good sense to use it. So I keep my camera in its most intelligent mode - evaluative metering - for ambient and flash. When encountering a new lighting situation I will first set EC and FEC to zero if using Av mode. If using flash indoors I set the camera to M, shutter to 1/125th, and aperture to f/5.6. That is my baseline for seeing how the camera will expose the scene. Starting from the same "zero" baseline makes it easier to evaluate the results of the first test shot.
Camera set, I just point and shoot a test shot then look at the playback in info mode where the histogram and overexposure (blackout) warning is visible. It is very easy to tell from the playback what if any adjustments are required. Knowing how to read a histogram I can usually make one adjustment and get exposure "nominal" for the scene.
When possible I toss a crumpled up white towel in the scene near what needs to be perfectly exposed (i.e. the face in a portrait). The texture in the towel provides visual feedback on under/overexposure. When its brightest parts start to black out (overexposure warning) in the playback I know from testing that exposure is optimal for RAW capture. If shooting JPG I know from experience to reduce exposure by 1/3 stop when I see the warning. Its very simple and takes only a few seconds -- test shot - evaluate - adjust EC and FEC.
Summary
Just keep in mind that no exposure system is full automatic and capable of getting the exposure right 100% of the time by default. The camera can only evaluate light levels, not what is most important in the scene. That might seem to be an argument for using spot metering, but the less the camera measures the more the photographer is required to know about how the exposure metering works.
Remember it's all guess / second-guess regardless of what metering mode is used. I know a great deal about how exposure meters and the Canon cameras work, yet I prefer to let the camera take its "best shot " at getting the exposure correct and the adjust from that baseline because I find is a faster and more consistent path to the correct exposure.
How the camera will react to a given situation is difficult to predict because the logic behind the decisions is not well documented. But the camera will react to the same type of scene in a consistent way which becomes predictable once you gain experience. The only way to clearly see how the camera is reacting is to work from its "zero" baseline of zero EC and FEC. For example, by shooting indoors from the zero FEC baseline in M mode (1/125th @ f/5.6 @ ISO 100) with the towel as an exposure guide it will become very obvious very quickly how much FEC is needed to obtain a correct indoor exposure with flash.
Click here for the Table of Contents for my other tutorials specific to Canon Flash
Holistic Concepts for Lighting
and Digital Photography
This tutorial is copyrighted by © Charles E. Gardner. It may be reproduced for personal use, and referenced by link, but please to not copy and post it to your site.
You can contact me at: Chuck Gardner
For other tutorials see the Tutorial Table of Contents