with studio lighting
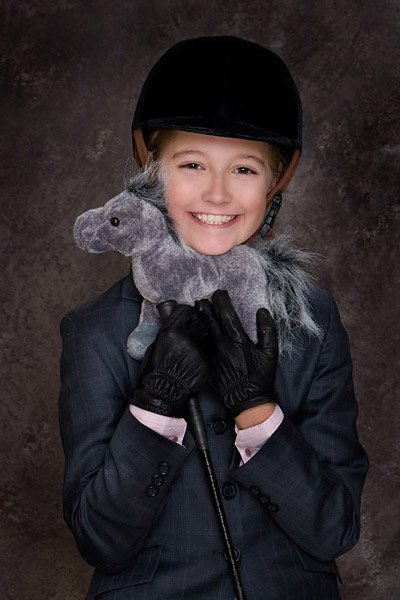
In conventional portraiture the goal is flattering the subject by finding the combination of facial angle and lighting on the face which makes them most attractive. There are a infinite variety of combinations which are possible but as a starting baseline the easiest lighting strategy for a beginner to master is an oblique pose with short lighting on a dark background. Short lighting isn't always the best strategy, or the only one that you should ever use, but learning how to execute it effectively is a very flattering baseline which can be compared with other lighting strategies you wild explore later. Short lighting on a dark background is also the easiest technique to master because both the lighting and the posing are obvious and intuitive.
Stop and consider what makes a face look attractive in a photo. Two important elements are symmetry and slimness in the appearance of the face. Although the face is actually turned broad side to the camera in an oblique facial angle, short lighting, by highlighting only the front part of the face, tricks the brain of the viewer into focusing only on the highlighted area and mentally tuning out the shaded side of the face. The net effect is a face which is perceived to be slim and symmetrical.
The shape of a person's face dictates the lighting pattern which which will be most flattering. For that reason I don't teach lighting patterns by rote or what they are called beyond the generic categories: short, broad, butterfly. Instead I'd like you to understand the broader goals of the exercise which are to:
- Guide the viewer to the front of the face with contrast: On a dark background putting the highlights on the parts of the face you want the viewer to see and then hiding everything else in the shadows to varying degrees will make the front of the face the star of the show in same way a spotlight on a stage does. The deeper the shadows the more the distractions are hidden and the easier it is for the viewer to find what is really important
in the photo; the expression created by the more brightly lit the eyes and mouth. Its pretty obvious strategy once we think
about it in terms of the broader goal of guiding the viewer the face and holding attention there.
- Model the face with a natural 3-dimensional appearance: Our perceptual baseline for "looks normal" is formed by pattern of highlight and shadow created by light which comes from overhead. One of the characteristics of most flattering lighting patterns is a downward direction of the light which places highlights on the top surfaces of the chin, cheeks and chin and shadows below. Our brains, programmed from birth by seeing things around us illuminated that way outdoors and indoors will react to downward patterns and being more natural. When artificial lighting looks unnatural and "fake" most often the reason is that the angle of the light relative to the face is too low. The strongest illusion of 3D in a photo is created by putting the strongest "key" light behind and to the side of an object, but with human portraits the need to get light in the recessed eyes dictates the need to place the "key" light in front and above the face to get light in the eyes and create natural 3D modeling.
- Trigger the desired emotional reaction in the mind of the viewer: There is no "right" or "wrong" way to light a face. But if we start with a clear understanding of how you want the viewer to react, we can objectively determine whether the lighting of the portrait effectively meets the goals and criteria we have set. Eye contract is an very important aspect of body language when be meeting a stranger. In person we can detect movement, and if a person diverts their eyes and avoids eye contact it sends a different message than direct eye lock. In a photo that same body language is convey by whether or not the eyes are well illuminated and looking into the camera.
The Raw Materials - Recognizing Prime Facial Angles
The first thing a builder does before erecting a house is create a solid, level foundation. In a portrait finding the most flattering camera angle is foundational because without an attractive angle to the camera the net effect of even the best executed lighting pattern will be diminished. Some camera angles will be more flattering than others, and if the goal is to flatter the subject then its common sense to start out with the most flattering angle to the camera. There are five "primary" facial angles which will, combined with a complementary lighting pattern, make a face appear symmetrical: 1) profile facing left 2) oblique facing left, 3) full face, 4) oblique facing right, 5) profile facing right.
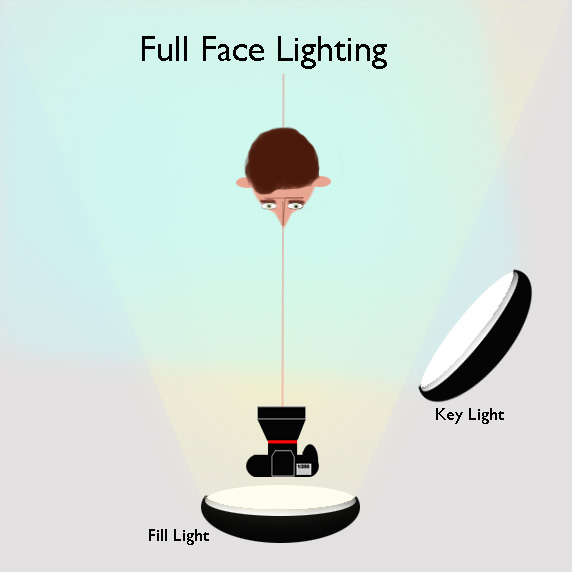
In general the thinner a face looks the more attractive it will be perceived in the mind of the viewer. A face will always look wide when viewed full-face because the sides of the head are visible beyond the eye and the ears stick out to varying degrees if not covered by hair. A full-face pose isn't the most flattering for most people because their heads are wider behind the eyes than in front resulting in a wide oval or round appearance. Also, most faces are asymmetrical to some degree and a full face pose will make it obvious. In a full face view the eye sockets divide the front and rear parts of the face. Everything forward of the eye sockets is what needs to be highlighted and everything behind the eyes de-emphasized with the lighting strategy. One of the more attractive strategies for lighting a full face view is to use a centered strategy which places the "key" light which models the shape directly above the camera in-line with the nose so the symmetry of the lighting pattern complements the symmetry of the pose.
As a face slowly turns sideways to the camera its appearance changes. One side of the head and ear visible beyond the eye disappears from view and the indentation of the eye socket and the rounded shape of the far cheek comes into view creating a compound curve from eye to chin which is more
attractive than the oval full-face shape. When the head is turned too far away from the camera the far side of the face will start to disappear and the tip of nose may sticks out past the cheek line. There is no "perfect" angle because faces have different shapes. Finding the most flattering oblique angle is judgment call based on finding a good visual balance between the eye and cheek and the appearance of the chin on the far side. But most cases the subject's nose winds up pointing 45 degrees to the right or left of the camera axis. This view is called "Oblique" and is the most flattering for most facial types because it reveals the shape of the face. There are two oblique angles: facing right and facing left. When a face isn't perfectly symmetrical one direction will usually be more flattering than the other. Discovering which is most attractive is simply a matter of looking at both of them and using your judgement: look at the cheekbone and the line formed from eye-to-chin.
The Role, Goals and Basic Tools of Lighting
The goals for lighting are two-fold: 1) create contrast between face and background to lead the viewer to the face, and 2) model the natural 3D shape of the face. If you have read the COI for THOU tutorial will realize that on a holistic level the contrast of the face and background can be controlled by selecting a background with makes the clothing non-distracting. Here we are focusing on using a dark background so you will want to dress your subject in solid tone clothing which is darker than the face, but a bit lighter than the background. The second goal, modeling the face naturally is a function of key light placement relative to the face. When lighting a face I think of the bridge of the nose between the eyes as "ground zero" and measure the position of the lights relative to the that spot rather than the camera axis. This differs from most lighting texts, but more logically describes the cause and effect of what the key light does.
Key Light Position - the natural model for lighting: The model for natural light is what occurs outdoors where the sun and sky are overhead. Our brains are conditioned to seeing faces and objects lit from a downward angle so it follows that to create natural looking artificial lighting we would be wise to mimic what occurs in nature and put our light sources above the heads of our subjects. There are always two sources of lighting outdoors and indoors: dominant (key) and subordinate (fill). Most beginners only consciously recognize the role of the dominant "key" in creating the highlights on faces and objects, but the ambient fill is also important because it is the tone of the shadows which creates the mood of the lighting which affects how the viewer will react emotionally to the content. The same pose will light and dark shadows will create a different reaction to the content.
Fill is a technical requirement: While the role of the key light is obvious to most the technical requirement for fill is not. To create a realistic reproduction of a scene or person the camera most capture detail accurately over the entire tonal range our perception expects to see. Unfortunately the camera cannot record the same range of tone we see in person. A digital file exposed outdoors or indoors with just a single key light for detail in all the highlights cannot record the shadow detail. It fit the range of the scene to the sensor it is necessary to first lift everything the camera sees with the fill up to the point the camera records detail in the darkest shadows. That fill is the foundation upon which the lighting ratio is built upon. The key light, and any others visible in a studio portrait will overlap the even fill to create brighter highlighted areas. Some advocate learning with one light but I suggest starting with two to overcome this most basic shortcoming of the photographic process.
Fill Location: The inclination of most beginners is to place the fill on the side opposite the key light. That seems logical but when placed to the side of the head it generally will overfill the shadow side ear making it an unwanted distraction or be shaded by the cheekbone resulting in dark voids on the face in creases where neither the key or fill reach. Putting the fill light near the camera axis will ensure that all shadows visible to the camera will be filled uniformly. There will be no dark voids and the fall off of the key light which creates the highlight to shadow tonal transitions will be smooth and uniform. The only situation when camera axis fill is not desirable is in a profile view, for the same reason its not a good idea to place it on the side in a full-face or oblique pose; it tends to overfills the side of the head. Camera axis fill will create a second catchlight in the middle of the pupil which gives the eyes a somewhat dazed look. It is easily
retouched with the paint brush or clone tool during editing. I have more detailed tutorials on Fill and Lighting Ratios you should read later.
Facial Angle and Lighting Working Together in an Oblique Pose
The head can be turned obliquely to the camera in two directions:
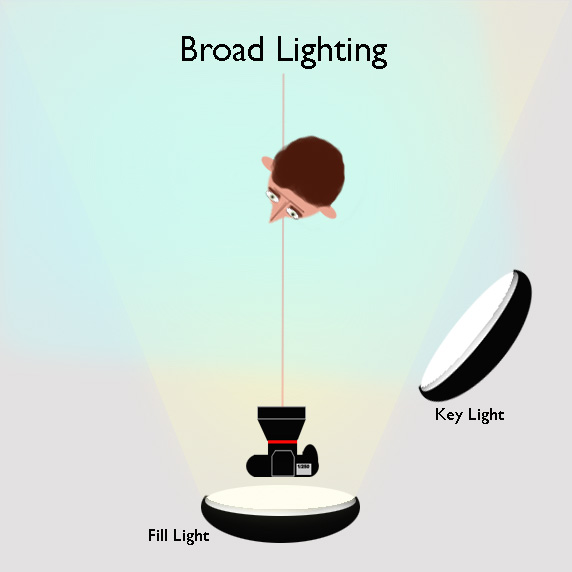
- Broad Lighting - Nose turned away from the key light:
Half of the face, the far side which is nicely profiled by the oblique angle, and one
eye fall into the shadow created by the nose hiding parts of the face you want the viewer to see. At the same time the side of the head and ear now visible to the camera is brightly lit by the key light, even more so than the highlighted half of the front of the face. The parts best hidden from view are instead spot lit. This is called broad lighting because the key light hits the broad side of the head (half of the front and all of the side).
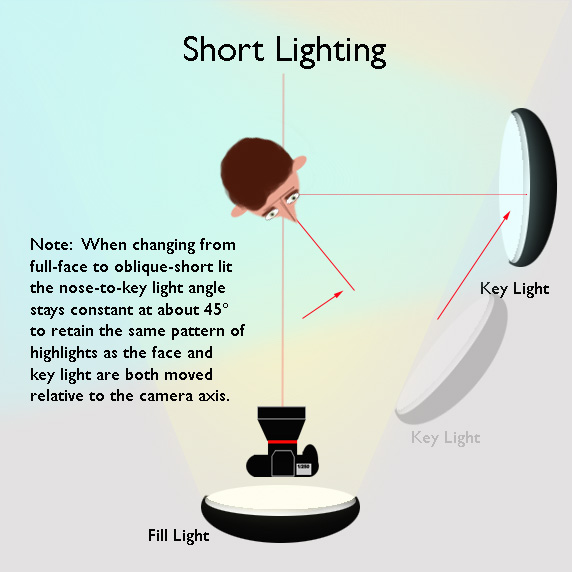
- Short-Lighting - Nose turned towards the key light:
The far side of the face profiled against the background is now the brightest lit area on the face creating maximum eye-catching contrast with the darker background. If the key light is moved around the face to where it is about 45 degrees from the center of the nose (90 from the camera axis) the highlight pattern it creates will illuminate both eyes, both cheekbones beneath them defining their shape, and the mouth (all very good things you want the viewer to see). When the key light is positioned so it only hits the front of the face (the part in front of the eyes) the broad side facing the camera the side of the head behind the eye sockets and all its distractions you want hidden will be fade into the shadows, The key light height will control where the nose shadow falls. Ideally it should fall down over the side of the nose and top of the nostril, not sideways on to the shadow side cheek and eye. The depth of the shadows is controlled by the fill light positioned near the camera axis. This is called short lighting because the short side of the face (i.e., the front of it) has the light on it.
Here are a few basic lighting exercises which will give you a good starting baseline.
1) Pose someone full face with key light at 45 degrees from nose and camera axis so the key light hit only the front of the face and fill near the camera. Use a subject with short hair on a dark background. The bigger the ears are the better for this test. For this exercise set the lights at the same strength if you have a flash meter and same power setting and distance if you don't have a meter.
If you are using window light see this tutorial for lighting diagrams.
2) Without changing the light positions turn the person away from the key light until the far side of the face and ear disappears from view. That's broad lighting.
3) Turn the person back past full face to the oblique view in the other direction, facing directly at the key light (which should still be 45 degrees off the camera axis). Now move the key light backwards so it is about 90 degrees to the camera and 45 degrees behind the centerline of the subjects nose. Adjust the key light so the side of the head facing the camera (everything past the eye socket) is in shadow and the shadow from the tip of the nose falls down over the top or over the shadow side nostril. That's short lighting.
Don't rely on the diagrams. Shoot the photos. Compare the appearance of the person in all three views. Which
is the most flattering to your eye? That's what counts, so you be the judge.
Extra Credit Assignments:

After you master the oblique, short lit pose try a
profile. Its the exact same key light pattern on the face as
full-face and oblique so you still keep the key light about 45
degrees to the side of the nose. The face and key light rotate
another 45 degrees relative to the camera axis. The fill moves
from near the camera, where it would overfill the side of the
head, to in front of the face where the fill will fall off gently
front-to-back relative to the front of the face making the side of
the head dark and increasing the attraction of the highlights on
the cheek and ridge of the nose. You want the side of the head
very dark with almost no fill because the highlight area
attracting the viewer to the front of the face is very small.
Half of the face, the far side which is nicely profiled by the oblique angle, and one eye fall into the shadow created by the nose hiding parts of the face you want the viewer to see. At the same time the side of the head and ear now visible to the camera is brightly lit by the key light, even more so than the highlighted half of the front of the face. The parts best hidden from view are instead spot lit. This is called broad lighting because the key light hits the broad side of the head (half of the front and all of the side).
The far side of the face profiled against the background is now the brightest lit area on the face creating maximum eye-catching contrast with the darker background. If the key light is moved around the face to where it is about 45 degrees from the center of the nose (90 from the camera axis) the highlight pattern it creates will illuminate both eyes, both cheekbones beneath them defining their shape, and the mouth (all very good things you want the viewer to see). When the key light is positioned so it only hits the front of the face (the part in front of the eyes) the broad side facing the camera the side of the head behind the eye sockets and all its distractions you want hidden will be fade into the shadows, The key light height will control where the nose shadow falls. Ideally it should fall down over the side of the nose and top of the nostril, not sideways on to the shadow side cheek and eye. The depth of the shadows is controlled by the fill light positioned near the camera axis. This is called short lighting because the short side of the face (i.e., the front of it) has the light on it.
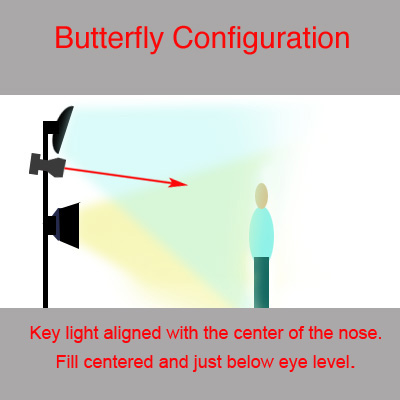
As mentioned in passing above a flattering strategy for a person who has a naturally slim and symmetrical face to use a full-face pose complemented by a centered lighting strategy, which is generically referred to as "butterfly" after the shape of the shadow cast under the nose. The key light is kept directly above the camera and the fill is placed at chin level with the camera shooting from between the two lights.
Raising a hot shoe flash on a bracket 12-18 inches above the lens of the camera creates the same centered "butterfly" strategy and is a simple but effective way to make candid portraits more flattering:
See this tutorial on butterfly lighting variables:
Link
Let's Recap:
Facial Angle: Full face usually isn't the most flattering angle for average faces, but look at it first, then compare both oblique views. Pick the most attractive angle.
Lighting: The facial angle to the camera and the tone of the background dictates which lighting strategies will be most effective for making the front of the face contrast with a dark background, and look slim and symmetrical.
If you are a beginner who has never done portraits you now have a
baseline to grow from creatively as you try different backgrounds
and lighting styles and something you know works to fall back on
when you start to get confused. And you will get confused; there
many variables to deal with and they change with each face,
background and clothing situation.
As you experiment you'll discover that the short lit oblique
strategy for dark backgrounds doesn't work as effectively on
white ones. That may confuse you at first, but remember the
thing that attracts the eye of the viewer isn't the light but
rather the contrast between the front of the face and everything
else in the photo. On a white background the brightly
lit front a short lit face will tend to disappear into the
background and the darker side of the head will attract more
attention. But if you use a lighting strategy which makes the
side of the head brighter than the front, the front will contrast
more than the side with the white in tone and color. You will have already
practiced one strategy for that in step #2 above; broad
lighting.
Here is a list of basic strategies I think are effective:
- Dark Background - Full Face: Centered (Key Light centered on nose)
- Dark Background - Oblique: Short Lighting (Facing Key Light)
- Dark Background - Profile: Short Lighting (Facing Key Light)
- Light Background - Full Face: Centered (Butterfly)
- Light Background - Oblique: Broad Lighting (Facing away from Key Light)
- Light Background - Profile: No effective strategy
You should notice that the strategy for oblique facial angles changes, depending on whether the background is light or dark. That is because the goal is to make the FRONT of the face CONTRAST. There is no effective strategy for a profile view on a white background, except perhaps for a silhouette.
I hope this starting baseline will help you up technique learning curve. If you always ask the following questions when faced with any new lighting problem you should be able to figure out the most effective lighting strategy by deduction:
- How do I want the viewer to react on an emotional level?
- What is most important to evoking that emotional reaction?
- How can I make what is most important contrast the most with the background
- What other potential distractions are in the photo and how can they be eliminated or mimimized?
Answer those questions and you'll be 80% of the
way towards delivering the message effectively.
Holistic Concepts for Lighting
and Digital Photography
This tutorial is copyrighted by © Charles E. Gardner. It may be reproduced for personal use, and referenced by link, but please to not copy and post it to your site.
You can contact me at: Chuck Gardner
For other tutorials see the Tutorial Table of Contents