I learned flash photography in the early 1970s working as Monte Zucker's full-time assistant. At that time Monte was already acknowledged as the one of the best wedding photographers on the planet. Monte got his reputation by introducing new lighting concepts to wedding photography, which at the time consisted of flat lit single flash photos with lots of gimicks like kalidascope prisms and smearing grease on the lens filter for a soft "misty" look. Monte's simple and elegant style used natural window lighting for formal portraits and short-lit dual-flash lighting for candids. The classic elegance of his portraits and dual flash "candids" was emulated by so many other professional photographers it is now considered to conventional to be cutting edge and trendy.
Monte's distinctive style was the result of using window light and a reflector for the formal posed shots and two battery operated flashes the location coverage at the reception which gave nearly every shot in a wedding album the same key/fill short lighting obtained in a studio. Back in the 1970s we used Graflex stobes with huge heavy battery packs. There was no TTL or automatic anything, but Monte developed a very simple technique of using two identical flashes making distance the variable which controlled both exposure and ratio.
Ironically, the passage of time has a habit of turning any revolutionary idea into the status quo which the next generation rebels against. Capturing "candid" action with flattering directional short lighting from two flashes has given way to lighting up an entire room like an overcast day with a tupperware diffuser on the hotshoe while the photographer fires away at 3 frames per second. They see "tupperware" diffusion devices as a way to free themselves from the burden of flash brackets and light stands. Some accepting their upside-down plastic cup as the Holy Grail never bother to try anything else and remain blissfully ignorant of how their lighting could be made more effective. Congratulations, if you are reading this you are probably not one of them.
Single Flash Limitations
A single direct hot shoe flash regardless of where it is positioned will create sharply defined dark shadows because the size of the light source is small and there is no secondary light source to "fill" and modulate the tone of the shadows.
A camera hot shoe locates a flash as close as possible to the lens axis to minimize shadows; just enough above the lens to prevent "red eye" reflections from the retinas of the person being photographed. That works OK in landscape mode, but when the camera is turned sideways into "portrait" orientation the flash moves down beside the lens which creates a harsh distracting shadows behind and to the side subject. Photographers learned to solve that shadow problem by raising the flash a foot or more directly above the lens with a bracket.
When a flash is raised directly above the lens, the head shadow falls down behind the shoulders out of sight. The potentially distracting nose shadow falls below the nose in a full face view or behind the nose in an oblique view where is it barely noticed.
Diffusion Cap or Bracket - Which method is best?
There is a great deal of discussion on net forums about diffusion devices and thousands of people who seem willing to throw $20 to $100 at problem many really don't understand. They confuse soft room-filling non-directional light with good lighting, not realizing that good lighting requires precise and predictable control over both the direction and character of the light.
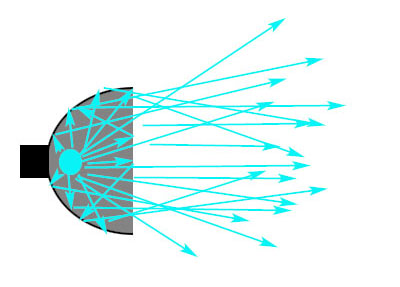
Diffusion of photographic light sources is characterized by the rate of transition at the highlight/shadow borders. In simpler terms, how sharp or hard the shadows appear.
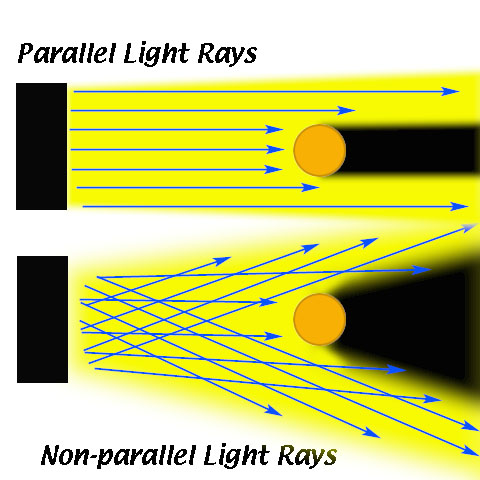
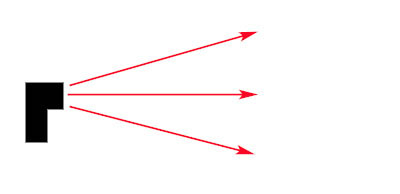
As illustrated above what actually determines how diffuse the shadow borders are is now parallel the light is when it hits the object creating the shadows. With photographic light sources two variables affect how parallel the light rays are when striking an object: the size of the the light source and its distance to the object casting the shadow. At the same distance a light source with a larger area will produce softer shadow borders. If the distance of the larger source is increases the shadows become more distinct. At the point where the large source, because it is further away, appears to be about the same size as the smaller, closer one the character of the shadows produced by each will be about the same. The combined effect of distance and size is often referred to as "apparent size".
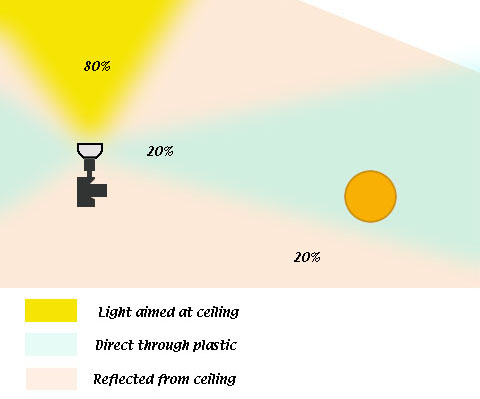
Plastic cap diffusers are designed to split the light from a single flash in two directions. Because the flash is aimed upward at an angle most of the light is bounced off the ceiling. The big illuminated spot on the ceiling increases the apparent size of the flash but the light bounced off the ceiling lights up the room with flat light like an overcast day outdoors. A smaller amount of light is projected forward, designed to fill the "raccoon eye" shaded eye sockets the steep downward path of the "key" light created when shaded by the brow.
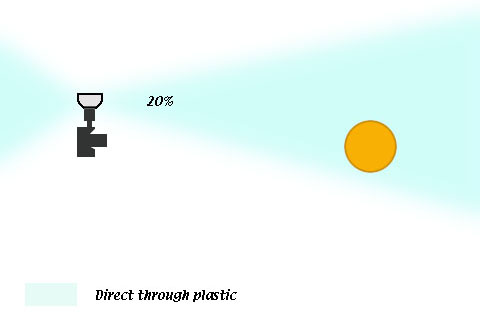
Outdoors where there is no ceiling a "tupperware" diffuser sends a flash signal straight up to a galaxy far-far away. I think it says, "Some humans have more money than sense." There is a modest increase in apparent size vs. the bare flash head but not much modification of the light occurs. If the flash is tilted down to its normal position the apparent size and performance is nearly the same as bare flash. Besides, if you want to use tupperware the real stuff is much cheaper and just as effective.
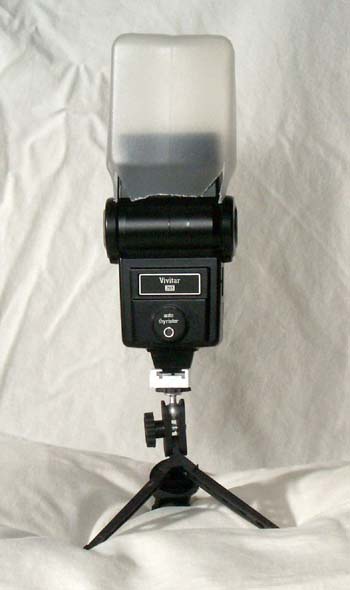
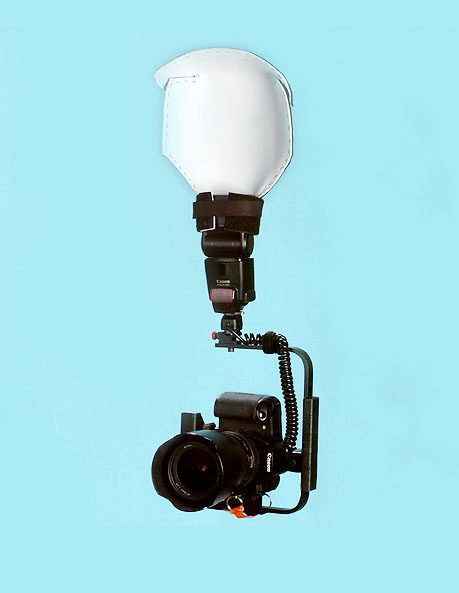
That was one of my earlier experiments. It did a great job of lighting up an entire room like a overcast day. That can be quite useful at times but not what I prefer for portrait or candid lighting with hot shoe flash.
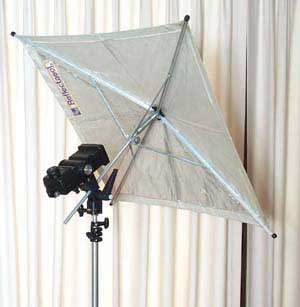
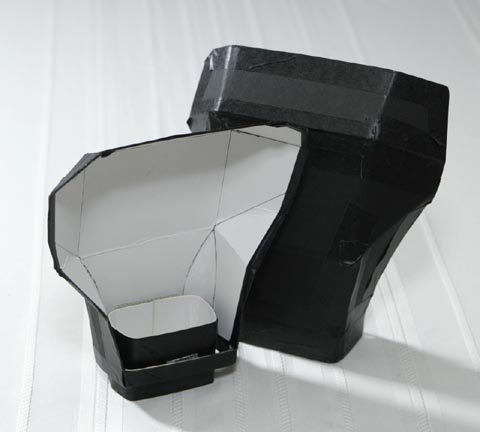
I also tried umbrellas but found that using two stands and umbrellas rather cumbersome and inconvenient compared to the bracket and IV stand system I was already using with direct flash. That is when I started building my own reflection diffusers. My first was a copy of a popular commercial product.

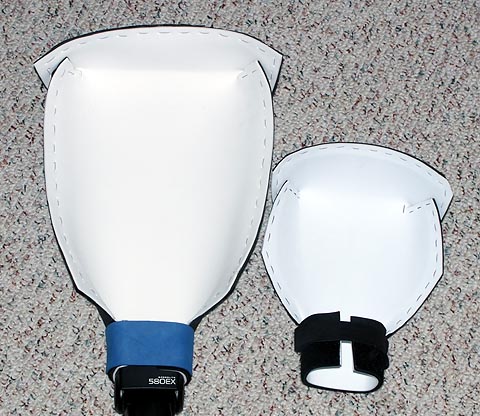
As always I used it with a flash bracket. I was disappointed with its performance. It was too small to diffuse the light much and too much light spilled out the top and sides. So I enlarged it and wound up with this design:
Here are a couple samples of the results to producese with a pair of hot shoe flashes:
Not on par with portraits taken with larger studio softboxes and studio lights but pretty outstanding for about 25 cents worth of cardboard. I also experimented with a larger hexagonal design constructed with an elastic band so it would store flat and pop into shape:
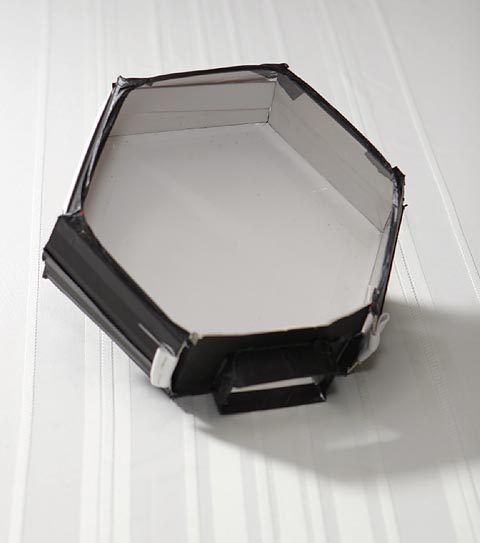
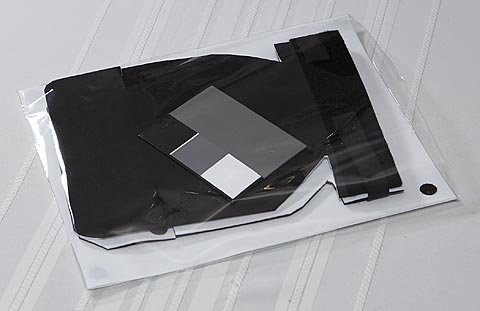
It produced a bit more diffusion than my original design and was too heavy and cumbersome. At the same time I was working on those someone who saw photos of my DIY efforts on the lighting forum built something functionally equivalent using thin foam sheets. I tried the material and found it solved the storage problem:
What about softboxes on hot shoe flash?
There is a difference in how a soft box performs with a bare bulb studio flash head and the focused light of a hot shoe flash. With a studio flash the tube sits out in the middle of the box radiating light in all directions. The curved walls of the softbox gather and redirect it forward.
The flash tube of a hot shoe flash is behind a set of fresnel focusing lenses so its light is projected forward and as result the sides of a soft box are not used as effectively to change the direction of light.

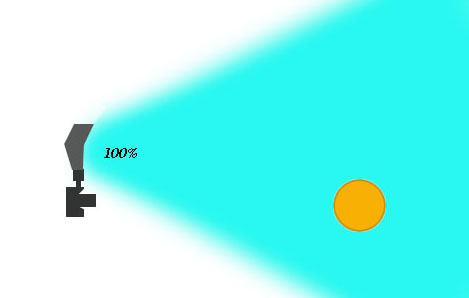
It is important to remember it is omni-directional light which creates fuzzy shadows. So if size and distance are equal between a softbox on a hot shoe flash and a foam reflection diffuser whichever one changes the direction of the fresnel focused light more will produce the softest shadows. The foam diffuser actually changes the direction of the light more because the flash is pointing vertically and 100% of the light gets re-directed forward.

 .
.
A 12 x 18 softbox will produce more diffuse light than a 9 x 12 inch sheet of foam, but the foam also comes in 12 x 18 inch size.
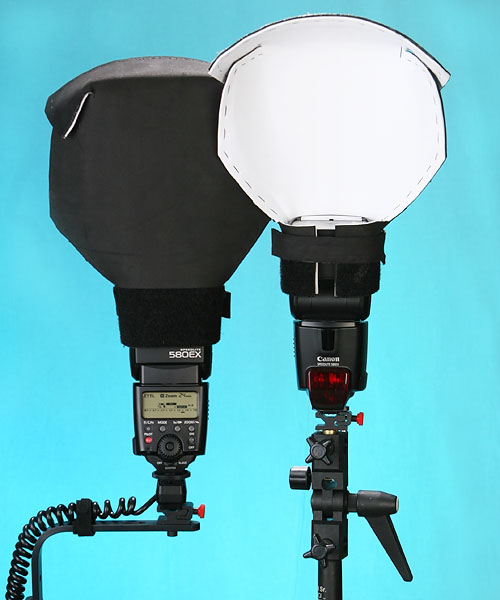
But as with the umbrellas it distills down to a question of diffusion vs convenience and control over the light. A big white umbrella will produce the most diffuse shadows but isn't really useful in a situation like this one below, a going away party for a pastor at my church:
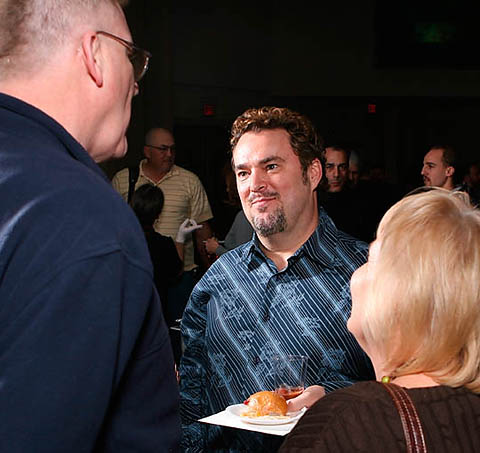
That was taken with a pair of Canon 580ex flashes with foam reflectors; one on a bracket and the other on a IV stand with five legs and casters I can roll around the floor with my free hand. A 12 x 18 softbox wouldn't be very convenient on flash bracket or rolling stand either. So for me the foam diffusers are the perfect balance of results and convenience. Your milage will vary as they say, but I think its a bit foolish to spend $130 on a softbox before at least trying this $2 solution. Here's a link to a tutorial with templates for making one further down in this missive...
Light direction and contrast is important
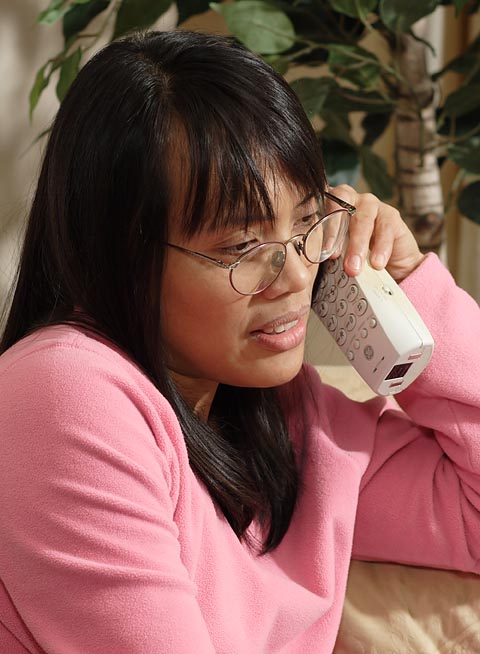
Creating flattering lighting depends more on where where the highlight and shadows are placed than how soft the edges of the shadows are. Even the harshest direct sunlight will be perceived as flattering if there is good light in the eyes with the shadows well placed and filled to reveal detail. For example the test shot below was taken with two direct Canon 580ex flashes in a short lighting key / fill configuration.
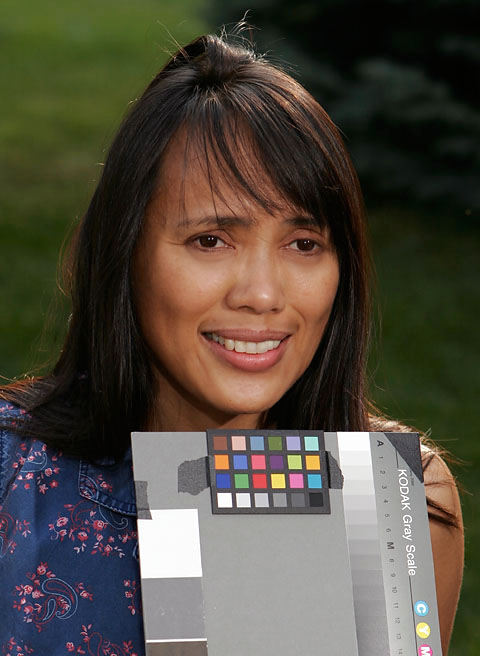
Notice how the features of the face are modeled naturally with emphasis on the front of the face. Does it scream Taken with flash! at you? I hope not. Thats what can be done with fill from but the on-bracket flash and the sky softening the harsh shadows of the off-camera flash to the right:
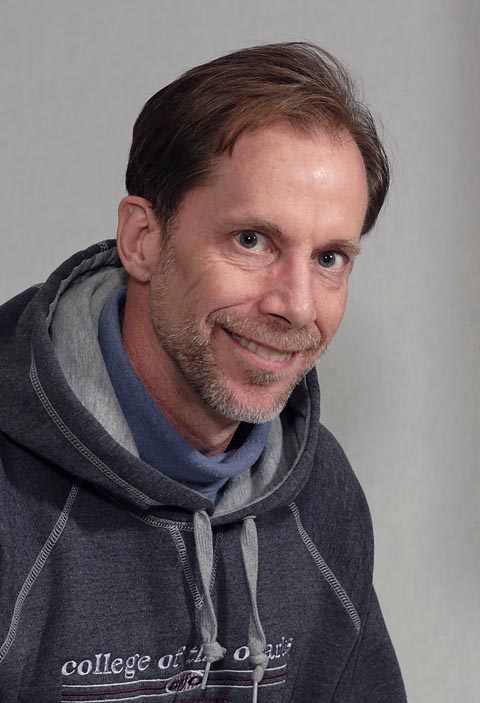
Beyond modeling the features of a face, lighting is visually effective when it provides visual clues to guide the viewer to what is most important. In a portrait there is nothing more important than the eyes and the front of the face. Contrasting that important area from all the other potential distractions should be an important part of any lighting strategy. My short checklist for composition and lighting is: 1) What is most important in this photo? 2) How can I make it contrast and attract the eye of the view to it? 3) What is likely to distract the viewer away from it?
Just putting a lot of bright light on the front of the face isn't always the most effective solution. That only works effectively if the background, clothing and everything is darker than the face. If the background is white a brightly lit face will seem to disappear completely except for the contrasting dark pupils and hair. It is CONTRAST between the front of the face and everything else that is needed to attract the attention of the viewer there. Lighting a face requires control of where the light goes, and equally importantly where it doesn't; the shadows. On a dark background making the face brighter than everything else is most effective, but on a white background the tonal balance is reversed and the face must be made dark enough to contrast with it, but light enough to reveal its detail. Not surprisingly it is more difficult to light a face effectively on a white background because the contrast control required is far more subtle than on a dark one.
Ceiling bounce diffusers gets poor marks for directional control and creating contrast. The light, while diffused, seems to descend from above the scene in the photograph which isn't flattering if it creates shadows in the eyes. Everything in the photo is illuminated evenly. Foreground, subject and distracting background all merge together into a sea of sameness which gives no clue via the lighting as to what is most important. That's why I say the lighting, while diffuse, is not effective
Forced to choose between a single flash mounted in the hot shoe with a cap diffuser and the same flash used directly on flash bracket I'd choose the bracket. The downward angle of the light will hide most of the shadows completely behind the subject and put those which are visible on the face in places which are not distracting. The direct light will fall off more rapidly, creating a darker background to help contrast with the brightly lit face in the foreground. It will not be difficult for the viewer to find what I think is most important in the photo; it will be the bright thing in the middle surrounded by all the darker stuff.
Try everything then decide for yourself
My opinions have been formed by years of experimenting with many different methods of diffusion for hot shoe flashes. I've concluded that a self-contained reflection style diffuser is the best overall balance of efficiency, light quality and portablility for the style of photography I do. I also have a complete set of studio lights and a clean north facing window as other options because I know there is no all-encompassing one-size-fits-all lighting solution.
Umbrellas are an inexpensive way to diffuse hot shoe flash and control its direction. I have used them but found the need for or two light stands and a way to trigger the lights. With the cords, stands and big umbrellas it wasn't as mobile or controlable as the diffuser. I also found that the small size of the flash head resulted in most of the rays of light being reflected nearly parallel from the relatively flat center portion of the umbrella.
Portability and elevation of the flash on a bracket were key requirements for me so I tried various forms of card reflectors attached to the back of the flash head. I found that a flat card worked similar to a cap diffuser; most of the light bounced off the ceiling, not the card. Wanting better control of the light and more efficiency I folded in the top and sides of the card over the flash head to capture all the light and redirect it forward. Knowing the size of the light source is a variable affecting the softness of the shadows, I made it as large as feasible.
The amount of diffusion produced by my DYI reflection diffuser was not as great as bouncing the light off a spot on the ceiling or into an umbrella, but I feel both of those methods spread light too much lighting everything too evenly. The flat even light creates very little contrast between subject and background and wastes flash power lighting areas not in the photo. A reflection diffuser has three advantages: The direction and intensity of the light can be precisely controlled, it utilizes the flash output efficiently and it functions the same indoors and out without the need for a ceiling.
The are several commercial products utilizing the refection method available, but something similar can be made in a few minutes with a piece of white board and some tape. I've made diffusers from mat board but the ones I currently use are constructed from foam sheets found at the craft section of Walmart. The idea for using the foam came from MikeM on the DPR lighting forum who created his diffusers with foam after seeing my mat board designs. Photos showing their construction and results they produce can be seen in this tutorial article.
More historical perpective:
The fact that Canon and Nikon now have multi-flash wireless hot shoe lighting systems can be attributed directly to Monte Zucker introducing and championing the idea of using two flashes to cover wedding receptions starting 40 years ago. Professional quality portable flash equipment at that time was bulky with heavy high voltage battery packs. Monte's innovation was to use a second flash, identical to the one on the camera bracket, on a wheeled stand with the newly introduced photocell trigger. Keep in mind that 40 years ago a three-transistor radio smaller than a toaster was the cutting edge in electronics.
Monte's use second hot shoe flash for wedding receptions created dramatic 3D modeling the likes of which had never been seen before. But in retrospect I think his idea to use a compact stand on wheels was his most brilliant new idea. It is what made dual-flash "candid" photography practical and totally portable. We'd just pull the off camera light around with our free hand and could reposition anywhere it in seconds. Ironically, I searched high and low for a light stand similar to the one I used with Monte, which had a stable heavy cast steel base with four short legs.
Turns out I was looking in the wrong places because it was a medical IV stand, not a light stand! I recently found a similar IV stand at local thrift store. It's visible in the photo of my two-light set-up in this tutorial showing how to make the type of reflection-diffuser I've found to be most effective.
Using two flashes can be made simple and easy
During the first part of my apprenticeship with Monte I tended his off camera "key" light, following him and moving it to create a short lighting pattern with a 3:1 highlight to shadow ratio on the face of the subject he was photographing. Why short lighting? Because in was the most flattering and dramatic on the dark backgrounds the fall-off of the light created.
The idea of using two flashes without modeling lights to guide placement might seem difficult and intimidating but Monte taught me a very simple method. Fill on the camera bracket creates virtually shadowless "neutral" light which lightens everything visible to the camera. Positioning the off camera light is just a matter of placing yourself behind the flash where the light is aimed can be seen as it is moved. Since light on just the front of the face is desired in a short lighting pattern its simply a matter of moving it around until a perfect oblique view of the face and both eyes are seen. If the far eye can't be seen because the nose is in the way, it also indicates the key light will create a nose shadow which will fall into that eye. After setting the key light moving and shooting from full face or the opposite shadow reveals a flattering short lighting pattern.
The beauty of digital is the instant feedback. You'll know you've got a good short lighting pattern when the nose shadow is falling along side the nose and over the top of the nostril or into the valley between cheek and mouth. If the nose shadow is falling sideways out onto the brightly lit cheekbone or into the shadow side eye the key light position needs to be adjusted in the direction opposite the shadow is falling.
Manual vs TTL
Canon and Nikon make flash systems which allow lighting ratios to be dialed in from the master flash or control unit on the camera. The exposure sensor and computer of the camera determines the power levels needed for the ratio and proper exposure via evaluation of pre-flashes before the shutter is opened. These systems work amazingly well, but the photographer has very little understanding of the actual light levels and only limited control of the outcome via exposure and flash compensation (EV and FEC).
Manual flash forces the photographer to make all the decisions, but also provides total consistent and predictable control over the outcome. Manual power settings produce the same amount of light each time and it always falls off the same way, by 1/4 or two f/stops each time its distance to the object it illuminates is doubled.
Monte taught me a very simple method for setting ratios and exposure with two lights which are identical in all ways: power, coverage, and modification. Using identical units for fill on camera and key on the stand eliminates a huge number of variables which will affect the lighting ratio, leaving a single variable to control the ratio; the relative distances of the two lights to the subject's face.
Since fill is on the camera bracket the shooting position and the desired ratio dictates the distance the off camera light must be placed. The two lights will overlap, so if they are placed at equal distances this is what occurs:
Highlight:Shadow
1:1 fill everywhere
1:0 key in highlights
===
2:1 H:S ratio
Moving the off camera light closer will make it brighter than the fill and increase the ratio. If shooting from 8ft from the subject the key light on the stand will be twice as bright and create a 3:1 ratio when moved to 5-1/2 feet.
Highlight:Shadow
1:1 fill
2:0 key 2x brighter
===
3:1 H:S ratio
Distance combinations for fill and key of 16ft/11ft, 11ft/8ft, 8ft/5.6ft and 5.6ft/4ft will all produce a 3:1 ratio when two identical flashes are used. I use distances which are the same as the f/stop settings because like an f/stop each increment alters the exposure by a one f/stop. Shooting positions which are 16, 11, 8 or 5-1/2 feet from the subject will cover most flash situations. Because the output of the two manual flashes will be consistent all that is required to determine the ideal exposure is a one-time test at each distance.
For example my standard set-up for two flash portraits is to shoot from 8 feet and place the off camera flash head (not the base of the stand) 5-1/2 feet from the subject about 45 degrees from their nose for short lighting 3:1 ratio. By doing an exposure test I determined an f/stop of f/6.3 was needed for 1/2 pawer with ISO 100. It's always f/6.3 because the distance and power of the lights in that particular set-up is always the same. There's no need to measure with a meter or fiddle with flash compensation. It takes all of 20 sec. to set up anywhere and produces predictable consistent results.
I don't carry a ruler and protractor to set the lights. My arm span is 5-1/2 feet and three steps backwards from the subject is 8ft. I've been doing it that way for over 30 years now and can set the angle and height of the off camera light by eye, changing the height as necessary for different size subject to keep it above the eye line for a downward angled nose shadow.
I approach lighting like everything else in my life. Figure out how everything involved works, what makes the most sense and what will cost the least. For me a pair of hot shoe flashes diffusers are a good balance between results and convenience for location shooting. With the off camera light mounted on a wheeled stand and the aim-as-the-light-sees method its as easy as shooting with a single flash. That's something you really need to try to believe.
Holistic Concepts for Lighting
and Digital Photography
This tutorial is copyrighted by © Charles E. Gardner. It may be reproduced for personal use, and referenced by link, but please to not copy and post it to your site.
You can contact me at: Chuck Gardner
For other tutorials see the Tutorial Table of Contents