and
Incident Metering
Demystified
The term "lighting ratio" is a quantitative measure of the difference between two light sources, or the amount of light reflection from the highlight and shadow sides of the face. A numerical ratio is like a blueprint a builder can follow to construct a building he has never before seen. For example an assistant might be told to set up the studio lights for a "3:1" ratio and know per the convention for portraits that means the key light must be 2x (1 f/stop) brighter than the fill.
What makes ratios and metering confusing for a beginner is the fact that there are two types of ratios, incident and reflected and an incident meter is used to infer the amount of light reflected from the face. To help clarify the situation let's start with a basic physics lesson:
Light intensity measure by a meter is based on the amount of energy hitting the sensor. As a light source moves further away the cone of light it emits covers a wider area and the intensity at any one spot decreases. A bare bulb source will decrease in intensity by 1/4 each time the distance is doubled because the same amount of light covers 4x more area. That exponential relationship of distance and intensity is known as the "inverse-square law":
Intensity = 1 / distance 2
The modifier on the light will affect how the light spreads but as a rule of thumb we can assume that doubling the distance of a light will decrease its intensity by about 1/4 or - 2 f/stops.
Next let's define INCIDENT and REFLECTED ratios:
INCIDENT RATIO: An incident ratio expresses the difference in intensity between two or more lights based on an INCIDENT meter placed where the light hits an object and aimed at the source. Incident meters are used in studios because its easy to place the meter where the light hits the subject. The difference in intensity between the lights is then used to infer the reflected ratio. An INCIDENT ratio of 1:1 would indicate two light sources of equal strength at the point of contact with the object.
REFLECTED RATIO: A reflected ratio expresses the difference in intensity between the light reflecting from an object of uniform tone such as a face when some parts are highlighted others are shaded. The convention for ratio notation in portrait photography is based on the relative amounts of reflected on the highlighted and shaded sides of the front of the face. Per the convention a 2:1 ratio means the highlights on the front of face appear twice as bright at the shadows on the front of the face.
The ratio reflective convention in portraiture predates electronic metering. The earliest ratio meters consisted of a card with two holes, held in front of the eye over the shadow and highlight side of the face. Different amounts of neutral density would be placed over the hole on the brighter highlighted side until it matched the shadow side visually. The amount of density required would reveal the difference in reflectance in f/stops (.30 density units = 1 f/stop difference = 2x more light). The fact this earliest form of metering what based on matching the highlight side to the shadows is likely the reason that in the ratio convention the intensity of the shadows is always expressed as the constant "1".
What Ratios Mean on a Perceptual LevelBefore digging any deeper into technical morass let's stop and consider how humans react to different lighting ratios on a face in a photograph. Photographers will refer to light as being "soft" or "hard" but those are perceptual impressions formed in the brain based on the clues the lighting ratio creates. In all lighting ratios it is the appearance of the highlights which remains constant as the shadows change in tone. As the shadows on a face get darker the brain perceives the increase in contrast as an increase in size or sharpness. A face with light open shadows will be perceived as being softer and rounder than the same face modeled with darker shadows.
For a beginning photographer is more important to understand the perceptual connection between shadow tone and the illusion of shape and "hardness" than it is to know what the numerical ratio of the lights is. Ask yourself what type of contrast on a face flatters a woman, man or child. The answer is not found in a book about lighting ratios or a meter manual but all around you in the images you see in photographs, TV, and in real life. Women and young kids are flattered more by low ratio lighting with open shadows. Slightly darker shadows will give a man or older boy a "harder" stereotypical masculine look. Very dark shadows can be used to create an impression of advanced age and are more appropriate to character studies than general portraiture.
There are no rules, just cause and effect. Once you begin to consciously equate how you react to photos on an emotional level with the ratios used to light the faces. Its really not important to be able to look at a photo and know a 3:1 ratio was used, only that the tone of the shadows looks appropriate for the gender, age, and context of the photo. For example you might light a woman with light open shadows in a photo in a cocktail dress for a glamor portrait but use darker shadows for a business head shot. More than any other aspect of lighting it is the tone of the shadows which set the mood in a portrait. The lighter the shadows the lighter the mood.
The Magic of Photographic ProcessThe magic of the photographic process is that it is engineered to reproduce a scene as seen by eye when the scene is exposed in a way that preserves the detail in the darkest shadows and the brightest shadows. Everything between white and black will look normal, as seen by eye. What that means in practical terms is that if you were to take a person in dark clothing and expose the photo so there was detail in both the deepest shadows and the brightest solid highlights the lighting on a person would look normal.
In the days before digital and instant feedback a good meter and the knowledge how to use it was necessary to predictably achieve well exposed photographs. Meters are equally valuable today, but simply not as mission critical as in days past. In most cases the feedback from the last shot taken provides better information on which to base exposure decision. But since this is a metering tutorial we will now return to our regular program, with this final admonition: learn to use all the tools.
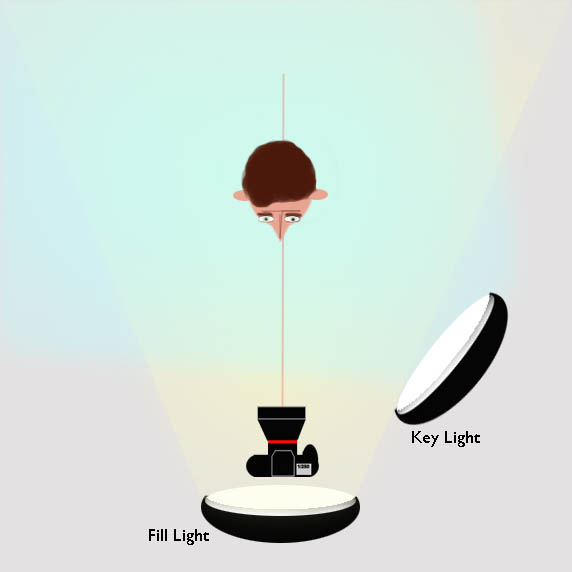
Ratio Math - Converting Incident Readings Into Reflected RatiosThe process of converting an incident ratio - the difference in intensity between key and fill lights - into a reflected ratio of how much more light is reflecting off the two sides of the face is based on an assumption in the ratio convention that the fill source is centered and even on both sides of the face and the key light overlaps it. If we take two identical lights and put one over the camera as fill at distance of 8ft and another at a 45 degree angle to the face at the same 8ft distance as the key light their incident strength would be the same, an incident ratio of 1:1.
The fill light is the "anchor" of the lighting ratio and is always denoted as 1 on the right side of the N:1 ratio. When the fill light is placed near the camera axis any other light placed between the fill and the front of the subject's face will overlap with it.
Ratio math works like this:
| Key vs Fill Difference f/stops |
Math | H:S Ratio | Suggested usage |
| +0 | H:S 1:1 Fill 1:0 Key === 2:1 |
2:1 | Women Kids White backgrounds |
| +1 | H:S 1:1 Fill 2:0 Key === 3:1 |
3:1 | Men older boys still life |
| +1-1/2 | H:S 1:1 Fill 3:0 Key === 4:1 |
4:1 | Character studies where aged look is desired |
| +2 | H:S 1:1 Fill 4:0 Key === 5:1 |
5:1 | Profile views where less shadow detail is desired |
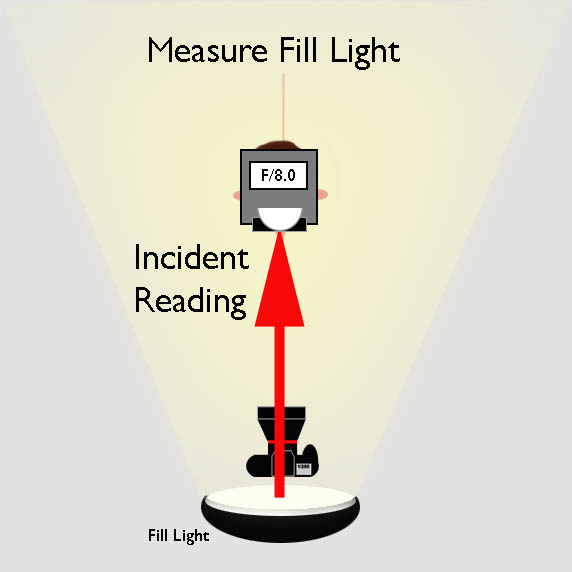
When setting reflected ratios per incident readings you first must realize that each f/stop difference in the measurement - e.g. f/8 vs f/5.6 represents a 2x increase in light. For a 2:1 ratio the incident strengths must be equal. For a 3:1 ratio the key light must be 2x brighter (1 f/stop brighter) For a 4:1 the key light must be 1-1/2 stops brighter.
An incident meter indicates the value needed to expose the middle of the tonal scale correctly. So if the fill light reads f/5.6 and a 3:1 ratio is desired you would turn off the fill light, turn on the key light, the raise its power until the meter reads one stop higher, or f/8. How the actual camera exposure is determined is discussed below.
Metering Technique
using a Sekonic L-358
Design of an incident meter
The Sekonic L-358 has a retractable white dome which when raised is designed to mimic the way light hits a three-dimensional object. The meter is used two different ways for two different purposes: 1) setting ratios with the dome down pointing at each light separately, and; 2) determining the exposure with the dome up, pointing at the camera lens while all lights are fired. Both applications the meter requires a photographer to understand what the f/stop values represent in terms of actual light intensity:
| f/22 | f/16 | f/11 | f/8 | f/5.6 | f/4 | f/2.8 | f/2 |
| 128x | 64x | 32x | 16x | 8x | 4x | 2x | 1x |
| 8 | 7 | 6 | 5 | 4 | 3 | 2 | 1 |
Each increase in the numerical f/stop value represents doubling in light intensity. For example a reading of f/16 indicates the light is twice as bright as an f/11 reading. The shutter speed is also set on the meter, but it does not affect the exposure in a studio environment.
By default the L-358 shows exposure in 1/10th stop increments. For example 85 indicates f/8 + 5/10ths. The camera shows f/stops in 1/3 stop increments. To get the meter showing the same 1/3 stop increments as the camera set DIP switches in battery compartment WITH POWER OFF to UP-DOWN-UP-UP.
The L-358 has two different compensating functions:
- Exposure Compensation:
- This adjustment is made starting with the meter power ON. It allows a range of +/- 9.9 stops. When an adjustment is entered a [-/+] indicator will be seen on the display
- Calibration Compensation:
- This adjustment is made starting with the meter power OFF. It allows a range of +/- 1.0 stops. When an adjustment is made there is no indicator seen on the display
Either one can be used to match the meter to the camera, but I prefer to use "exposure compensation" so the reminder it is set appears on the display.
Adjusting the meter to match actual results in the camera
The L-358 meter is calibrated at the factory to ANSI ISO standards but usually your camera will not be. For example, at a setting of ISO 100 the true speed of Canon cameras is usually about 120.
If you find the reading you take with the meter using the correct procedure of pointing the dome at the camera and firing all lights does not result in a perfectly exposed file then it will be necessary to add a compensation factor into the L-358. Without such a compensation using the meter would be like firing a gun with a crooked sight. The meter might read f/8 but setting the camera at f/8 results in over-exposed file. The fault isn't the meter, its just an indication that the ISO in the camera isn't the same as the same setting on the camera.
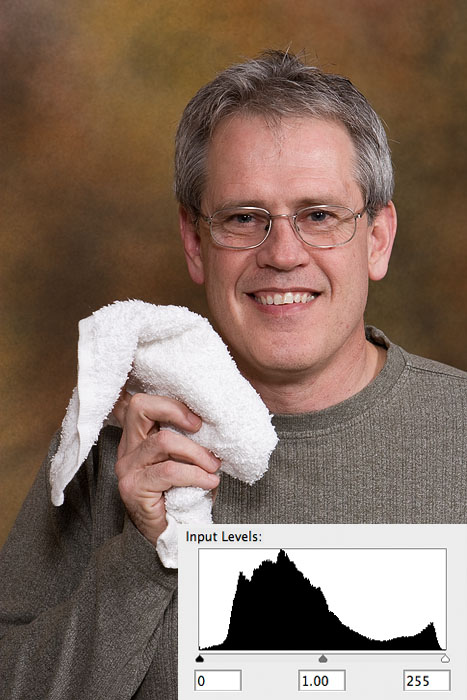
Since highlight detail is critical in digital files the compensation test is based on correct highlight exposure using a white terry towel as a visual indicator of when exposure is correct. The towel is better than a white card or other smooth target because its very easy to see visually in the test files when overexposure starts to destroy subtle highlight detail. The determination of "correct" exposure is based solely on reproducing the towel accurately.
What about the shadows? The range of the camera sensor may not be able to record detail in the darkest shadows, but that is not important for this test. Putting detail in the shadows is why a separate fill light is used.
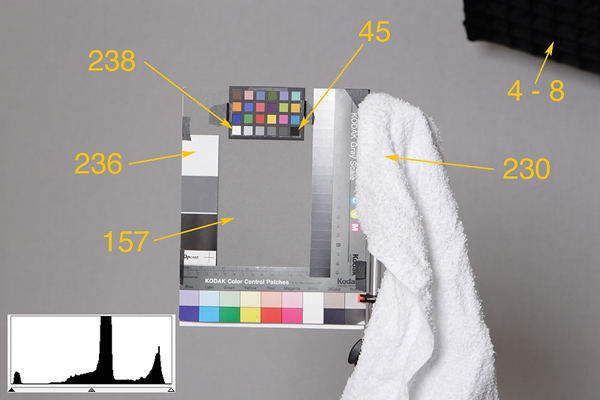
Below is is test shot from a recent calibration of my L-358. The numbers are the RGB eyedropper readings in this file which I determined was best exposed per the texture of the towel. Paper white should be about RGB=240. The only 255 values should be in specular highlights. I don't try to keep exposure on the "bleeding" edge of overexposure. That leaves no margin for error. It is trivial to adjust a slightly underexposed file when editing, but its much more difficult to clone in blow highlights.
Performing the Compensation Test
Set up one light over the camera in the neutral fill position.
Set the camera at ISO 100 in M mode at 1/160th sec.
Set L-358 meter ISO at 100.
Perform custom WB on a gray card to ensure the three R-G-B channels are all exposing the card equally in the file.
Place the white towel and other test objects on a stand and take a meter reading from in front of it, pointing the meter at the light with the dome up, and adjust the power of the light until the meter reads f/8. Take several readings to ensure the lighting is stable.
Taking care to let the flash recharge completely between exposures, shoot a bracketed set of files from f/5.6 to f/11 by changing aperture in one click (1/3 f/stop) increments, which will produce 7 shots.
Open the 7 files with your editing program using your normal workflow. Pick the file which reproduces the white towel most accurately. If file taken at f/8 is the not the best, compute the difference. For example if the meter reading was f/8 but the file shot at f/9 produced the best exposure, the difference needed to correct meter it actual camera speed is + 1/3 f-stop.
To enter the compensation:
1) turn the meter ON then press both ISO 1 and ISO 2 buttons at the same time. It should read "Adj 0.0".
2) Continuing to hold both ISO buttons, turn the wheel wheel on the side to enter the exposure compensation. The meter uses decimals .3 and .6 for the 1/3 stop increments. For example, if the variance was + 1/3 stop the wheel should be turned until "Adj 0.3" appears. A square black icon containing [+/-] will appear on the meter readout.
If you go back and take another reading of the lights and the meter will now read f/9 and a shot taken at f/9 should produce perfectly exposed highlights. All subsequent readings will now be accurate for that camera body.
If you have more than one body test each one separately.
Using the Meter for Ratios and Exposure
Before using my meter I perform the "pre-flight" checklist below to avoid silly frustrating mistakes.
- With meter off set DIP switches in battery compartment to UP-DOWN-UP-UP
- Turn Meter ON
- Press Mode and turn wheel to select the desired metering mode -
e.g., manual (lightning bolt), via PC cord (lightning bolt + C) - Press ISO 1 button and enter ISO 100
- Turn wheel until it reads 125 (1/125th sec). The letter "T" should be visible above it.
- Press ISO 1 and ISO 2 buttons at the same time to check compensation factor. It should be the value determined in the test above.
- Set Camera to M (Manual), ISO 100, and adjust shutter to 1/125th sec. Check other camera settings like white balance.
Step 1 - Adjust the Fill Light Intensity
Step 2 - Adjust the Key Light Intensity
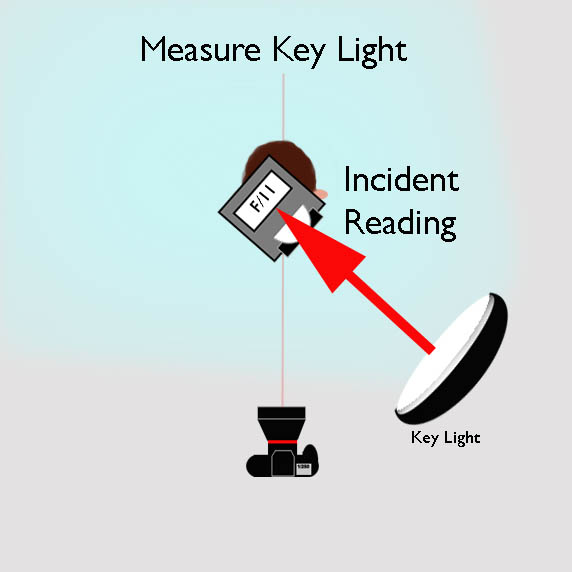
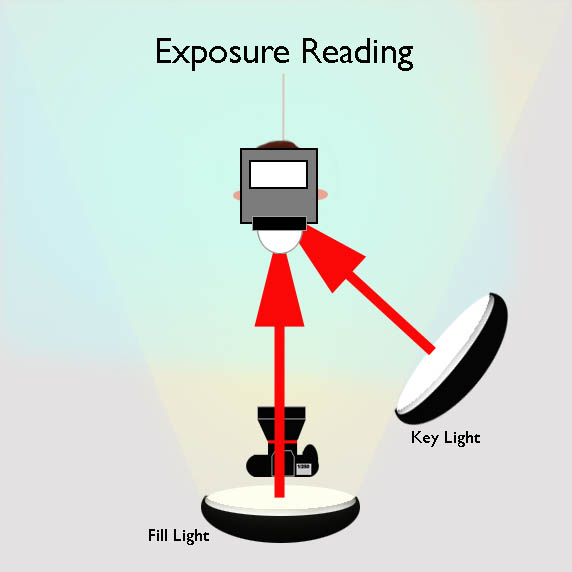
Step 3 - Make the Exposure Reading
Turn the fill light on so key and fill are overlapping and creating a highlight:shadow pattern on the subjects face. Make a mental note of what a 3:1 ratio looks like by eye.
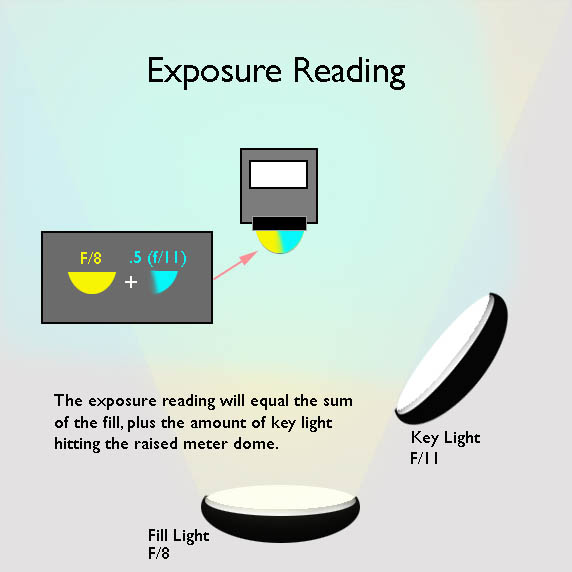
A different metering technique is used for the exposure reading. All the lights are turned on and fired. The meter dome is raised. The meter dome is pointed directly at the lens of the camera. The goal here is to get the light to hit the dome the same way the camera sees it hit the face. The camera axis fill will illuminate the entire dome, the key light only about half of it. The two are averaged by the meter to determine a "middle-gray" exposure value that should correctly expose the subject. It is important not to shade the meter with your body or refect light from your clothing into it when taking readings. Standing behind the subject on the side opposite the key light will eliminate this problem.
Light falls off at the inverse-square if the distance. In plain English it means if the distance is doubled the intensity is two-stops lower. An easy way to remember light fall off is to use the f/stop numbers. As a light is moved from out 2.8, 4, 5.6, 8, 11 feet, meters, or cubits the light will fall off by one stop at each increment. Thus if the subject is 8ft. from the fill light and the background is at 11ft. the background will get hit by one stop less light than the subject. If the background is white it look gray. If gray it will look darker gray. A separate background light may not even be needed.
Reading the Background: When neutral fill is used it will illuminate the background. Any other light or reflective surface will also contribute to its illumination to some extent via bounce. Because of this I make the background light reading with the key and fill lights on with the meter dome placed dome up at the spot I see behind the subject in the viewfinder, setting it to match the Key+Fill exposure reading.
Reading the accent lights: Accent lights should be used judiciously especially on dark backgrounds where bright equals distraction. They should be positioned on the subject in such a way that their brightness pull the viewer's attention over the face to reach them. Readings for accent lights should be taken where the light hits the subject with the dome down. For a hair light that means the top of the head, not down in front of the face. Since accent lights don't typically overlap the fill light their meter reading will match their appearance. Since I don't want them to be a distraction I will usually start by setting them to match the fill light reading and adjust visually by viewing form camera position.
Evaluating exposure
An incident meter is an averaging device. It sees all the light in the room including what is bounced off walls, the ceiling and furniture. Because of this the default exposure reading of the meter will not produce an ideally exposed digital file, which for digital means one which retains detail in all but the brightest specular (mirror-like) refections in the photo.
The camera histogram is wonderful tool for evaluating exposure, but only when used with the same consistent target from session to session. I use a test target which combines a Kodak 18 percent gray card, a Kodak Color Separation Guide and Grayscale, an a tri-color QPCard target.
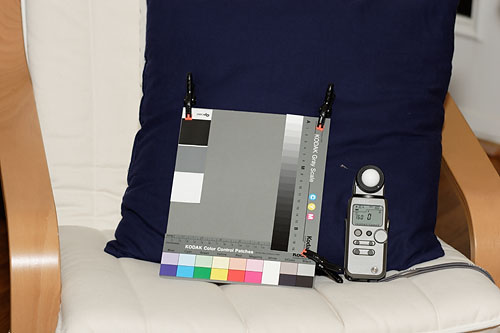
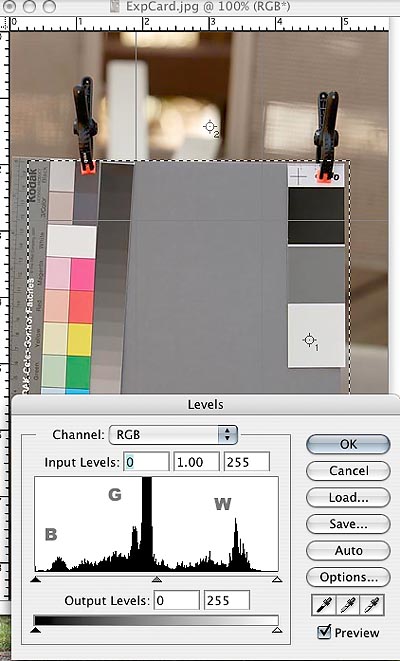
Throw in the towel: Since highlight detail is critical all that is really needed for the exposure test is a white object with texture, like a white towel with texture. Its histogram spike will be a rough barometer for exposure. Enlarging the file in the camera viewfinder or editing program will reveal if the texture has been retained.
Holistic Concepts for Lighting
and Digital Photography
This tutorial is copyrighted by © Charles E. Gardner. It may be reproduced for personal use, and referenced by link, but please to not copy and post it to your site.
You can contact me at: Chuck Gardner
For other tutorials see the Tutorial Table of Contents