I've done comparison testing with all 18 of the possible ambient / fill metering combinations on my Canon 20D and having been shooting seriously since the late 1960s using every meter type and method there is including Sunny 16. Regardless of the metering mode we select with our in-camera Through The Lens (TTL) metering getting the exposure correct is a three step process 1) let the camera metering make its best guess, 2) evaluating that guess, and 3) second-guessing the camera.
An axiom of metering is: The less one measures the more they need to know how to interpret the reading. For example a hand-held one-degree spot meter or the 5 degree metering spot in the camera can produce a precise measurement of light reflectance from that spot, but translating that reading into a correct exposure requires knowing that the indicated exposure will simply reproduce the spot as gray. It the measured spot is actually a textured highlight one would need to interpolate from the reading to arrive at the correct settings to reproduce it correctly. It's the same three step process as above except the photographer does all the guessing in selecting what to measure and then guessing what the reading actually means.
Call me old and lazy but the reason I bought a 20D is because its faster and smarter that I am when it comes to calculating exposure. That translates into convenience, which is a big priority when you are lazy. But I'm also experienced enough to know the camera almost NEVER gets the exposure 100% right because it can't read my mind and know what I think the most important thing in the viewfinder is. I play the odds, confirmed with testing, that the most intelligent metering mode the camera has will, on average, produce the best results. That why I leave my camera in evaluative mode for ambient and flash, point, shoot and let it do its thang before trying to second guess it.
The metering of each camera I've owned has been different and carrying methods and habits that worked for one over to another hasn't always worked. That's certainly been my experience after switching to Canon. Once I learned how the camera operated and adapted my shooting methods to how it was designed to work I found my focusing and exposure results improved dramatically.
Whenever I get a new camera I put it in its most automatic "idiot" program mode for a day or two and shoot a variety of scenes which I know will challenge the metering system. I just point and shoot. As expected the camera doesn't get the exposure perfect, but by shooting from its baseline and resisting the temptation to twiddle every knob I quickly get a feeling for when it hits and how it misses. I'll then switch to Av mode and repeat the process, narrowing exposure down to one simple variable: what shutter speed the camera things is best. That makes it easy to understand how the camera is interpreting various scenes.
One of the best features of digital is the immediate feedback it provides. The second part of my process of discovery and education is to look at the feedback for the test shots when the camera gets it right and more importantly when it doesn't. I make the determination of when the camera gets it right on the screen of my Mac, not the camera, then I go back and corollate what my eyes tell me about the image on the monitor to what the camera histogram and overexposure warning reveals about that same file. The process calibrates my brain to understands what the histogram and overexposure warning mean in terms of exposure for that camera.
For example, I've learned by comparing the camera indicators to actual results where the brightest textured highlights -- which read about 245 in Photoshop -- need to be on the camera histogram to make the exposure perfect. There's a really simple 30 minute test which will reveal what every point on the bottom scale of histogram means in terms of tone in the reproduction:
1) Get a gray card and first perform custom WB so the RGB values recorded when its shot.
2) Put your fastest lens on the camera in M mode, open it to its widest aperture (e.g. f/1.4) and shoot the card with it filling the entire viewfinder. Adjust exposure with shutter speed until the brightest part of the card produces an overexposure warning. Adjust the card so it is evenly lit and the warning occurs on most of the card at the same time. Now cut the exposure until by increasing shutter speed until the overexposure warning disappears. The objective is to find the point at which the camera warning is indicating clipping and then make the first exposure of the test 1/3 stop (one adjustment click) below it.
3) Now shoot a series of frames, changing the aperture in full stops: 1.4, 2, 2.8, 4, 5.6, 8, 11, 16, 22, 32 .. until the camera is at its minimum aperture. If sequence through the files the card will change tone from white to black and the spike from the histogram will appear to march from right to left across the camera histogram. The jumps will not be linear (evenly spaced)
4) Create an graph like the camera histogram in a new Photoshop document. Open the files in Photoshop. Read the RGB values on the card (which fills the entire frame). Copy a small section of the file and paste it into the new Photoshop document where the spike is on the histogram. When that is done for all the files in the test the result should look like this:

If you perform that simple test you'll have a Rosetta Stone for translating what the histogram says into actual tonal values in the final reproduction. You'll also know how many f/stops of scene illumination your camera can record with detail. That graph is from a test with my 20D which can record a bit over 5 stops with detail. It's the range with detail - from 245 to about 20 which matters not the range from absolute white to the noise floor of the sensor.
After performing that simple test you should have no trouble at all getting the exposure correct. Print the little chart and carry it with you on the back of your gray balance target. The brightest thing in the photo is always on the right-side base of the histogram bar graph. By adjusting the exposure and moving the it left and right on the histogram you can make it whatever tone you want in the reproduction, just as you did the gray card in the test. If the right edge is falling half way between the middle and the right edge a quick glance at test card will tell you exactly what RGB value it will wind up being in the file. With the exception of specular highlights or a scene intentionally overexposed the histogram should never run off the right side.
The overexposure warning is the "speed limit". When it is visible the sensor is clipping. Back off until it disappears. Trying to clip the specular highlights and not the textured highlights based on camera feedback is a bit little walking on the high wire without a net. Better to err on the side of 1/3 stop underexposure which is easily corrected in Photoshop rather than risking blown and unrecoverable highlight detail.
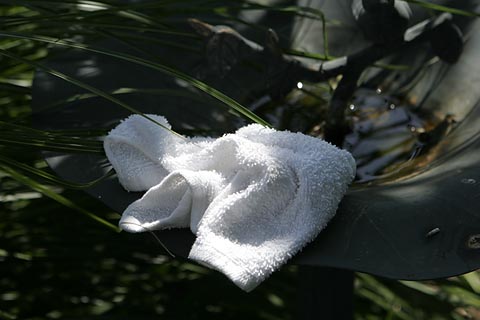
Scenes with textured bright highlights are the easiest to evaluate with the histogram and over exposure warning. Since all scenes don't have one I carry one in my bag in the form of a white terry washcloth. The texture of the cloth provides the best possible tool for evaluating correct exposure; highlight detail. I crumple the towel and put it in a test shot. I can tell just by looking at the texture in an enlarged view in the LCD when the exposure is perfect. The shot above is from a fill flash test I did recently to evaluate how well my camera default metering handled a fill flash situation in bright sunlight
Once I understood what the feedback from the camera was telling me getting correctly exposed files became simple. I don't expect the camera to get exposure right and now know from understanding feedback how to correct it quickly when it isn't. Outdoors I'll start with the camera in Av with the EC and FEC set to zero, put the white towel in a test shot if possible, point, shoot, and then evaluate. Because I know what each point on the histogram represents both in terms of RGB value and stops of underexposure I can look at the histogram and know from where the right edge of the curve is falling on it how much to correct.
But being lazy I usually use the simpler method; I adjust EC and FEC until the overexposure warning appears in the brightest highlights then back off one click (1/3 stop).
Contact: Chuck Gardner
Tutorial Table of Contents ©Charles E. Gardner - all rights reserved